MWSTEWART | 500+ BHP Project | 10/04/2024
Re: MWSTEWART | 500+ BHP Si Project | Cross member 04/06
![]() by Excursion on Sun Jun 05, 2011 10:24 pm
by Excursion on Sun Jun 05, 2011 10:24 pm
Robbie - We definitely should
Si - it's finished, I'm now holding him up because the dry sump hasn't yet arrived
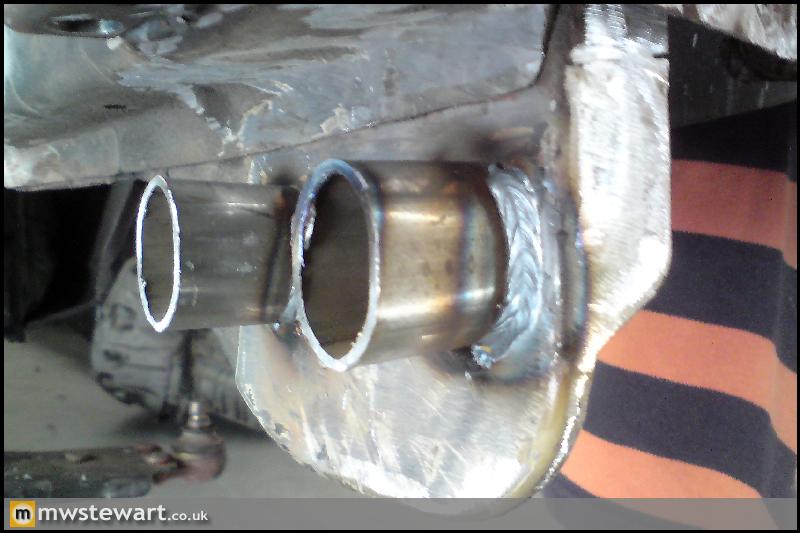
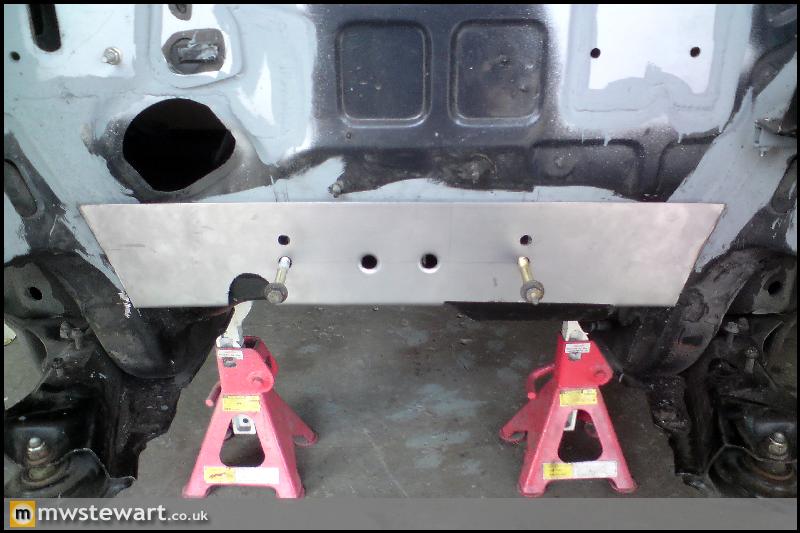
Today I finished off the mounting for the new cross member.
I wanted to bolt to some existing tabs that protrude down from the chassis legs, so I added some tube to prevent the tabs bending as the bolts are tightened:
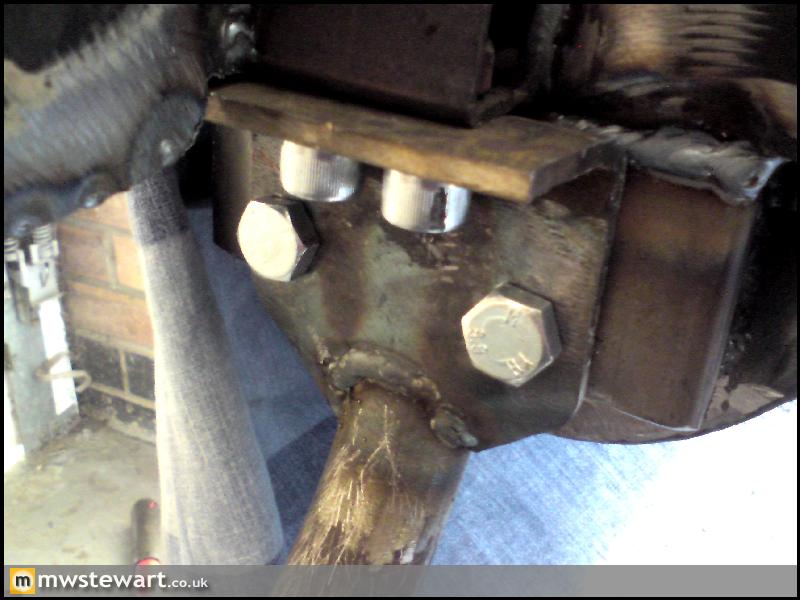
I then boxed over them, drilled through, and welded a captive nut to the outside face of the tabs:
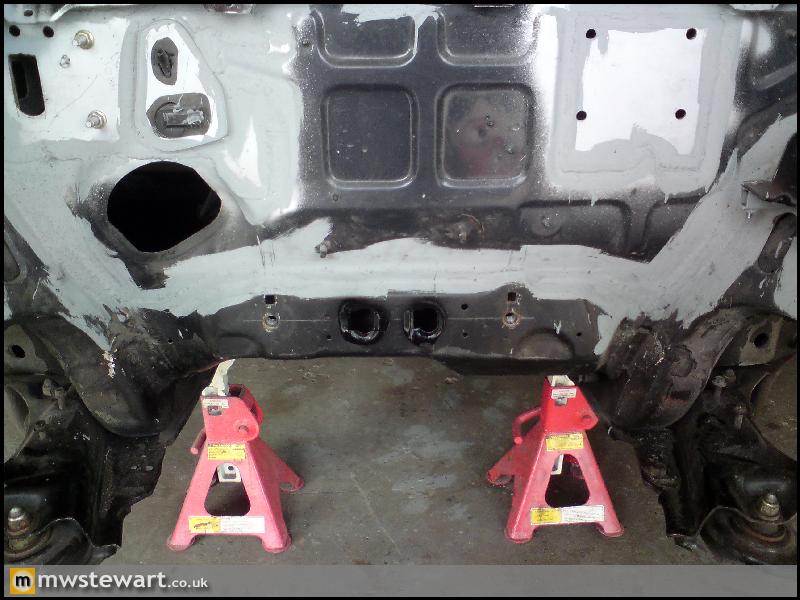
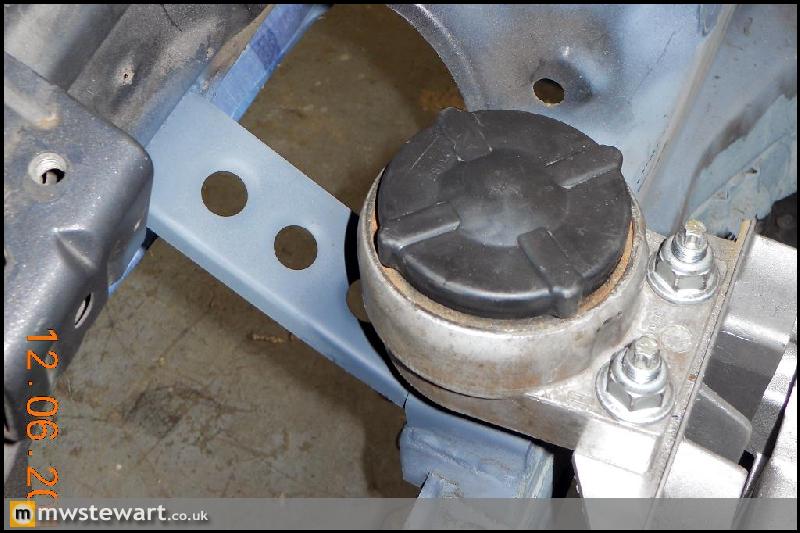
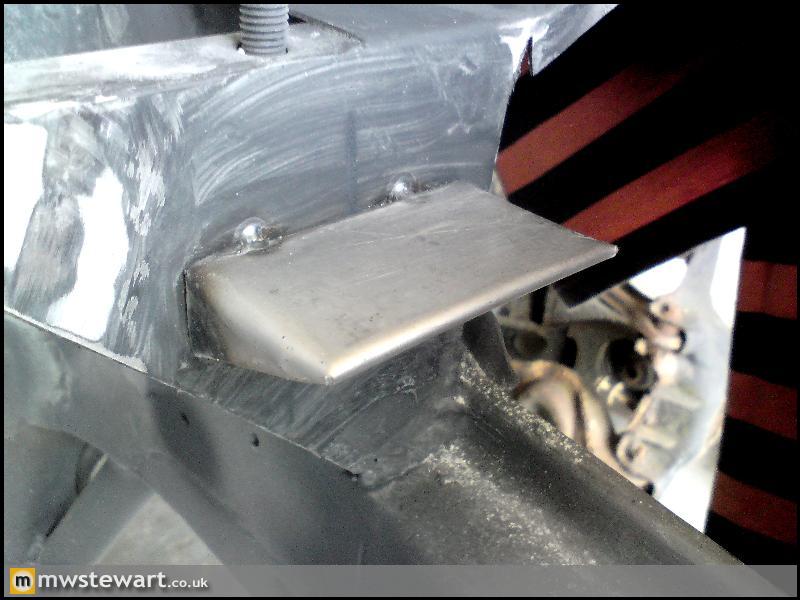
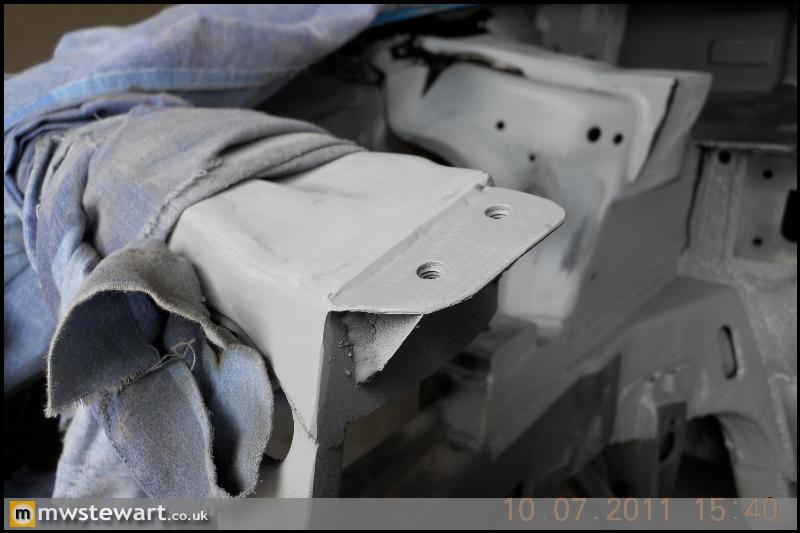
Next up is reinforcement of the steering rack mounting area to help further improve steering feel. The photo below is of the area in standard form, it's not particularly clear from the photo but the central 'pad' that the rack mounts to is isolated from the chassis rails either side of it:
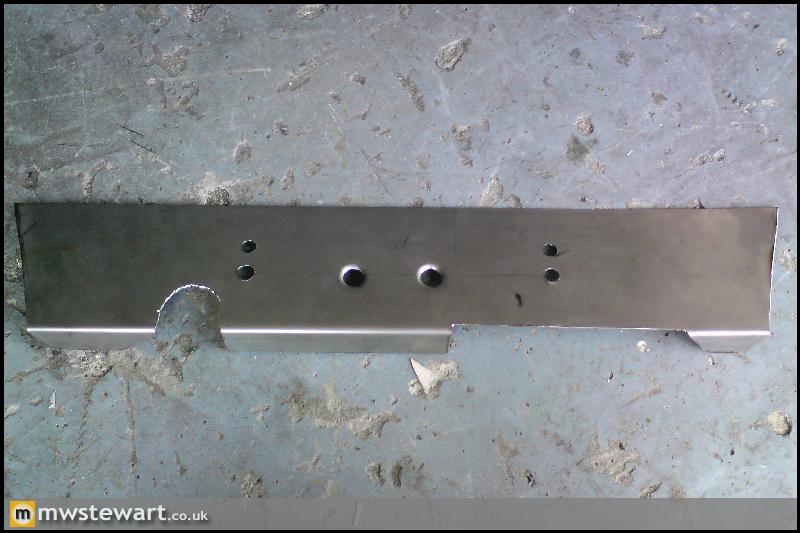
The reinforcement piece I made which will link the rack mounts to the chassis rails:
And in place:
I ran out of time today so didn't get chance to weld it in. The above jobs look insignificant but take a fair amount of time.

- Excursion
- Bulletin Board User


- Posts: 15265
- Joined: Thu Jan 01, 1970 1:00 am
- Location: Skynet
- Your car: Ford Fiesta
Car: 1990 Ford Fiesta XR2i
Re: MWSTEWART | 500+ BHP Si Project | More Fab 05/06
![]() by moondustka on Wed Jun 08, 2011 3:59 pm
by moondustka on Wed Jun 08, 2011 3:59 pm
I guess it's possible to mount this in the bay. It's a weigh up for me whether it's easier to get an electric one or just modify the headlight cover. Either way some pipework needs adapting. Anyone know the pressure of the high pressure side? I take it you gotta use threaded fittings for this?
Nice work btw
- moondustka
- Elite Post Master
- Posts: 1178
- Joined: Wed Aug 22, 2007 9:17 pm
- Location: Surrey
Re: MWSTEWART | 500+ BHP Si Project | More Fab 05/06
![]() by Excursion on Wed Jun 08, 2011 4:57 pm
by Excursion on Wed Jun 08, 2011 4:57 pm
moondustka :This PAS pump stuff is interesting! I might look into this as the pulley of the standard belt driven zetec one i have is sort of in the cover of the headlight!!
I guess it's possible to mount this in the bay. It's a weigh up for me whether it's easier to get an electric one or just modify the headlight cover. Either way some pipework needs adapting. Anyone know the pressure of the high pressure side? I take it you gotta use threaded fittings for this?
Nice work btw
Thank you. PAS fluid pressure can exceed 1000 psi (70ish bar) depending on the level of assistance/pressure relief valve spring rate. I believe that Aeroquip now manufacture PAS fittings, or alternative you can use a local Hydraulics firm to make you up some swaged hoses. I've used the latter approach in the past.
Another option would be to have an under drive pulley made, or investigate fitment of a PAS pump from another Ford that has a smaller pulley as standard. A lot of the PAS pumps use the same parallel bolt pattern.
- Excursion
- Bulletin Board User
- Posts: 15265
- Joined: Thu Jan 01, 1970 1:00 am
- Location: Skynet
- Your car: Ford Fiesta
Car: 1990 Ford Fiesta XR2i
Re: MWSTEWART | 500+ BHP Si Project | More Fab 05/06
![]() by Excursion on Sun Jun 12, 2011 7:05 pm
by Excursion on Sun Jun 12, 2011 7:05 pm
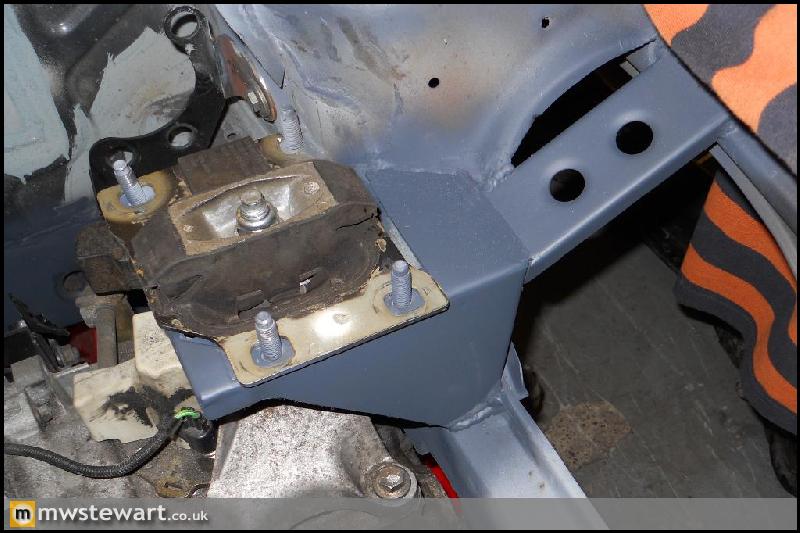
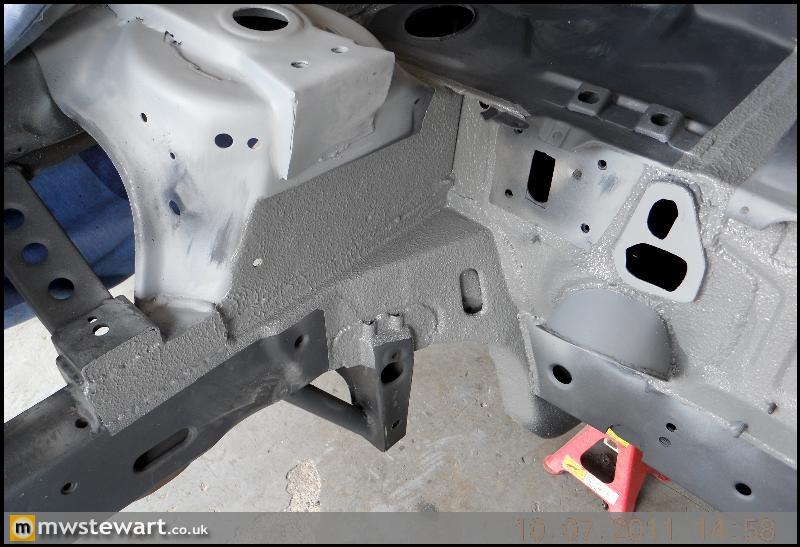
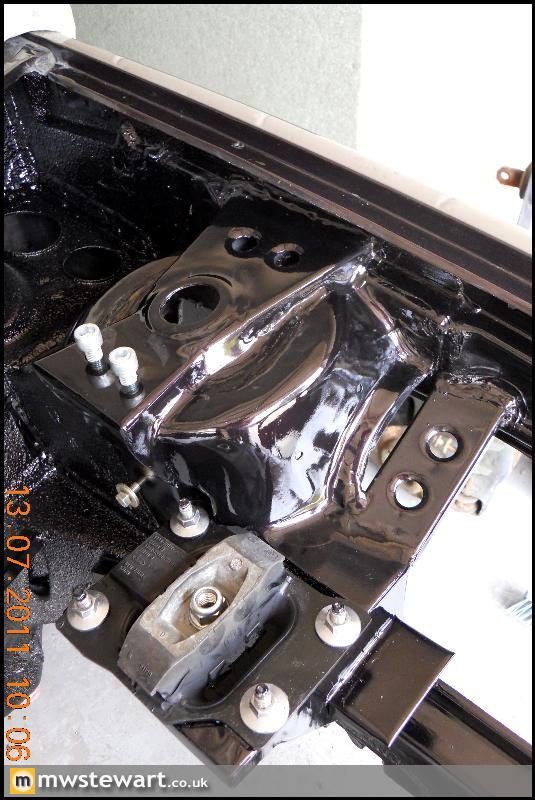
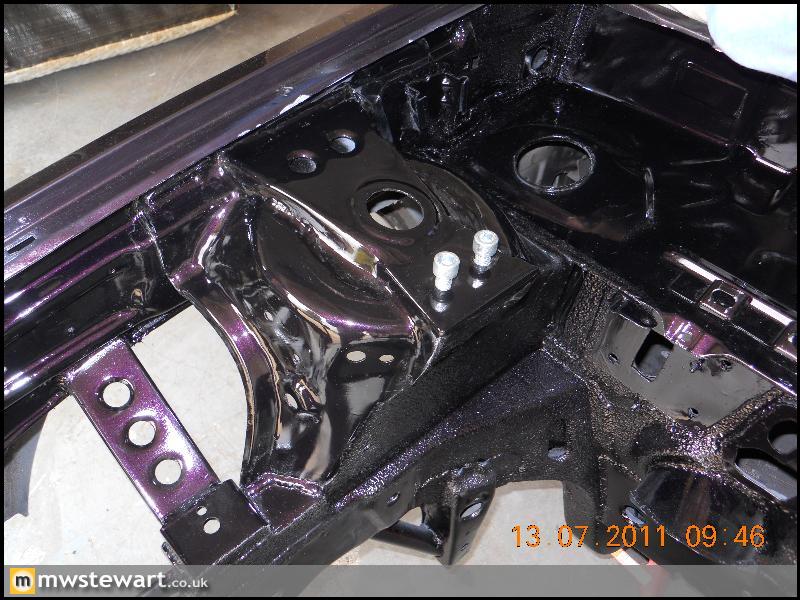
Gearbox mount plated over and bridged to inner wing:
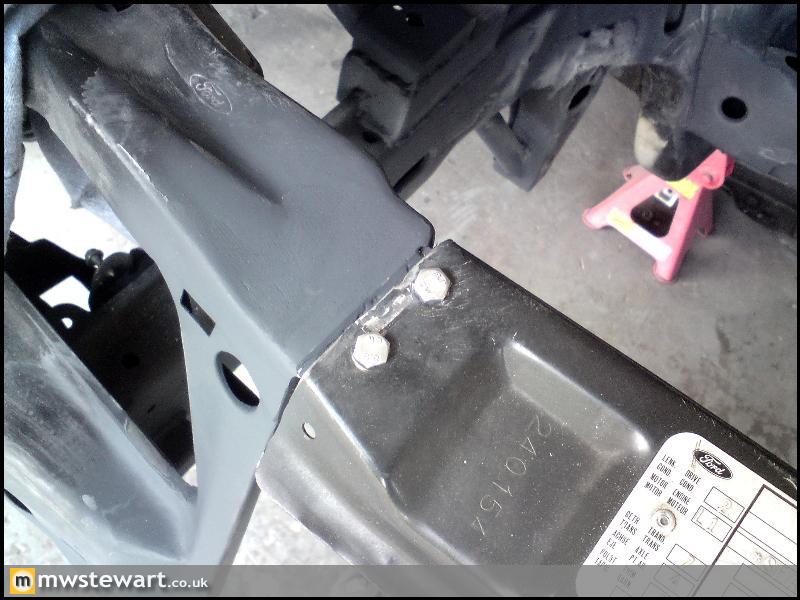
Steering rack reinforcement is on:

That's pretty much all the engine bay fabrication complete so now I can finally prep it for paint.
I also did some planning for the cooling system. I bought a Focus and Mondeo radiator pack to have a play around with, as these were the best fit for my engine bay.
Original radiator core: 500mm x 298mm x 27mm
Focus Mk1 core: 600mm x 358mm x 27mm
Mondeo Mk1 & Mk2 core: 620mm x 395mm x 27mm
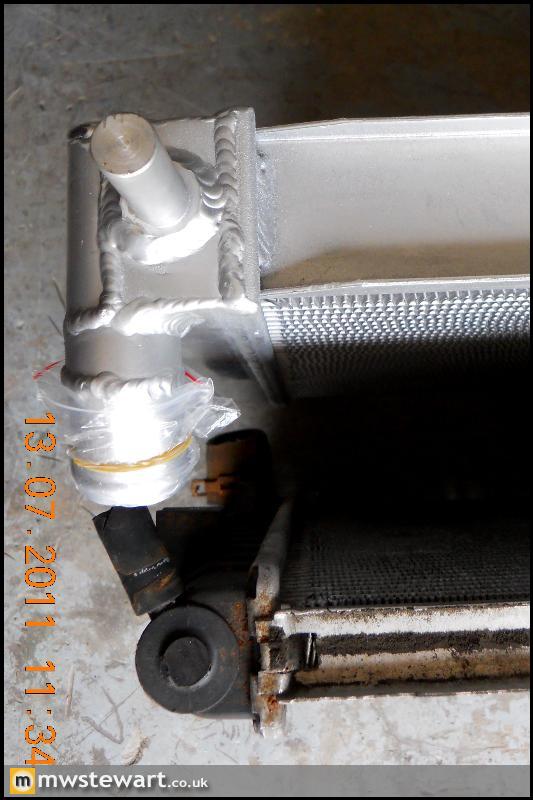
I managed to get the Mondeo rad to fit however the outlet spigot is too close to the A/C pump. I have found a company who make uprated radiators for the Mondeo, so I have ordered an all aluminum rad with a 50mm core. I can then cut off the spigot and re weld in a slightly higher position.
- Excursion
- Bulletin Board User
- Posts: 15265
- Joined: Thu Jan 01, 1970 1:00 am
- Location: Skynet
- Your car: Ford Fiesta
Car: 1990 Ford Fiesta XR2i
Re: MWSTEWART | 500+ BHP Si Project | Rad etc. 12/06
![]() by jayrs on Mon Jun 13, 2011 12:48 pm
by jayrs on Mon Jun 13, 2011 12:48 pm

- jayrs
- Elite Post Master

- Posts: 31520
- Joined: Mon Apr 19, 2004 10:32 pm
- Location: I.O.W
- Your car: FRST, XR2, ST170, ST225
Car: 1991 Ford Fiesta RS Turbo
Re: MWSTEWART | 500+ BHP Si Project | Rad etc. 12/06
![]() by Excursion on Mon Jun 13, 2011 1:16 pm
by Excursion on Mon Jun 13, 2011 1:16 pm
jayrs :why didnt you jus ask the company that make the rads to move the outlet a bit higher?
It is an off the shelf product, sold wholesale, so unfortunately wasn't an option.
- Excursion
- Bulletin Board User
- Posts: 15265
- Joined: Thu Jan 01, 1970 1:00 am
- Location: Skynet
- Your car: Ford Fiesta
Car: 1990 Ford Fiesta XR2i
Re: MWSTEWART | 500+ BHP Si Project | Rad etc. 12/06
![]() by jayrs on Mon Jun 13, 2011 2:00 pm
by jayrs on Mon Jun 13, 2011 2:00 pm
- jayrs
- Elite Post Master
- Posts: 31520
- Joined: Mon Apr 19, 2004 10:32 pm
- Location: I.O.W
- Your car: FRST, XR2, ST170, ST225
Car: 1991 Ford Fiesta RS Turbo
Re: MWSTEWART | 500+ BHP Si Project | Rad etc. 12/06
![]() by MR2 Guy on Mon Jun 13, 2011 11:53 pm
by MR2 Guy on Mon Jun 13, 2011 11:53 pm
- MR2 Guy
- Newbie Poster

- Posts: 3
- Joined: Sat Jun 11, 2011 11:54 pm
- Your car: Gen 2 Toyota MR2 2.0
Re: MWSTEWART | 500+ BHP Si Project | Rad etc. 12/06
![]() by The Stig on Tue Jun 14, 2011 12:48 am
by The Stig on Tue Jun 14, 2011 12:48 am
MR2 Guy :good stuff mark, looks great, love the many reinforcements
jonyb4, we all know its you, you have been banned, and all new user accounts will also be banned

- The Stig
- World's Fastest Moderator
- Posts: 56
- Joined: Mon Jan 30, 2006 6:31 pm
- Location: Classified
Re: MWSTEWART | 500+ BHP Si Project | Rad etc. 12/06
![]() by SiST on Sun Jul 03, 2011 9:59 pm
by SiST on Sun Jul 03, 2011 9:59 pm

- SiST
- Poster

- Posts: 80
- Joined: Thu Sep 16, 2010 9:34 pm
Re: MWSTEWART | 500+ BHP Si Project | Rad etc. 12/06
![]() by Excursion on Mon Jul 04, 2011 4:12 pm
by Excursion on Mon Jul 04, 2011 4:12 pm
SiST :You managed to spend anymore time on the project recently Mark? Keep coming back to see updates and am bored of waiting
Only little bits here and there mate, I'm saving photos for a decent update rather than the small ones I've been making recently. I have changed the engine spec again hence the pistons and rods in the 'for sale' section
- Excursion
- Bulletin Board User
- Posts: 15265
- Joined: Thu Jan 01, 1970 1:00 am
- Location: Skynet
- Your car: Ford Fiesta
Car: 1990 Ford Fiesta XR2i
Re: MWSTEWART | 500+ BHP Si Project | Rad etc. 12/06
![]() by Excursion on Wed Jul 13, 2011 12:57 pm
by Excursion on Wed Jul 13, 2011 12:57 pm
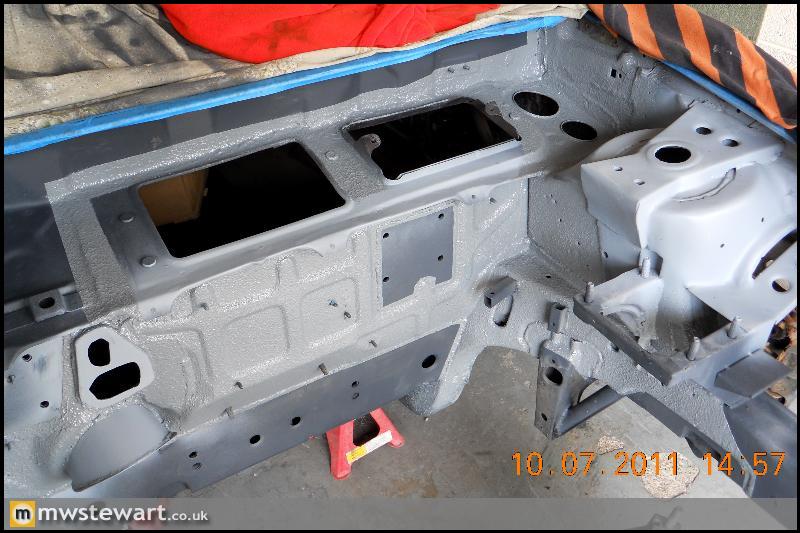
I stripped back to bare metal in key areas of the engine bay, to ensure a good finish.
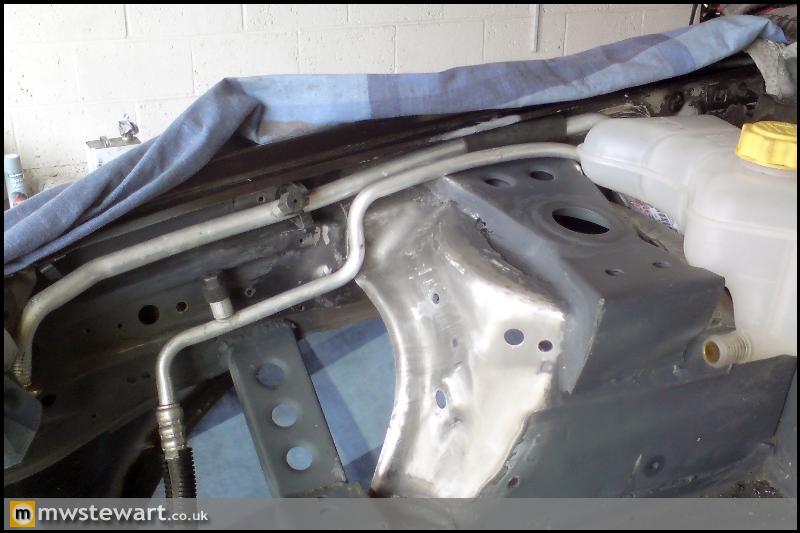
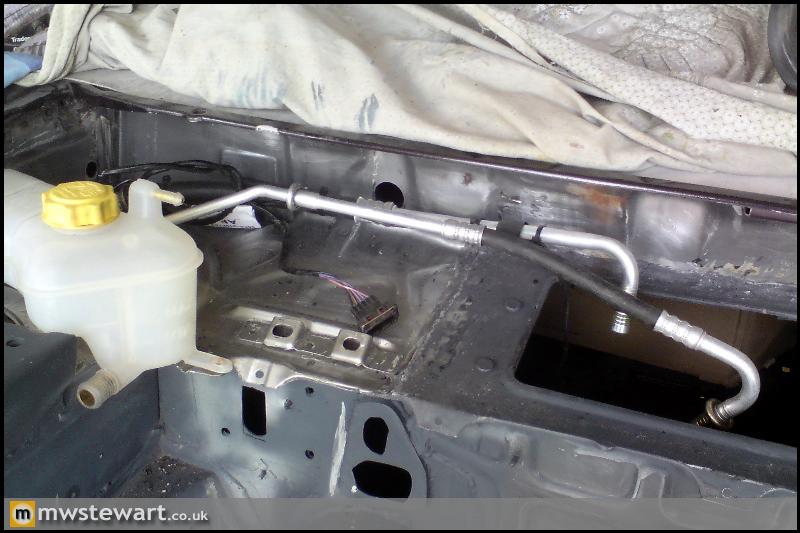
Air Conditioning Pipes - Test Fit
The AC pipes are from a Ford Puma which has an engine bay that is dimensionally very similar to the Mk3 Fiesta, so only a small amount of bending and reshaping was required. I've ordered some heat shrink to fit over areas which come close to the chassis.
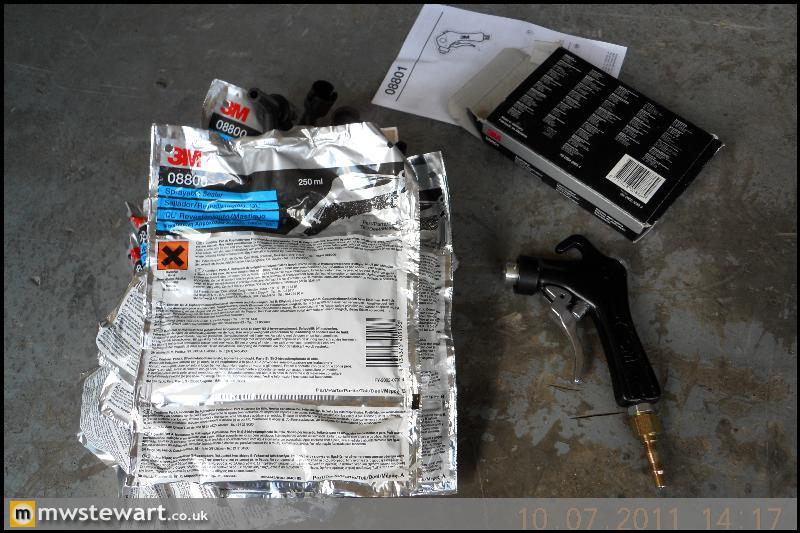
Sealer Application
3M 08800 is regarded as the best sealer available, it's not cheap but the quality and finish is superb - it's OEM for premium brands. A special applicator gun is required and is pictured below.
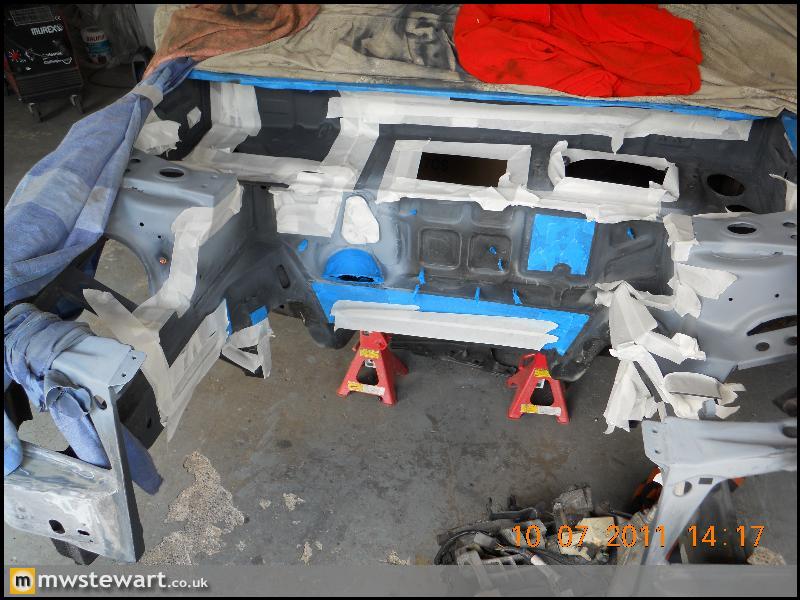
Engine bay masked off and 'panel wiped':
Sealed
Engine Bay Modifications
I'm relocating the screen wash reservoir to the rear of the O/S wheel arch in order to liberate space for the AC receiver. I added a swaged plate to the O/S inner wing so I can pass a filler tube through, I have Caravan black waste pipe in mind for this.
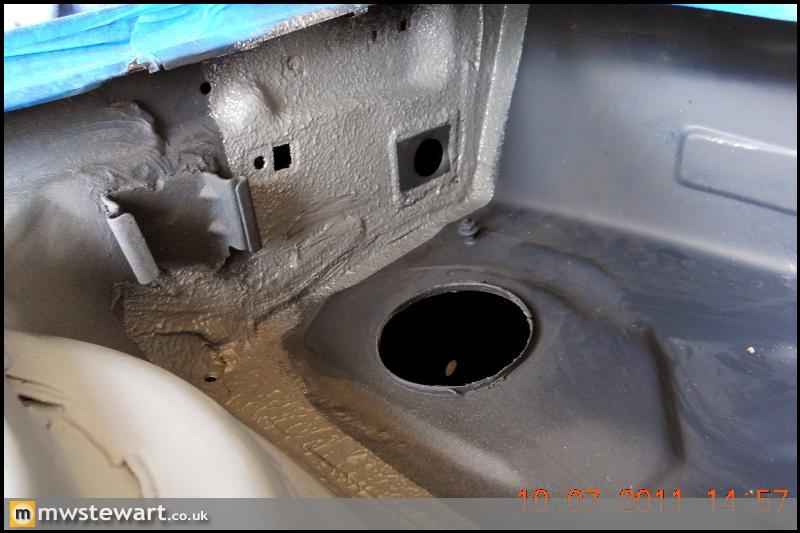
Bracket for a battery positive terminal. I'm relocating the battery to the boot so this terminal will let me join the existing positive wires to a 300 Amp cable that will run to the boot.
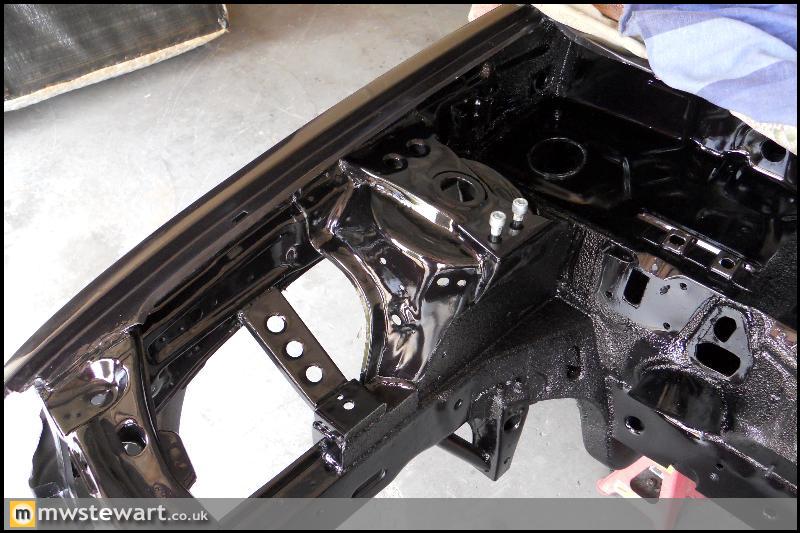
The original steering column was sealed on the bulkhead with a rubber grommet, and the UJ was still left exposed to the elements. The slight play in my UJ was testament to this. Taking inspiration from a later Fiesta I fabricated a shroud on the bulkhead which will enable me to mount a cover for the UJ.

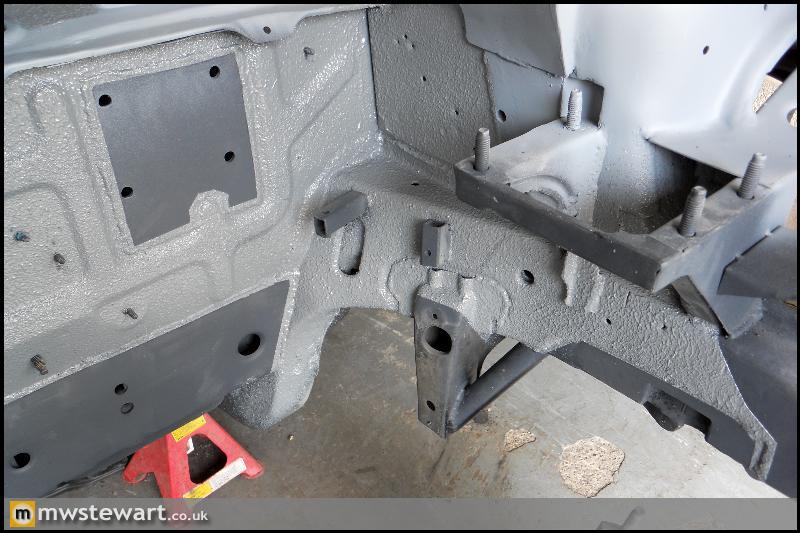
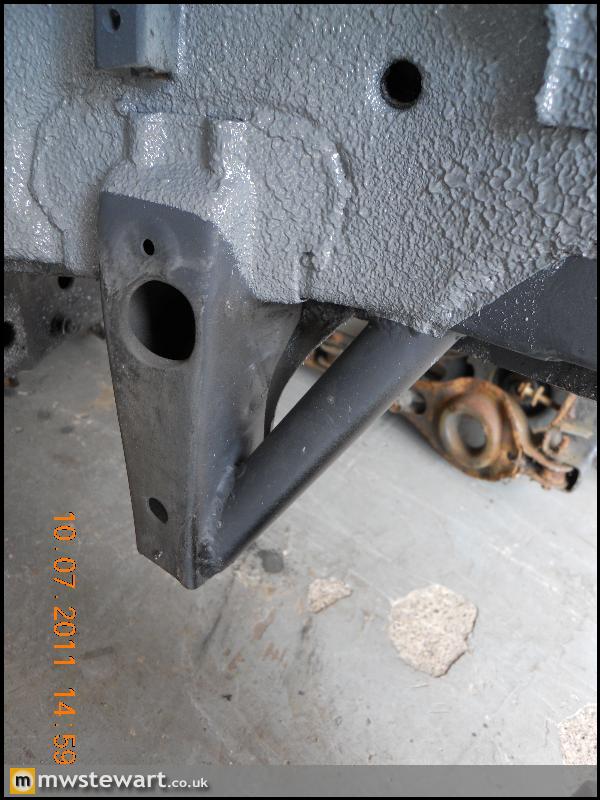
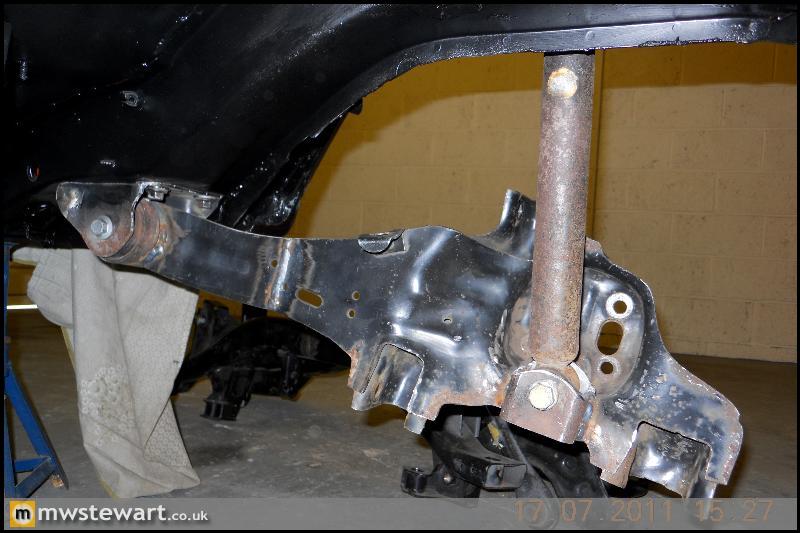
Lower arm points reinforced to chassis leg
Slam panel clearanced for large radiator, and sectioned to be made removable in order to improve access to the radiators and engine. The first photo is of a standard panel for reference.
Painting
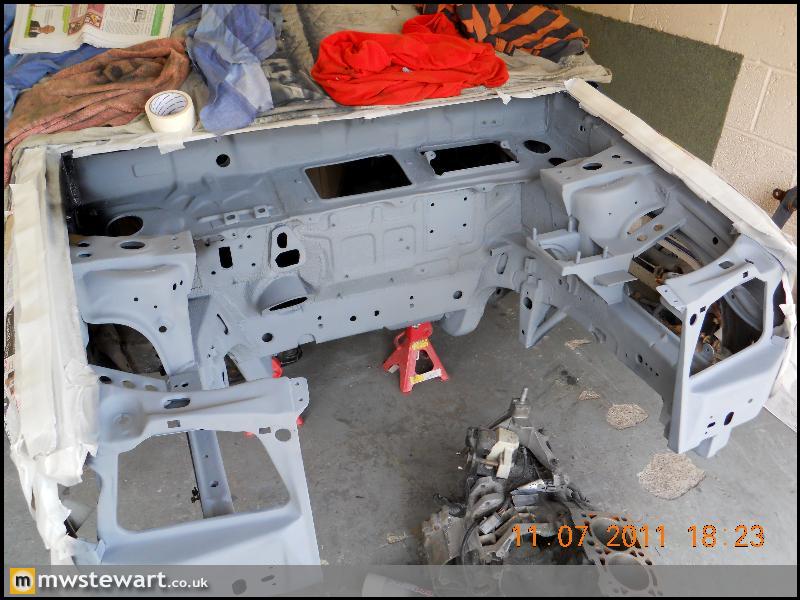
In primer
Painted
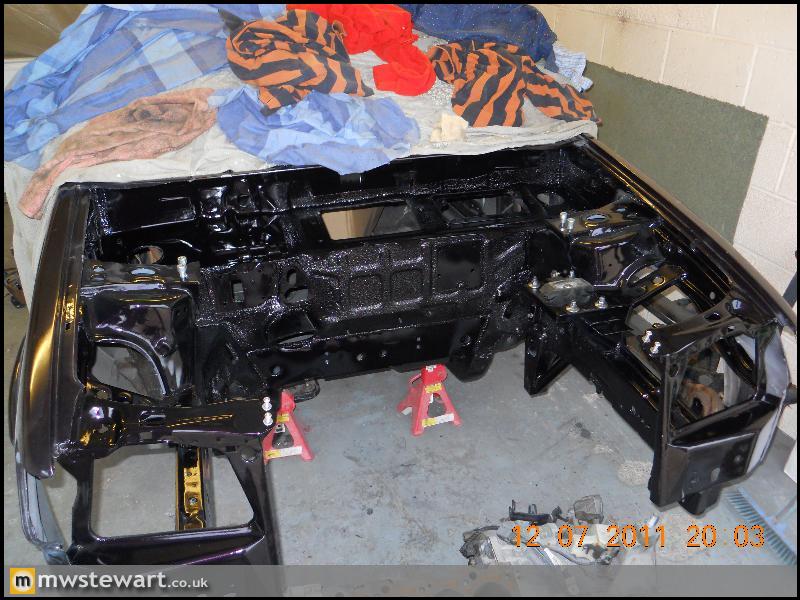
The rich colour really comes through in this shot:
Independent rear suspension
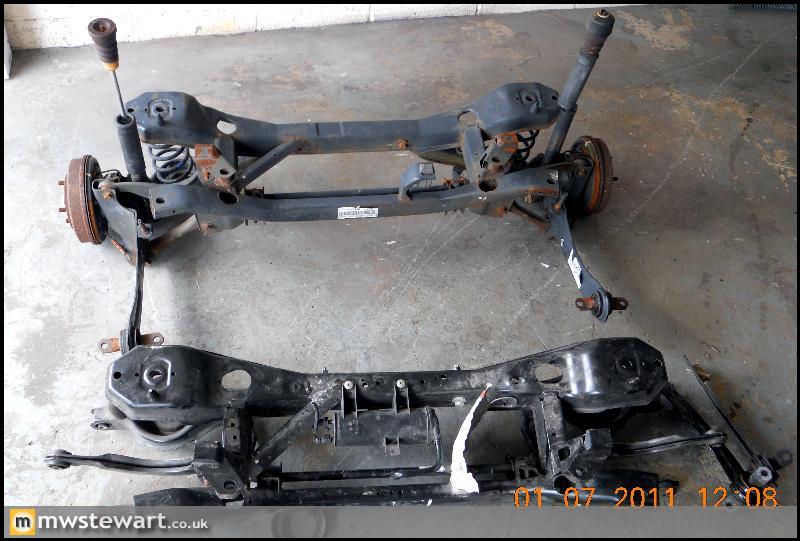
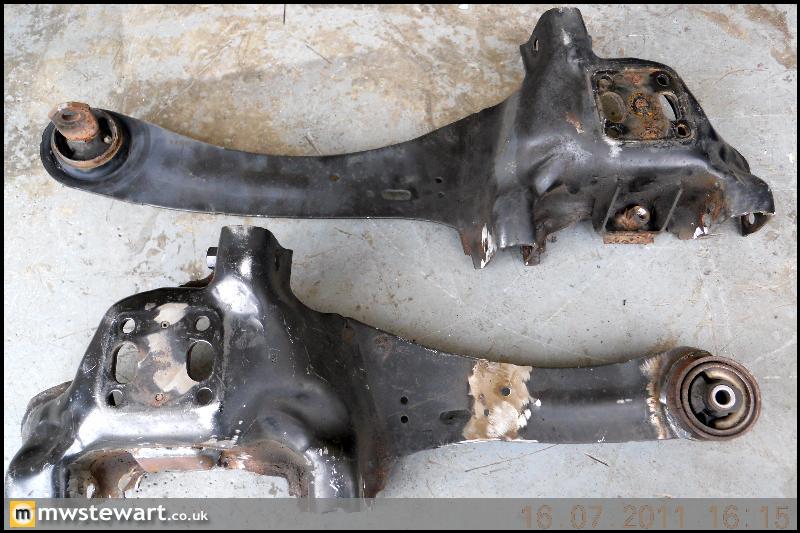
The next phase of the project is independent rear suspension taken from a Focus. I knew the Mk1 and Mk2 Focus shared an identical rear suspension arrangement aside from the hubs (5 bolt vs 4 bolt) so I bought a very low mileage rear beam/sub frame from a 2009 Focus. It turns out that the Mk2 hubs also have a significant track increase which meant I'd be running too much positive offset on the rear wheels when compared with my existing front axle. The green line in the photo below shows the distance between the lower arm and the hub mounting face:

I bought another rear end, this time from a Mk1 Focus and the photo below shows the dramatic reduction in track width:

A comparison shot. I will use the newer Mk2 subframe and arms but with the Mk1 hubs and my own disc brake conversion.
MIG Welding Aluminium
I wanted to break the dependence I had on local engineering firms for Alloy welding, so I bought some parts for my Mig Welder that will let me perform the job myself; pure Argon, Alloy wire (a general grade), oversize tips, Stainless Steel wire brushes and a Teflon lined torch.
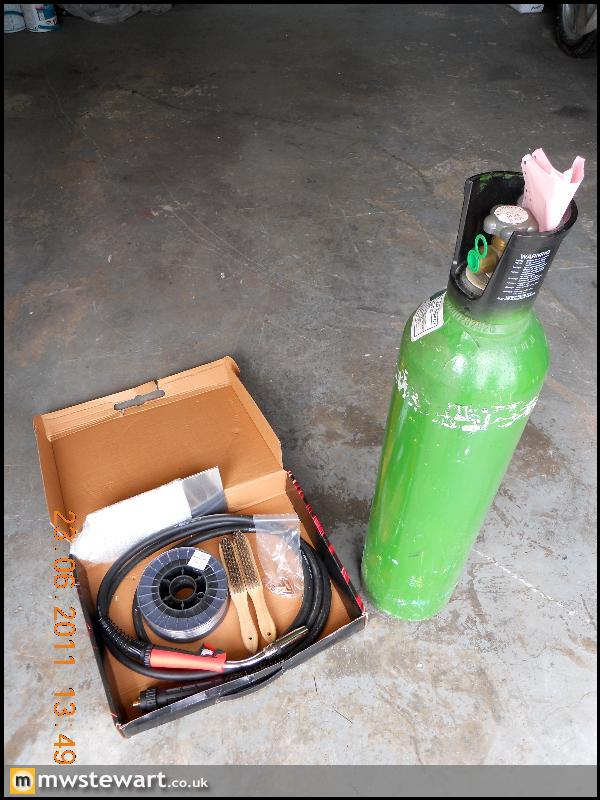
My first Alloy welding job will be to make some radiator brackets for my new radiator. It is an 'uprated' Mondeo radiator, all alloy and double capacity.
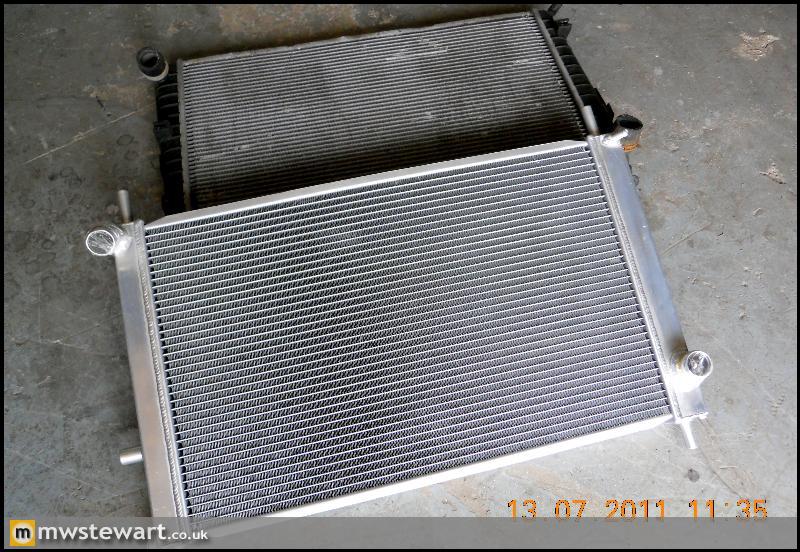
50mm vs 27mm core.
- Excursion
- Bulletin Board User
- Posts: 15265
- Joined: Thu Jan 01, 1970 1:00 am
- Location: Skynet
- Your car: Ford Fiesta
Car: 1990 Ford Fiesta XR2i
Re: MWSTEWART | 500+ BHP Si Project | Eng. Bay Complete 13/07
![]() by HCS PIMP on Wed Jul 13, 2011 8:56 pm
by HCS PIMP on Wed Jul 13, 2011 8:56 pm
especially with white accents sets the colour off
- HCS PIMP
- Elite Post Master
- Posts: 1642
- Joined: Sat Nov 19, 2005 10:46 pm
- Location: leeds / gt harwood
Re: MWSTEWART | 500+ BHP Si Project | Eng. Bay Complete 13/07
![]() by Excursion on Thu Jul 14, 2011 9:49 am
by Excursion on Thu Jul 14, 2011 9:49 am
HCS PIMP :awesome mate great progress does that mean your motor will be dark aubigenemy 2.0 Si was I loved it the colour is sooo nice
especially with white accents sets the colour off
Cheers
- Excursion
- Bulletin Board User
- Posts: 15265
- Joined: Thu Jan 01, 1970 1:00 am
- Location: Skynet
- Your car: Ford Fiesta
Car: 1990 Ford Fiesta XR2i
Re: MWSTEWART | 500+ BHP Si Project | Eng. Bay Complete 13/07
![]() by russ-RST on Thu Jul 14, 2011 10:06 am
by russ-RST on Thu Jul 14, 2011 10:06 am
A mk3/3.5 with a/c too will be a bit posh

The colour looks gawjus
- russ-RST
- Elite Post Master
- Posts: 1438
- Joined: Thu Apr 01, 2010 11:05 am
- Location: margate kent
- Your car: fiesta rs turbo
Re: MWSTEWART | 500+ BHP Si Project | Eng. Bay Complete 13/07
![]() by dontpannic on Thu Jul 14, 2011 11:00 am
by dontpannic on Thu Jul 14, 2011 11:00 am

- dontpannic
- Elite Post Master

- Posts: 7246
- Joined: Thu Mar 16, 2006 5:21 pm
- Location: Orpington, Kent
- Your car: Fiesta ST / Saxo VTS track car
Car: 2007 Ford Fiesta ST
Re: MWSTEWART | 500+ BHP Si Project | Eng. Bay Complete 13/07
![]() by Excursion on Thu Jul 14, 2011 12:56 pm
by Excursion on Thu Jul 14, 2011 12:56 pm
- Excursion
- Bulletin Board User
- Posts: 15265
- Joined: Thu Jan 01, 1970 1:00 am
- Location: Skynet
- Your car: Ford Fiesta
Car: 1990 Ford Fiesta XR2i
Re: MWSTEWART | 500+ BHP Si Project | Eng. Bay Complete 13/07
![]() by Michael! on Thu Jul 14, 2011 1:01 pm
by Michael! on Thu Jul 14, 2011 1:01 pm
well done sir!

- Michael!
- Elite Post Master
- Posts: 2088
- Joined: Tue Jul 27, 2010 2:15 pm
- Location: Blackpool
- Your car: RS1800 Sleeper Project + 6N2
Re: MWSTEWART | 500+ BHP Si Project | Eng. Bay Complete 13/07
![]() by Excursion on Thu Jul 14, 2011 1:05 pm
by Excursion on Thu Jul 14, 2011 1:05 pm
Michael! :fudgekin hell the detail and work going into this is unreal
well done sir!
Thanks mate
- Excursion
- Bulletin Board User
- Posts: 15265
- Joined: Thu Jan 01, 1970 1:00 am
- Location: Skynet
- Your car: Ford Fiesta
Car: 1990 Ford Fiesta XR2i
Re: MWSTEWART | 500+ BHP Si Project | Eng. Bay Complete 13/07
![]() by ~nomad~ on Thu Jul 14, 2011 2:09 pm
by ~nomad~ on Thu Jul 14, 2011 2:09 pm

:2004 Merc Vito: - :1983 Nissan Datsun 280zx: - :1992 GT Pro Series: - :2012 Mondraker Dune R:
- ~nomad~
- Elite Post Master
- Posts: 12504
- Joined: Fri Jan 18, 2002 12:00 am
- Location: hertfordshire
- Your car: Breadvan
Re: MWSTEWART | 500+ BHP Si Project | Eng. Bay Complete 13/07
![]() by Big Walker on Sat Jul 16, 2011 1:28 pm
by Big Walker on Sat Jul 16, 2011 1:28 pm
What AC pump did you use in the end ?
Truly gobsmacked at the attention to detail in this (and genuine parts
awesome awesome awesome
Each day I break my own personal record for the number of consecutive days I've stayed alive
- Big Walker
- Elite Post Master
- Posts: 3874
- Joined: Mon Oct 17, 2005 1:28 am
- Location: N. Ireland Drives: Anything :p
- Your car: Seat Ibiza
Re: MWSTEWART | 500+ BHP Si Project | Eng. Bay Complete 13/07
![]() by Excursion on Mon Jul 18, 2011 1:01 pm
by Excursion on Mon Jul 18, 2011 1:01 pm
Uncle Fester - Cheers! The A/C pump is from a Focus.
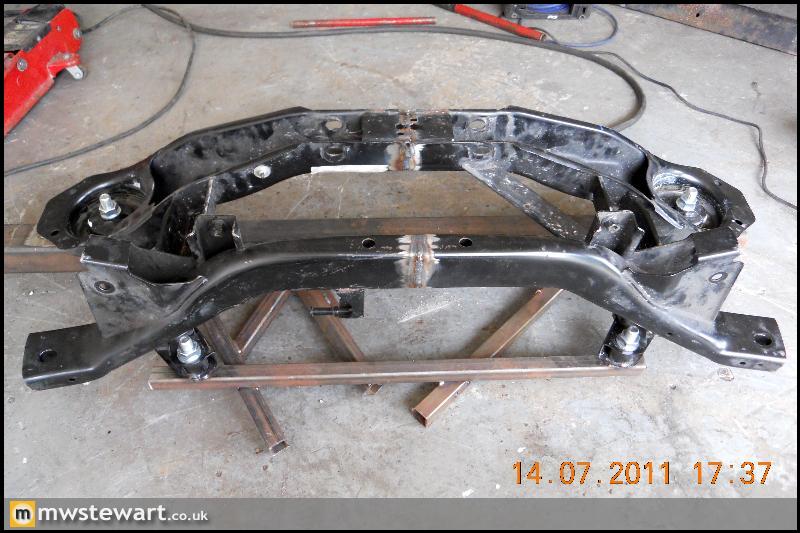
Independent rear suspension, Part 1 – Modification of Focus components
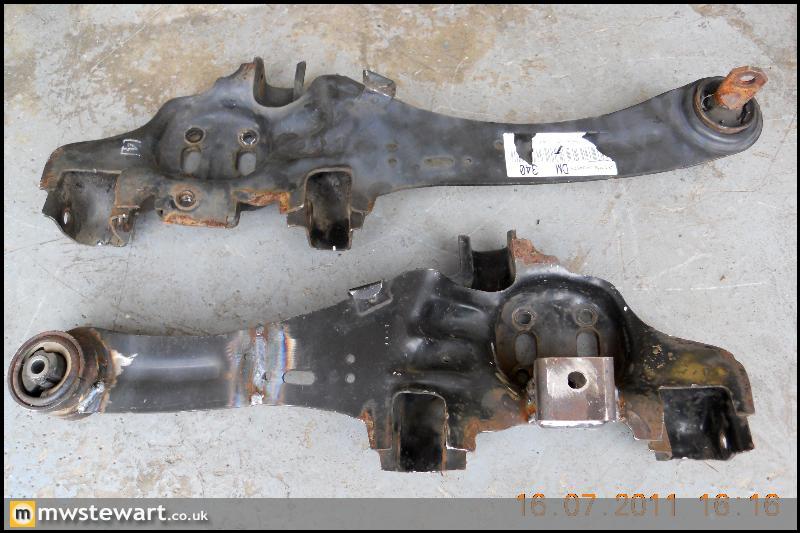
My own requirements were that the Fiesta McPherson struts would remain as would the forward mounting points for a Fiesta rear beam, this way I would not be forced to mix and match suspension and as contingency I could bolt up a Fiesta beam should I ever need to. I started by gathering data for the key dimensions of Fiesta and Focus rear suspension so measurements such as distance between trailing arms, strut mounting points, chassis legs, subframe mounts etc. Based on this data I decided that the best way forward would be to modify the Focus suspension to provide standard Fiesta track width, and to achieve this Focus subframe and knuckle/trailing arm assemblies would be modified to suit the Fiesta struts and forward beam mounts.
The first step was to create a jig based on the standard Focus subframe. At this stage I marked on two pieces of steel the position of standard Focus mounting points and also new mounting points at a reduced width which would produce standard Fiesta rear track. I fixed bolts to the Steel and bolted it to the unmodified Focus beam to begin fabrication of the jig, this way I ensured that everything was perfectly parallel. Once that was done I welded on bolts in the shortened position and sectioned the beam to suit.
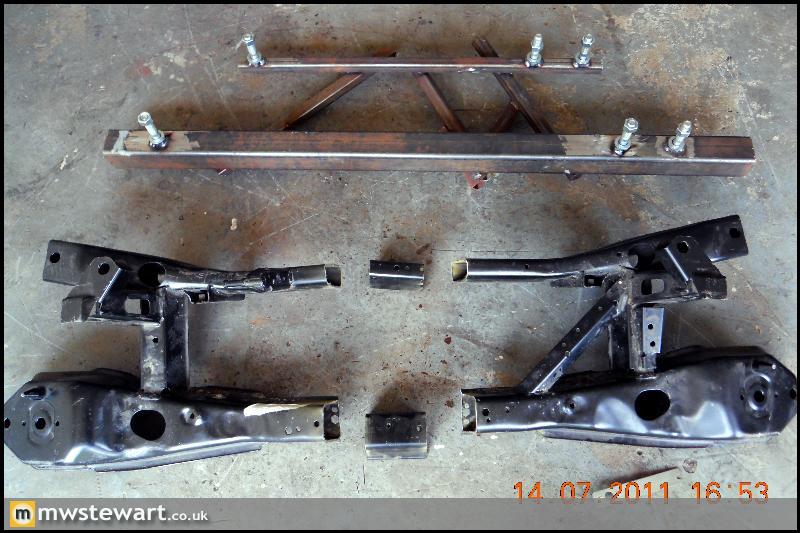
Jig #1 did its job well: here's the shortened subframe welded together but still attached to the jig.
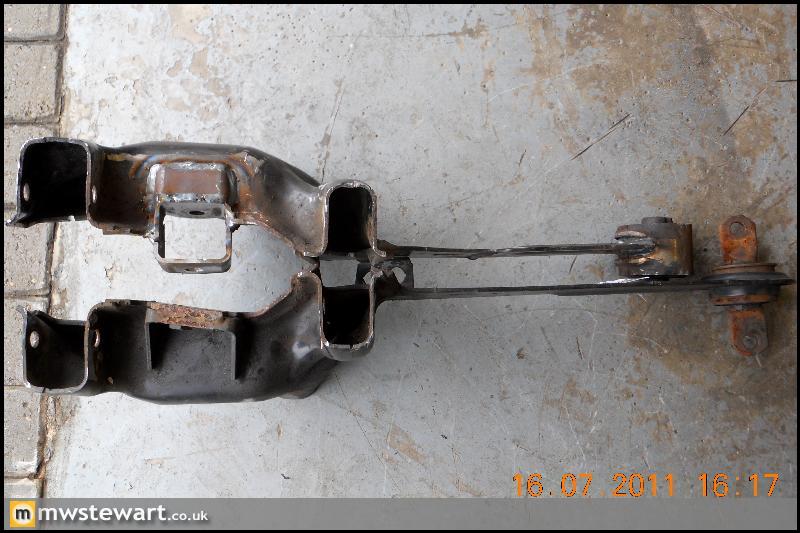
Next up I went back to the Fiesta beam to make a jig that would help me modify the Focus trailing arms, and my life here was made easier by the fact I'd previously upgraded to a Puma/Mk5 Fiesta beam which actually shares the same hub mounting bolt pattern as the Focus; this allowed me to make a jig to provide the Fiesta lower strut mount and forward beam mount based on the common hub mounting face/bolt pattern. The alternative would be to make a jig based on wheel bolt flange and centreline, which would have taken longer.
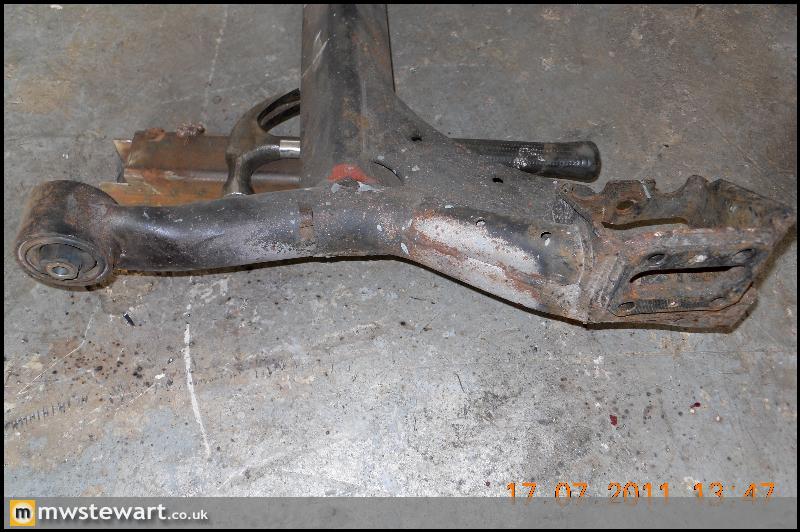
Here's the horrific looking but sturdy and accurate jig # 2 in action
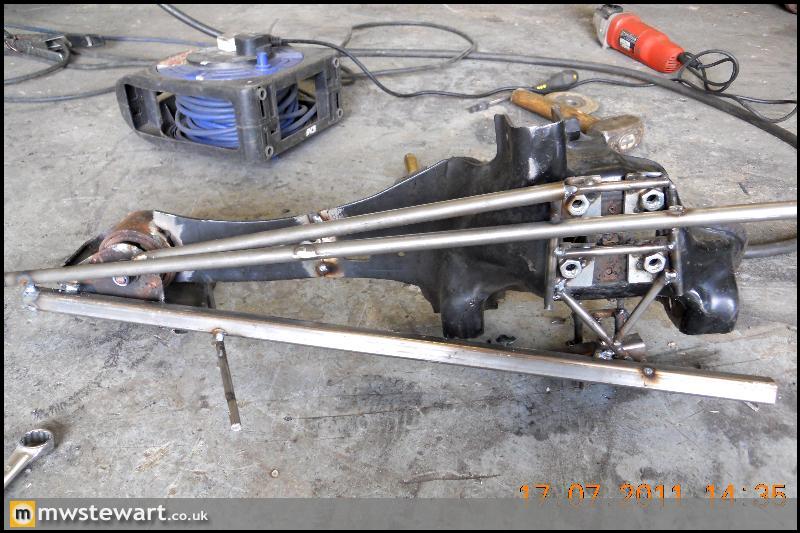
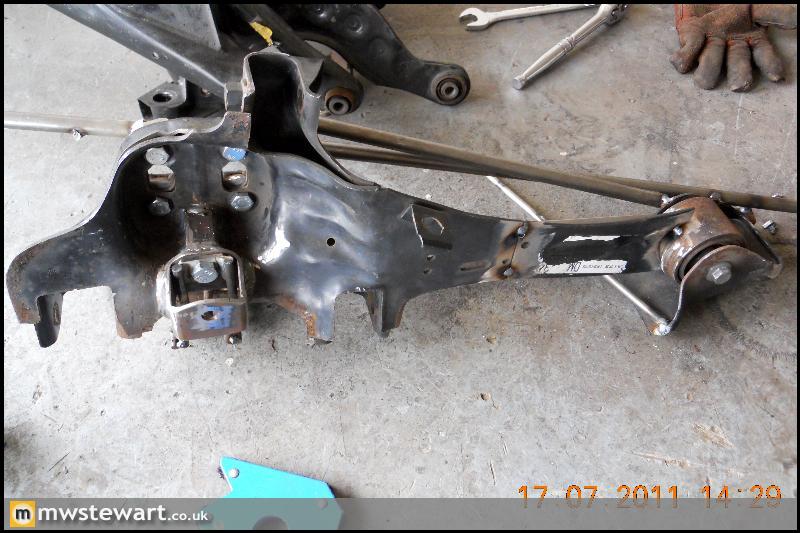
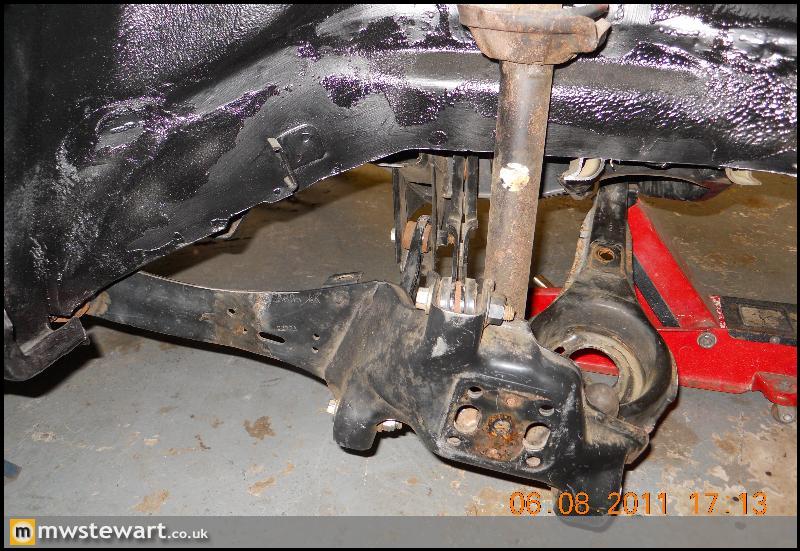
The second jig enabled me to fabricate the Fiesta lower strut mounts, shorten the Focus trailing arms, and change the angle of the trailing arms to suit the position of the Fiesta forward beam mount. I decided at this point to sacrifice the Fiesta beam for its front mounts/bushes to incorporate into the Focus arms, and in doing so replaced the trailing arm Focus bushes which are a weak point.
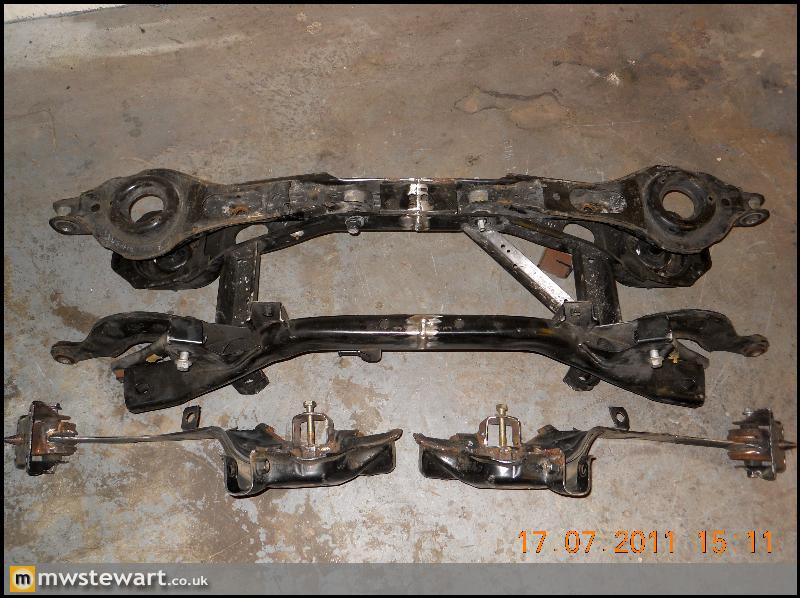
Top: Standard Focus, Bottom: Modified
This image shows the shortened trailing arm, the difference between Focus and Fiesta lower suspension mounts, and the reinforcing I made around the new lower mount. I was conscious here that the majority of load on the Focus system would have been taken by the lower arm that houses the spring, so as I was mounting a McPherson strut assembly in place of a damper, I made sure that the shock mount was of far sturdier construction than the original.
Subframe etc. completed.
Modified knuckle/trailing arm mounted to the Fiesta.
The next stage is to modify the Fiesta chassis to mount the subframe.
- Excursion
- Bulletin Board User
- Posts: 15265
- Joined: Thu Jan 01, 1970 1:00 am
- Location: Skynet
- Your car: Ford Fiesta
Car: 1990 Ford Fiesta XR2i
Re: MWSTEWART | 500+ BHP Si Project | Rear suspension 18/07
![]() by - Danny Boy - on Mon Jul 18, 2011 1:56 pm
by - Danny Boy - on Mon Jul 18, 2011 1:56 pm

- - Danny Boy -
- Elite Post Master
- Posts: 3844
- Joined: Mon Sep 10, 2007 5:49 pm
- Location: Portsmouth
- Your car: Fiesta Si 2.0
Re: MWSTEWART | 500+ BHP Si Project | Rear suspension 18/07
![]() by Big Walker on Mon Jul 18, 2011 2:45 pm
by Big Walker on Mon Jul 18, 2011 2:45 pm
Is there any reason behind the bracing on just one side or is it just not finished
as per usual though
Each day I break my own personal record for the number of consecutive days I've stayed alive
- Big Walker
- Elite Post Master
- Posts: 3874
- Joined: Mon Oct 17, 2005 1:28 am
- Location: N. Ireland Drives: Anything :p
- Your car: Seat Ibiza
Re: MWSTEWART | 500+ BHP Si Project | Rear suspension 18/07
![]() by Excursion on Mon Jul 18, 2011 3:02 pm
by Excursion on Mon Jul 18, 2011 3:02 pm
The bracing on one side is how Ford make them, it's the same crossmember used on both Mk1 and Mk2 Focus RS
- Excursion
- Bulletin Board User
- Posts: 15265
- Joined: Thu Jan 01, 1970 1:00 am
- Location: Skynet
- Your car: Ford Fiesta
Car: 1990 Ford Fiesta XR2i
Re: MWSTEWART | 500+ BHP Si Project | Rear suspension 18/07
![]() by RS rob on Mon Jul 18, 2011 8:57 pm
by RS rob on Mon Jul 18, 2011 8:57 pm
really hope it takes all the box's for you when its complete marcly poo's!!

- RS rob
- Elite Post Master
- Posts: 4176
- Joined: Tue Feb 18, 2003 1:16 am
- Location: south wales
Re: MWSTEWART | 500+ BHP Si Project | Rear suspension 18/07
![]() by Ratspeed on Sun Jul 24, 2011 9:38 pm
by Ratspeed on Sun Jul 24, 2011 9:38 pm
I wish i had the time, skills and attention span to do that kinda stuff.

- Ratspeed
- Elite Post Master
- Posts: 2787
- Joined: Sat Dec 08, 2007 4:54 pm
- Your car: Mk1 pop plus & Focus ESP
Re: MWSTEWART | 500+ BHP Si Project | Rear suspension 18/07
![]() by DanFraser on Mon Jul 25, 2011 4:53 pm
by DanFraser on Mon Jul 25, 2011 4:53 pm
Ratspeed :Jesus thats some proper work gone into that!
I wish i had the time, skills and attention span to do that kinda stuff.
And the money!
- DanFraser
- Post Master

- Posts: 791
- Joined: Sat Feb 21, 2009 3:17 pm
- Location: Derby
- Your car: Ford Fiesta SI 1.6
Re: MWSTEWART | 500+ BHP Si Project | Rear suspension 18/07
![]() by Ratspeed on Wed Jul 27, 2011 10:23 pm
by Ratspeed on Wed Jul 27, 2011 10:23 pm
DanFraser :Ratspeed :Jesus thats some proper work gone into that!
I wish i had the time, skills and attention span to do that kinda stuff.
And the money!
Yeah that would help too
- Ratspeed
- Elite Post Master
- Posts: 2787
- Joined: Sat Dec 08, 2007 4:54 pm
- Your car: Mk1 pop plus & Focus ESP
Re: MWSTEWART | 500+ BHP Si Project | Rear suspension 18/07
![]() by Excursion on Fri Aug 05, 2011 12:18 pm
by Excursion on Fri Aug 05, 2011 12:18 pm
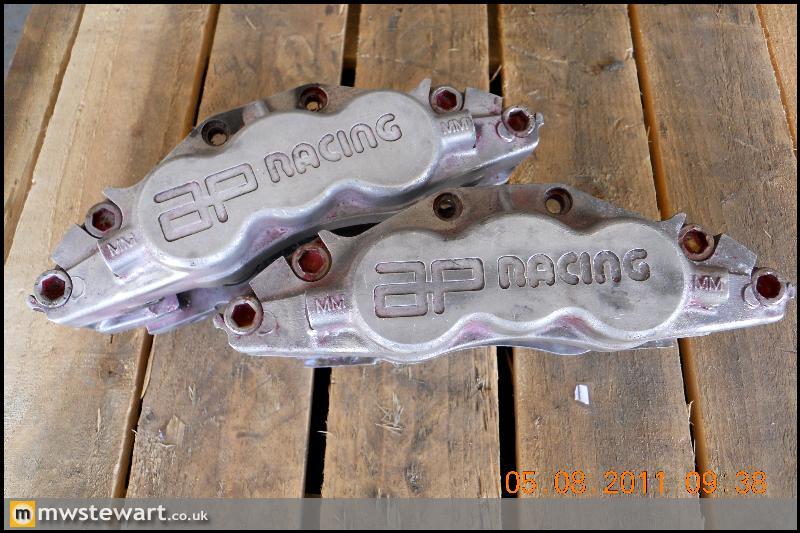
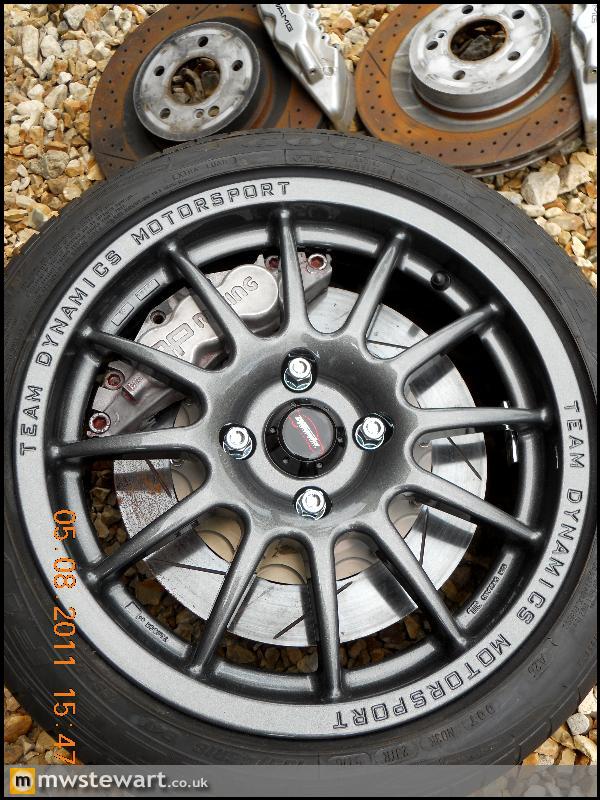
6 Pot calipers for the front. AP CP5555 motorsport version:
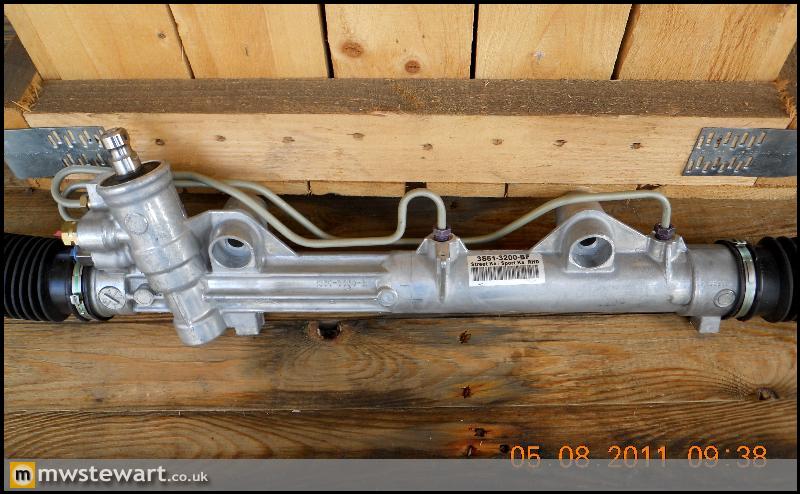
Brand new (not rebuilt) Genuine Ford Street/Sport Ka steering rack, as the Ka platform is a Fiesta it fit my Si. It's a unique part and is cast from a higher grade alloy and has solid mounts rather than rubber bushes.
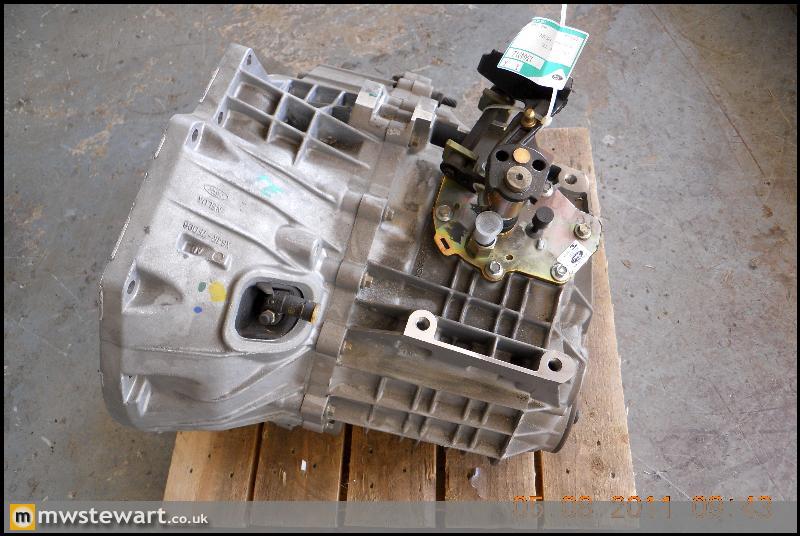
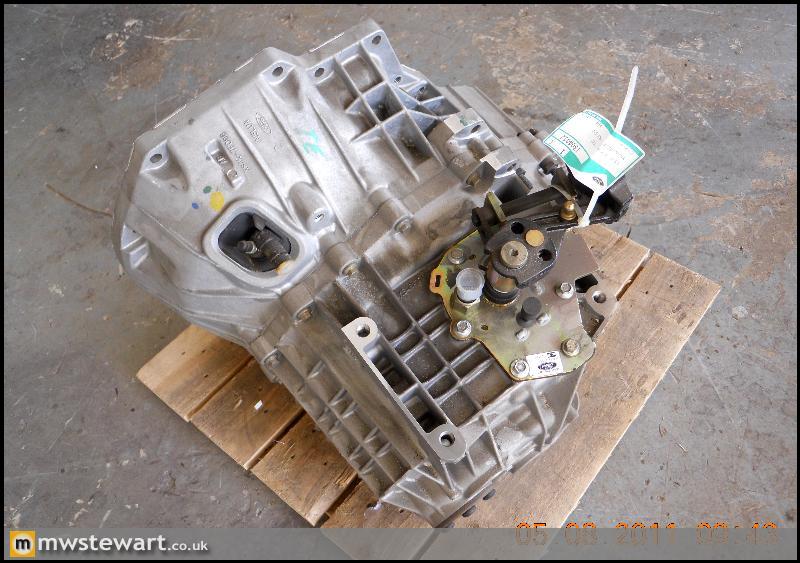
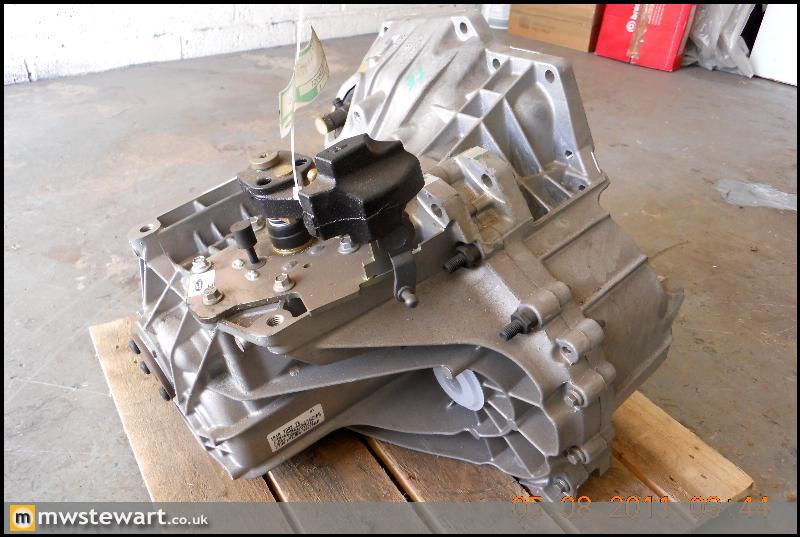
Ford Focus RS Gearbox, brand new in the crate. Thanks to Tom Peters Ford parts for this. I have three of these gearboxes now so will have to get around to selling one!
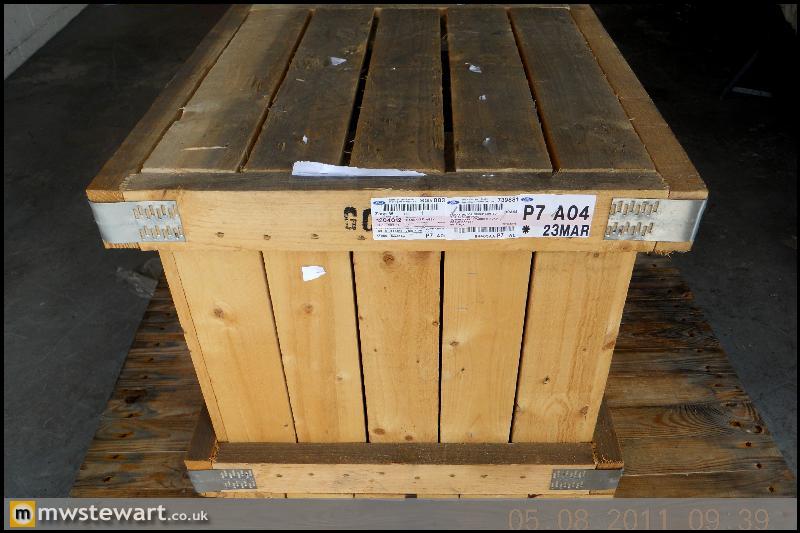
It is essentially a regular 2.0 Zetec Focus gearbox but with shot peened gears and a Quaife LSD. I also noticed that the shift weight is smaller, which is good.
I hope to get the Focus rear suspension finished off this weekend.
- Excursion
- Bulletin Board User
- Posts: 15265
- Joined: Thu Jan 01, 1970 1:00 am
- Location: Skynet
- Your car: Ford Fiesta
Car: 1990 Ford Fiesta XR2i
Re: MWSTEWART | 500+ BHP Si Project | New goodies 05/08
![]() by Excursion on Fri Aug 05, 2011 5:44 pm
by Excursion on Fri Aug 05, 2011 5:44 pm
- Excursion
- Bulletin Board User
- Posts: 15265
- Joined: Thu Jan 01, 1970 1:00 am
- Location: Skynet
- Your car: Ford Fiesta
Car: 1990 Ford Fiesta XR2i
Re: MWSTEWART | 500+ BHP Si Project | New goodies 05/08
![]() by robp-tt on Fri Aug 05, 2011 8:29 pm
by robp-tt on Fri Aug 05, 2011 8:29 pm
2.1 ZETEC TURBO,AREA SIX BITS,PECTEL T2,LIVE MAPED BY AHMED BAJOO AND GROVE GARAGE

- robp-tt
- Senior Poster

- Posts: 397
- Joined: Sat Mar 31, 2007 12:33 pm
Re: MWSTEWART | 500+ BHP Si Project | New goodies 05/08
![]() by - Danny Boy - on Sat Aug 06, 2011 8:58 am
by - Danny Boy - on Sat Aug 06, 2011 8:58 am
- - Danny Boy -
- Elite Post Master
- Posts: 3844
- Joined: Mon Sep 10, 2007 5:49 pm
- Location: Portsmouth
- Your car: Fiesta Si 2.0
Re: MWSTEWART | 500+ BHP Si Project | New goodies 05/08
![]() by Excursion on Sat Aug 06, 2011 9:21 am
by Excursion on Sat Aug 06, 2011 9:21 am
Front wheels are 16's and the discs are 325x28.
I have a set of AP 4 pots for the front with 304x25 discs which I will advertise as a bolt on kit at some point. I was going to use these before the 6 pots.
- Excursion
- Bulletin Board User
- Posts: 15265
- Joined: Thu Jan 01, 1970 1:00 am
- Location: Skynet
- Your car: Ford Fiesta
Car: 1990 Ford Fiesta XR2i
Re: MWSTEWART | 500+ BHP Si Project | New goodies 05/08
![]() by Excursion on Sat Aug 06, 2011 7:51 pm
by Excursion on Sat Aug 06, 2011 7:51 pm
First off I had to notch a horizontal chassis member at each end to provide clearance for part of the new sub frame. The loss of strength isn't an issue for me because the two lateral members on the Focus sub frame will make the rear end more rigid than it ever was in standard form. I also had to cut out a section from each side of the main chassis rails in order to make a level bed for the sub frame as the rails slope down from the rear of the car towards the petrol tank area, you can make this out in the foreground of the photo.
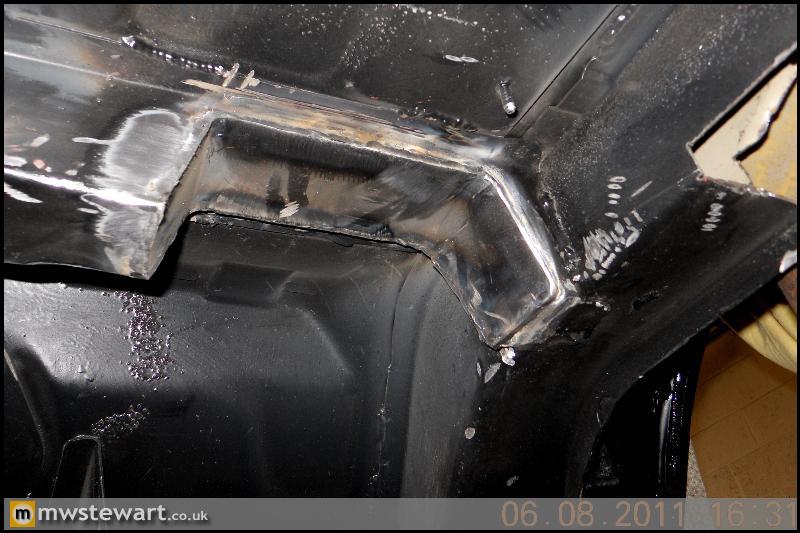
Here's the rear end temporarily mounted, you can see the parts of the sub frame that sit in the new notches:
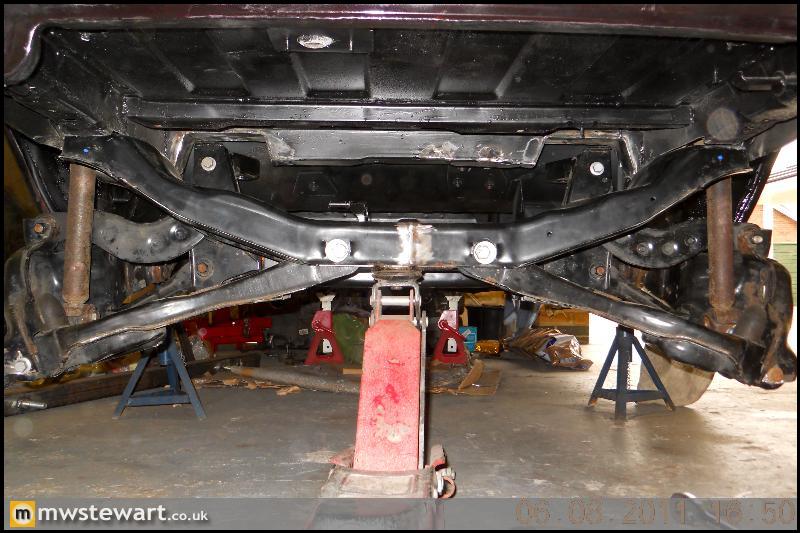
From the front.
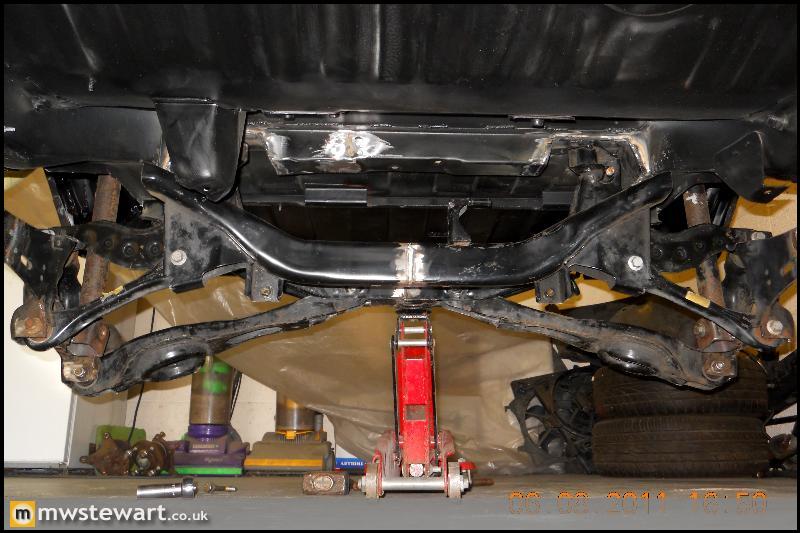
Slightly more advanced than the old twist beam!
- Excursion
- Bulletin Board User
- Posts: 15265
- Joined: Thu Jan 01, 1970 1:00 am
- Location: Skynet
- Your car: Ford Fiesta
Car: 1990 Ford Fiesta XR2i