Popular Plus - 04/02/14 - Page 19 - The End!
Popular Plus - 04/02/14 - Page 19 - The End!
![]() by Smo on Sun Aug 13, 2006 10:23 pm
by Smo on Sun Aug 13, 2006 10:23 pm
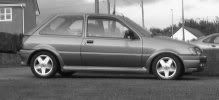
Anyway, after seeing fiestamodder123's post, I thought I might as well post a little about mine. I've always loved sleepers and I've always wanted to build one - I've had a few ideas in the past of what to use for the car; these included Orions (don't ask me why, but I've always loved the shape and EFi ones make it easy for FRST lumps
So this is something I've been wanting to do with mine for the last 3 or so years (inbetween being incredibly indecisive and looking at other cars to buy) but after having an accident which was my fault in February 2004, it put my insurance up a bit more than I could afford at the time (being a student without a loan!), and therefore had to put up with a standard car for a bit longer - not fun! People wonder how I can drive a 1.1 for 6 years... Trust me, it’s not easy!
Well this first post is really only about the parts I’ve collected over time, so pretty boring, and more so because it’s very long! Sorry!
Part 1 - Parts Collection! (And a bit of loom-swapping)
Anyway, after finishing my degree last year, I decided this would be the year that I change that. Back in about March time, I decided to start adding to some of the parts that I'd already collected the last few years in preparation for this. Bear in mind, my car is a 1990 1.1 Popular Plus – this means it had literally nothing of use for a decent engine – so it was going to take some time getting everything necessary. Up until this point, current list of parts I’d collected were as follows:
CFi Fuel Tank – Came up cheap, so decided to get it as then all I needed to do was replace the pump with an EFi one:

(nice and rusty where it’s been sitting in my garden for quite some time!)
XR2i 16v Car and Engine Loom (Only car loom shown)

5 Speed Gear Linkage (Yes, my car is a 4 speed!)
<Picture to come>
Possibly some other bits, but nothing major…
My car had central locking and electric windows which I’d fitted a long while back at different times a few years ago, but having had the 16v car loom sit in my bedroom doing nothing for quite some time, I decided in August 2005 to spend a day where I work, ripping my car apart and fit it – a few reasons for this: 1) So I could move the electric window switches to the door pockets, and 2) I would now have all the loom in place for any potential engine swap
I’d already figured out what pins of my current engine loom (all 3 or 4 of them!
(Same image as above as it was taken when I was doing the swap!)
I had to pull just about all the interior out, dash, sill trims, door cards (for new door looms), driver’s seat and lift the carpet (to get to the handbrake switch), rear bench (for access to the fuel tank/sender unit), parcel shelf support on driver’s side, head lining had to be undone at the front to get to the courtesy light and god knows what else.

I have more photos but this is all I can find at the moment – I think I’d just started at this point as the headunit is still in! I’ll add the rest of the photos when I find them.
The car loom also includes all the non-engine-associated engine bay wiring too, such as the washer pump, wiper motor, lighting, horn, brake fluid level, starter motor, rad fan etc. It does differ to the old HCS car loom in one way though; the temperature switch/sensor wiring for the fan is part of the car loom on the old carb’d HCS loom (not sure how it is on the injection one), whereas on the 16v, it is part of the engine loom. So to get round this while my car was still running the on the old 1.1 lump, I borrowed the nice brown/white temperature sensor wire/connector from my old car loom and connected it to the 16v car loom just before the car/engine loom connector.
I also had to borrow the fuel sender wire/connector from the old car loom too, as my current tank uses a single push-on type connector as opposed to the multiplug connector on the 16v car loom (obviously for the fuel pump).
After completely disconnecting everything, I was able to pull the engine bay part of the loom through the big hole in the driver’s side bulk head and take the whole lot out – the car was now completely disabled – 3 miles from home! Scary!
At this time, it was about 4pm and I’d spent about 4 or so broken hours just pulling everything apart and disconnecting it all. I also now had about an hour to get the new loom in so I could drive home again! In a mad rush, I managed to do it, moving the engine loom pins out of the 6-pin connector and into the 12 pin 16v connector so that it would plug straight into the car loom, connecting everything up (most of the trim, dash, etc., still out though) and at 5pm, I put the key in and it started – seriously relieved! Especially after my dad spent most of the day giving the impression that he didn’t have much faith in it going to plan
Having done this, and tested everything (all worked
But anyhow, that was that done, the first step to fitting a newer and bigger engine easier – I now had all the wiring to fit anything, although Zetec was most likely going to be the way I would go… If I did decide on anything.
That’s pretty much how things stayed for while. I was still fairly broke, and couldn’t really do anything until I found a job. I had just about enough money to drive over to Max’s place in October so that I could collect some old wheels with good tyres on that he no longer wanted, just so I could get my car through the MOT
Along came February, and I managed to get a temporary job which would give me a little bit of money to may be add to my small collection of parts, and in March I purchased a matching 2.0 MAF sensor and ECU (DESK) from someone breaking a Mondeo 2.0 Si:

Annoyingly, as you can tell, the MAF sensor has been a little chive’d up!


Also annoying, one of the clips was broken…

Just in case anyone is interested in knowing the part number(s)
Around about the same time, I also bought an EFi fuel pump/sender unit from an XR2i:

Random shot of the connector for no apparent reason

All very boring so far, I know
Then came a slightly new plan… Up until this point, I’d pretty much decided that I was going to fit a 2.0 – been done a fair bit, but in a Popular Plus shell which wasn’t going to look much more, it should be quite fun. However, I’d been looking for quite some time, and trying to find a reasonably-priced engine was proving a nightmare
eBay to the rescue! Along with numerous other favourite searches that I have on eBay, I had “zetec engine” and “mondeo engine”, so one morning I find an automated email informing me of an Orion 1.8 Zetec Engine and Gearbox – “oooh” I think. Wasn’t really what I wanted, but decided to have a look at the auction anyway. Turns out the car was very low mileage at only 45,500 odd miles and I decided I wanted it.


(Photos as shown in the auction)
The rocker cover looked a mess, but it all seemed pretty genuine, so I decided to wait until the end day, and after a few fighting bids, I won
I also got the ECU and EDIS module from this car.


(Notice the SMO code - made for me
I would take a picture of the EDIS module, but it’s gone for a walk… I’m sure it’ll be back soon…
As a lot of you would have worked out/made out from the pics, it’s only a 105PS engine, however it didn’t really bother me at the time. Even if I didn’t use it, it still provided me with a lot of parts that I could use on a 2.0 conversion, and if I did use it, it was nice and low mileage – should prove a reliable engine to use for a while. At the same time, it’s still a good engine to tune, as a lot of you will know.
One problem though, got home, and found the sump was cracked – not happy!

We’re guessing that he tried to jack engine up when trying to get it out, but it wasn’t worth my time complaining – I knew where I could get a replacement relatively cheap, so would do that.
Well along came May, and I met up with bakewell001 (Steve) who had a set of 14” Si steel wheels he no longer needed, so I kindly took them off him
But never mind:


What with Fiesta In The Park, I arranged to collect a few bits from some people. Some were the rad and fan plus most of the water pipes from Percy! (Andy) – Nice to meet you

No pics of the pipes, but I’m sure you can imagine
XRMike (Mike) was kind enough to give me an airbox and crossmember too

Unfortunately, the crossmember wasn’t going to be any good to me as I didn’t realise the cat hangs from this, and the one Mike gave me didn’t have the brackets or the holes for the brackets, however I didn’t realise this until after I got it home! But not to worry
In between now and then, I also managed to pick up a downpipe and cat, along with the needed MAF sensor (an XR2i 16v one – compatible with the 2FCD ECU I removed from the Orion).


(Nice and restrictive! But it’s the right one for the ECU, so I’m using it)

(Just in case the code might be helpful to anyone)
The same person also had the front alternator bracket (which also doubles as the bracket for the front mount), however he wasn’t willing to let go of this, so I managed to get this from a guy breaking an XR2i 16v on eBay. I also asked for the front mount BRACKET that goes onto the side of the chassis leg, but unfortunately he sent the entire mount (minus the bracket)


At this point, I still needed a sump, so one was purchased off a local FT member who had a 2.0 Si until recently (he doesn’t post much at all on here, and I can’t remember his username!). Only got one photo, but after a bit of a clean, it came out looking pretty good:

Most importantly, no cracks! I’ve also got a brand new Ford sump gasket and some sealant stuff for when I fit it
Also needed was the rest of the exhaust system. Luck saw me getting an Si back box on eBay – brand new, but fell off the guy’s car about a week after purchase and fitting at a well known exhaust fitters, so I assume some how it was replaced and he ended up keeping the old one! Only a small dent on it, but for what I paid, I can’t complain


Hopefully it won’t stand out too much. If it does, I’ll just get it adjusted. As you can see, the tailpipe is just an end piece with a few tacks of weld, and so if the actual pipe is long enough, I may just remove the end piece – it’s not like I have an Si bumper that it needs to extend to anyway
I also needed a mid section, however finding a decent second hand or cheap one was proving very difficult, but after much ringing about of parts places and exhaust companies, I eventually found a new one for about £30 from - wait for it – Halfords. Yep, they gave me the best price… Was rather shocked at that, but very impressed nonetheless, and was with me next day!

(Pic also shows the back box and 16v crossmember – see further down)
I decided to buy a new rear engine mount, as it’s pretty much the most important one of the lot, plus the second hand one I’d purchased at a previous date was buggered. A little bit gutted though, as I paid the £47 that it cost me from Ford, only to get offered a near-new one for £20 last week

You’ll also see attached to that the bracket which goes between the block and the mount – major pain to find one second hand as people generally use them if they’re changing engines, or can’t be arsed to remove the engine to get it when breaking the car – can’t blame them though really!
Also at the same time, I obtained the crossmember I needed to hang the cat on (see mid section pic above). As you can see, it has the brackets and rubbers which the cat hangs on, to stop it from swinging about and obviously provide added support.
Something to bear in mind when putting a Zetec in a non-Zetec car, is that the mid section box has a different bracket to all other MK3 exhaust systems and therefore can’t use the standard bracket in that area. The 16v uses a bracket which is fixed to two of the rear beam fixing bolts, although these are actually special studs which according to Ford are no longer available. They didn’t tell me this at the time when trying to order them (like they did with a load of other bits I wanted), but when I went to collect them, so I assume they were told by the main parts centre – I will try another branch still, as I really do need them, unless someone breaking an Si would like send me them

I’ll get a pic of the bracket when I have some shoes on and I’m not so comfortable on my bed, so those that don’t know what I’m on about can see
Ok, so I think that’s about it for now… Rather boring stuff, but some people may be interested in seeing just what parts are needed when doing this with a non-Zetec (and in my case, non-injection and non-cat) car. There’s probably some parts I’ve missed out that I’ve got that are needed, but then there’s also some parts that I haven’t bought which would be needed if using a Mondeo engine – so remember that if you’re putting a 2.0 in!
There’s also another reason for this post – to hopefully give me some enthusiasm! Anyone who knows me, or who I talk to a lot will know what I’ve been like – I keep changing my mind for various reasons, and keep getting attracted to other cars! The amount of times I’ve gone searching eBay and Auto Trader for Fiesta and Escort Turbos, XR2i 16vs, and even Sis is unbelievable. I’m surprised some of you are still talking to me! I had actually planned on doing this this weekend, but due to some tiny little parts I still have missing (stupid reason that I won’t bother to explain, but thanks Ford) I couldn’t do it, and so I had pretty much decided to forget about it and buy something else. However, after a good night’s sleep, I woke up with the urge to do it again, and so hopefully this week or next, you’ll be seeing lots more boring photos and hopefully a Fiesta Popular Plus with a working 1.8 Zetec… For now
Lastly, just for those that are wondering… I do intend to upgrade the brakes and suspension! Thanks to some great people on here for getting it to me, I have a standard Turbo suspension setup waiting to go on, and I’ll be fitting RS2000 brakes as soon as I can get hold of some… Should be fun
Cheers,
Simon
P.S. Wake up

- Smo
- Elite Post Master


- Posts: 8658
- Joined: Sun Dec 29, 2002 12:33 am
- Location: My indecisive mind, in Thanet, Kent.
Car: 1990 Ford Fiesta Popular Plus
- XRMike
- Elite Post Master
- Posts: 2488
- Joined: Thu Jun 09, 2005 6:05 pm
- Location: North Wales Party's: All the time
Car: 1991 Ford Fiesta RS Turbo
![]() by Max M4X WW on Sun Aug 13, 2006 10:53 pm
by Max M4X WW on Sun Aug 13, 2006 10:53 pm
- Max M4X WW
- Elite Post Master
- Posts: 18161
- Joined: Sun Jun 22, 2003 9:52 pm
- Location: Hampshire
- Your car: Merc CL500
Car: 2014 BMW M135i
![]() by chris-fiesta on Sun Aug 13, 2006 11:08 pm
by chris-fiesta on Sun Aug 13, 2006 11:08 pm

- chris-fiesta
- Elite Post Master
- Posts: 3422
- Joined: Tue Jun 22, 2004 11:58 am
- Location: croydon, london Drives: 2.0 16v mk3
![]() by fiestamodder123 on Mon Aug 14, 2006 1:06 am
by fiestamodder123 on Mon Aug 14, 2006 1:06 am
keep it up and keep us informed,its going to be a superb sleeper
Gav
- fiestamodder123
- Post Master

- Posts: 603
- Joined: Sun Apr 02, 2006 3:09 pm
- Location: Mauchline (not the end of the world but you can see it from here)
![]() by Smo on Mon Aug 14, 2006 1:39 am
by Smo on Mon Aug 14, 2006 1:39 am
fiestamodder123 :this is the first time ive looked at your post and wow ,you really have been collecting,will be following this thread religeously (sp) as just from looking at what you have up on here i have learned a few things that i did not already know that would probably have stumped me ,like the difference in the s brace between the non cat cars and the xr2i 16v ,
keep it up and keep us informed,its going to be a superb sleeper
Gav
Cheers Gav,
I have to partly thank you (as well as Max, Mike, Steve and anyone else I can't remember!), as it was seeing your post that hit me a bit as to why I've been working on making it happen so long. I've had sooooo many little problems just with getting some of the parts along the way, that more times than I wish to count I have given up and decided to buy something else. But for some reason, I always seem to end up wanting to do it again
I've learnt quite a bit myself during my part collecting - it's normally when I've been revising the Haynes manual (joke, but close enough), looking at parts diagrams and general nosing at other peoples' cars that I find out things that I just never imagined! Things like the mid section bracket for example. I also found out the XR2i 16v (or at least some of them - don't know for sure yet) used a bolted flange to join the mid section to the back box. I only found this out when I started nosing at the parts books at various parts places
Cheers the rest of you, and if I need any help, you'll be the first I call
- Smo
- Elite Post Master
- Posts: 8658
- Joined: Sun Dec 29, 2002 12:33 am
- Location: My indecisive mind, in Thanet, Kent.
Car: 1990 Ford Fiesta Popular Plus

![]() by fiestamodder123 on Mon Aug 14, 2006 4:28 pm
by fiestamodder123 on Mon Aug 14, 2006 4:28 pm
Gav
- fiestamodder123
- Post Master
- Posts: 603
- Joined: Sun Apr 02, 2006 3:09 pm
- Location: Mauchline (not the end of the world but you can see it from here)
![]() by ScottP on Mon Aug 14, 2006 5:51 pm
by ScottP on Mon Aug 14, 2006 5:51 pm
Smo if you need any little bits i can try as my uncle owns a scrap yar, hes got an Si 16v in at the moment with a full interior, he also had an XR2i 16V not long back
- ScottP
- Post Master
- Posts: 690
- Joined: Sat Sep 11, 2004 2:44 pm
- Location: Barnsley, South Yorkshire
![]() by joe boy on Mon Aug 14, 2006 7:00 pm
by joe boy on Mon Aug 14, 2006 7:00 pm
cant wait to see it finshed after all the mind changin youve been doin
and if you need a hand remeber
- joe boy
- Post Master
- Posts: 734
- Joined: Tue Mar 07, 2006 11:45 pm
- Location: The Bay
![]() by Smo on Tue Aug 15, 2006 12:19 am
by Smo on Tue Aug 15, 2006 12:19 am
Re the back box, I found a 1.1-style swoop down job on eBay a while back for the 16v - it was so tempting
Scott - Thanks for the offer! You may be able to help me with one thing if the XR2i 16v is still there? I'll send you a PM
Thanks paradox, the updates certainly will come
Joe - I'm not changing my mind now
And yep, if I need a hand I know where you are... except neither of us will have a working car at the time - Smo
- Elite Post Master
- Posts: 8658
- Joined: Sun Dec 29, 2002 12:33 am
- Location: My indecisive mind, in Thanet, Kent.
Car: 1990 Ford Fiesta Popular Plus
![]() by Percy! on Tue Aug 15, 2006 12:39 pm
by Percy! on Tue Aug 15, 2006 12:39 pm
Good to see someone doing it to a lower spec model as most people are just lazy and use the Si to start with (nothing wrong with that).
Will be following this and will help with anything I can as I took mine apart (and put it back together) several times, also mine is still being broke so if you need anything give me a shout.

- Percy!
- Elite Post Master
- Posts: 3354
- Joined: Tue Jun 17, 2003 7:20 pm
- Location: Manchester
- Your car: Citreon
![]() by Smo on Tue Aug 15, 2006 12:49 pm
by Smo on Tue Aug 15, 2006 12:49 pm
Someone else has replied to my wanted post, but I'm after the inertia switch and any associated bracket/bolts/screws that may come with it, along with the two bolts/studs that the mid section bracket is attached too - the two same bolts/studs also make up the 2 of the 4 bolts that hold the driver's side of the beam up. Do you have these?
I'm also after the fuel filter bracket and the nuts that holds it to the inner wing.
Reckon you can do any of that? Ideally I'm after them before the end of the week if you can!
Let me know
- Smo
- Elite Post Master
- Posts: 8658
- Joined: Sun Dec 29, 2002 12:33 am
- Location: My indecisive mind, in Thanet, Kent.
Car: 1990 Ford Fiesta Popular Plus
![]() by bakewell001 on Tue Aug 15, 2006 2:02 pm
by bakewell001 on Tue Aug 15, 2006 2:02 pm
Only cause i want to help too, and ill have a working car at the time
- bakewell001
- Elite Post Master
- Posts: 2442
- Joined: Thu Feb 10, 2005 8:54 pm
- Location: Margate, Kent
![]() by Smo on Tue Aug 15, 2006 2:08 pm
by Smo on Tue Aug 15, 2006 2:08 pm
bakewell001 :DO IT DO IT DO IT!
Only cause i want to help too, and ill have a working car at the time
Hmm... Think I'm changing my mind again, wanna buy all my.....
You know I'm joking
- Smo
- Elite Post Master
- Posts: 8658
- Joined: Sun Dec 29, 2002 12:33 am
- Location: My indecisive mind, in Thanet, Kent.
Car: 1990 Ford Fiesta Popular Plus
![]() by joe boy on Tue Aug 15, 2006 6:54 pm
by joe boy on Tue Aug 15, 2006 6:54 pm
bakewell001 :DO IT DO IT DO IT!
Only cause i want to help too, and ill have a working car at the time
were sorted then smo, we can do the motor and we got a Bic™ to fetch the maccyd's in his working car!!!!!
- joe boy
- Post Master
- Posts: 734
- Joined: Tue Mar 07, 2006 11:45 pm
- Location: The Bay

![]() by Smo on Wed Aug 16, 2006 11:24 pm
by Smo on Wed Aug 16, 2006 11:24 pm
~joeboifiesta~ :bakewell001 :DO IT DO IT DO IT!
Only cause i want to help too, and ill have a working car at the time
were sorted then smo, we can do the motor and we got a Bic™ to fetch the maccyd's in his working car!!!!!
Haha, well I've managed to sort something good out with the insurance company now so I'm covered on my new policy to drive the car with the 1.1 up until the engine change which is now going to be the bank holiday weekend, and then my insurance will change over to cover me for that
Cheers thorny
Ok, only a really tiny update of a couple more bits collected.
When I got my engine, I only had the main bolts for the manifold to downpipe, and some rusty clips, so ordered some new clips, springs and nuts from Ford on Friday and got them yesterday:

Also, as much as I reckon I could probably make it work with my current one, I decided to get a new throttle cable for an XR2i 16v:

And lastly - pretty vital to any engine and gearbox, oil!

Not sure if I'll use the engine oil long term yet, but it'll do me to get it all up and running
Just trying to get an inertia switch now, some mid section bracket studs/bolts, a fuel filter bracket and an ECU bracket. I don't think there's anything else I need other than some RS2000 front brakes, about a million hose clips, some fuel hose and some random nuts and bolts
Not long now...
Cheers
- Smo
- Elite Post Master
- Posts: 8658
- Joined: Sun Dec 29, 2002 12:33 am
- Location: My indecisive mind, in Thanet, Kent.
Car: 1990 Ford Fiesta Popular Plus
- Max M4X WW
- Elite Post Master
- Posts: 18161
- Joined: Sun Jun 22, 2003 9:52 pm
- Location: Hampshire
- Your car: Merc CL500
Car: 2014 BMW M135i
![]() by Capri on Thu Aug 17, 2006 8:38 am
by Capri on Thu Aug 17, 2006 8:38 am
- Capri
- Elite Post Master

- Posts: 13015
- Joined: Sun Dec 09, 2001 12:00 am
- Location: Tunbridge Wells
- Your car: 1989 Citroen BX GTi 16v
![]() by Smo on Thu Aug 17, 2006 8:53 am
by Smo on Thu Aug 17, 2006 8:53 am
Max M4X WW :5w30 killed my crank seal
Thanks for that!
Thanks Alex, although you've killed my page width with that "ooooh"
- Smo
- Elite Post Master
- Posts: 8658
- Joined: Sun Dec 29, 2002 12:33 am
- Location: My indecisive mind, in Thanet, Kent.
Car: 1990 Ford Fiesta Popular Plus
![]() by chris-fiesta on Thu Aug 17, 2006 10:36 am
by chris-fiesta on Thu Aug 17, 2006 10:36 am
Smo :Max M4X WW :5w30 killed my crank seal
Thanks for that!Hopefully mine will last a little while, although I am tempted to buy myself an engine crane/hoist over the weekend now as it'll save a lot of hassle if I do need to get the engine out again in a hurry
Thanks Alex, although you've killed my page width with that "ooooh"
xactly what i did m8, was fed up of ppl promising me to lend me an engine stand and hoist and them neve coming through!! but both will cost you around the 200 mark and im sure you can spend that money elsewhere on the engine
make sure you use this time aswell to spray the bay and get it all nice and mint
- chris-fiesta
- Elite Post Master
- Posts: 3422
- Joined: Tue Jun 22, 2004 11:58 am
- Location: croydon, london Drives: 2.0 16v mk3
![]() by Smo on Thu Aug 17, 2006 11:20 am
by Smo on Thu Aug 17, 2006 11:20 am
We'll see though
And I'm not too fussed about paying out for a crane because I can use it for any other work I need to do... Plus £200 will be probably be relatively nothing compared to what'll get spent on it
- Smo
- Elite Post Master
- Posts: 8658
- Joined: Sun Dec 29, 2002 12:33 am
- Location: My indecisive mind, in Thanet, Kent.
Car: 1990 Ford Fiesta Popular Plus
![]() by fiestamodder123 on Thu Aug 17, 2006 11:31 am
by fiestamodder123 on Thu Aug 17, 2006 11:31 am
Gav
- fiestamodder123
- Post Master
- Posts: 603
- Joined: Sun Apr 02, 2006 3:09 pm
- Location: Mauchline (not the end of the world but you can see it from here)
![]() by Jay on Thu Aug 17, 2006 11:34 am
by Jay on Thu Aug 17, 2006 11:34 am
Comma oil is quite good..
Might as well of bought halfords branded though as that is manufactured by comma for halfords
Probably cheaper aswell

Formerly Jay246
- Jay
- Elite Post Master
- Posts: 2599
- Joined: Fri May 27, 2005 6:07 pm
- Location: Birmingham
Car: 1992 Ford Fiesta RS 1800
![]() by Smo on Thu Aug 17, 2006 12:30 pm
by Smo on Thu Aug 17, 2006 12:30 pm
fiestamodder123 :nice mate coming along well now ,do you mind if i ask what the part numbers are for the downpipe studds nyts and springs and how much they cost you ,oh and still no luck on getting you the studs foe the centre section ,my 2i 16v has not got themso it looks like i will be needing a set myself as well.
Gav
Odd, did it have nothing at all to hold the mid section up? Or is it that they've been removed?
I tried to take a photo of parts with the part numbers, but in case they're not that clear:
Nuts - 6704665
Springs - 6678581
Clips - On the bag (6678518) - On the sheet (6701093) - I think this explains why there was a 'conquering device' up and some random parts came in!
I can't give you a definite code on the studs, as I had them already, however I believe it may be 6701066. There are also some other clips (that you can see wrapped around the studs), which again I didn't order, but if you need them, try your luck with 6839364
Jay246 :Looking good!
Comma oil is quite good..
Might as well of bought halfords branded though as that is manufactured by comma for halfords
Probably cheaper aswell
I should have waited a couple of days, that's for sure, as dad got a trade card yesterday
- Smo
- Elite Post Master
- Posts: 8658
- Joined: Sun Dec 29, 2002 12:33 am
- Location: My indecisive mind, in Thanet, Kent.
Car: 1990 Ford Fiesta Popular Plus
- XRMike
- Elite Post Master
- Posts: 2488
- Joined: Thu Jun 09, 2005 6:05 pm
- Location: North Wales Party's: All the time
Car: 1991 Ford Fiesta RS Turbo

![]() by Smo on Thu Aug 17, 2006 7:37 pm
by Smo on Thu Aug 17, 2006 7:37 pm
javablu :Thought you were going to get a turbo dearheart?
I know, I was so close! But a few things seemed to change my mind, and so I'm doing mine now whatever
- Smo
- Elite Post Master
- Posts: 8658
- Joined: Sun Dec 29, 2002 12:33 am
- Location: My indecisive mind, in Thanet, Kent.
Car: 1990 Ford Fiesta Popular Plus
![]() by Smo on Fri Aug 18, 2006 1:40 am
by Smo on Fri Aug 18, 2006 1:40 am
~joeboifiesta~ :i wana see this bad boy in action against some nobber in his nova at the lights
lol, I don't know about that, but it'd be nice to surprise a few people
We'll see though, this is just the start of it all
- Smo
- Elite Post Master
- Posts: 8658
- Joined: Sun Dec 29, 2002 12:33 am
- Location: My indecisive mind, in Thanet, Kent.
Car: 1990 Ford Fiesta Popular Plus
![]() by Smo on Fri Aug 18, 2006 4:19 pm
by Smo on Fri Aug 18, 2006 4:19 pm

Yep, actually did some work on this yesterday instead of just collecting more parts! I didn't know the history of the cam belt or water pump, so decided to replace them - both bought a few months back, but don't think I mentioned them in my first post...
So, one shiny new water pump and gasket:

(I think I need a new toothbrush...)

One genuine Ford cam belt kit, however I realised yesterday one of the idlers was missing, but for what I paid I can't complain:

So never having done this before, I decided to get it done a good week before putting the engine in as I didn't want to get caught out with any problems - and as you'll see further down, it's exactly what happened!
One engine:

Anyone else ever noticed how parts look so much rustier than they really are in photos?
One cam cover removed so I could see the end of the cams and lock them:

I already had the top and middle cam belt covers off, although I can't remember for what reason
Got on and removed the water pump pulley bolts and the pulley:


I then rotated the crank pulley round to TDC, although as this rotates twice for every one rotation of each cam, I had to rotate it once again to get the offset cam slots above the head surface to lock them:

I'm embarrassed at the 'tool' (for want of a better description) I used to lock the cams so I'll omit the close up photo
Proud of my acheivement so far, I treated myself to a very cold glass of orange squash:

... and even my cat was impressed:

Next up, I locked the flywheel and undone the crank pulley bolt to remove the crank pulley (necessary to get the lower cam belt cover and cam belt off):

Even though I knew it was right, I just double checked the part numbers before disabling my engine completely

Old tensioner, which I loosened to remove the tension from the belt and allow me to get the belt off:

... and then eased the belt off, and removed the tensioner (as I was replacing it):

This then allowed me to remove old water pump:

Ahhh, big hole in the engine

The old pump had a bit of play in it, so I'm not sure how long it would have lasted, but my new one has none so I'm hoping that's a good sign
Gave the surface where the gasket sits a good clean up and then greased the gasket (really wasn't sure how much or how little I should have done, but hopefully it's ok!) and then put it in place:

New pump then went on, and torqued the bolts up:

Idlers refitted:

One new, one I had to reuse, but it appeared to be fine. All new bolts though.
New tensioner, spring and tensioner bolt on, and then the belt:

(Poor excuse for a cam locking tool in sight
Temporarily fitted the crank pulley and gave it a few rotations and everything was spot on! Saved messing about with the pulleys
Took the pulley back off, refitted the lower cam belt cover and then refitted the crank pulley.
Next was to refit the water pump pulley, but one of the bolts decided to snap on me AHHHHHHHHHHHHHHH. No pics, but fortunately, the snapped end had come out the other side enough to screw it out by hand... So ordered 4 new bolts today and will have them tomorrow
With that done, I refitted the cam cover, hoping that's the last time I have to open it for a while
Was getting late now, but while I was at it, I decided to remove the old Orion/Escort rear mount (as seen in the earlier engine pic and shown below again):
Old mount and bracket (left) and new Fiesta mount and bracket (right):

Bracket mountings:

As you can see, there's 4 holes there. The 3 clean ones are the ones used by the Escort/Orion bracket, however the Fiesta bracket uses the lower left one as opposed to the upper right one:


The actual mount will be bolted to the body first, and then the two holes in the bracket will be used to bolt the mount to the bracket once the engine is in place
And that's that for now... Only other news was a quick trip to Ford to order the water pump pulley bolts, an alternator nut and bolt, an o-ring for the dip stick tube (although I'm not sure if it's needed or not yet, but mine doesn't seem very well sealed) and a sump plug and washer (which they actually had in stock - only thing so far

Simon
- Smo
- Elite Post Master
- Posts: 8658
- Joined: Sun Dec 29, 2002 12:33 am
- Location: My indecisive mind, in Thanet, Kent.
Car: 1990 Ford Fiesta Popular Plus
![]() by Rhinopower on Fri Aug 18, 2006 5:04 pm
by Rhinopower on Fri Aug 18, 2006 5:04 pm
did you replace the rocker cover gasket?
MotorcyclesFish :The thing is if I caught Brian fudgekin a bloke, I wouldn't think 'oh Brian's a gay', I'd think 'Brian that fudgekin weird haired mongoloid is raping a gay to see if anyone finds it funny'
- Rhinopower
- Elite Post Master
- Posts: 6466
- Joined: Wed Oct 08, 2003 9:41 am
- Your car: Volvo FH330
Car: 1983 Ford Escort
![]() by Smo on Fri Aug 18, 2006 5:12 pm
by Smo on Fri Aug 18, 2006 5:12 pm
Rhinopower :i usually use a VHT instant gasket when fitting a waterpump to seal it up a lot better, nicely done though mate:)
did you replace the rocker cover gasket?
No, admittedly I didn't
I did wonder about the gasket on the water pump, but a couple of people said to use grease, so I thought I'd trust them - don't start making me worry
- Smo
- Elite Post Master
- Posts: 8658
- Joined: Sun Dec 29, 2002 12:33 am
- Location: My indecisive mind, in Thanet, Kent.
Car: 1990 Ford Fiesta Popular Plus