MWSTEWART | 500+ BHP Project | 10/04/2024
Re: MWSTEWART | 500+ BHP Project | T6 05/03/2016
![]() by Excursion on Tue Jan 29, 2019 12:01 am
by Excursion on Tue Jan 29, 2019 12:01 am
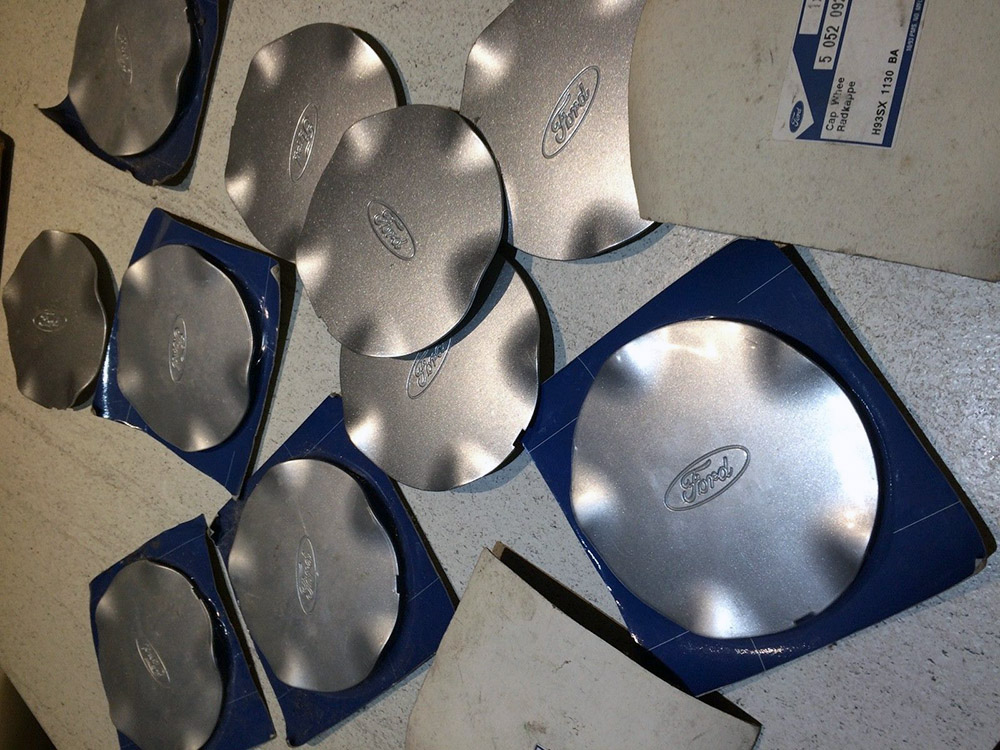
I found a set of the rare RS centre caps on eBay so I now have two sets from which I can make one really good set, and have a couple spare.

The body kit is sprayed and ready to fit so that will be the next task. No further movement until around May because I have other things to finish on the 430 ready for our wedding in June.

- Excursion
- Bulletin Board User


- Posts: 15265
- Joined: Thu Jan 01, 1970 1:00 am
- Location: Skynet
- Your car: Ford Fiesta
Car: 1990 Ford Fiesta XR2i
Re: MWSTEWART | 500+ BHP Project | T6 05/03/2016
![]() by Excursion on Tue Jan 29, 2019 12:01 am
by Excursion on Tue Jan 29, 2019 12:01 am
Crankshaft and Engine Build
Today I've been in conversation with Ian with regards a plan for completion of the engine, and I'm going to visit him next weekend to go over it. The bespoke crankshaft came up in conversation and the topic of dynamic balancing and lightening; I've never been particularly happy with the weight of the new crank and always planned to have it optimised then the machined areas re-nitrided. I had a flick through the IKE website and noticed that Ike has changed the design of the crank with the new ones seeming to have a lot more weight reduction machining than mine - compare the photos below
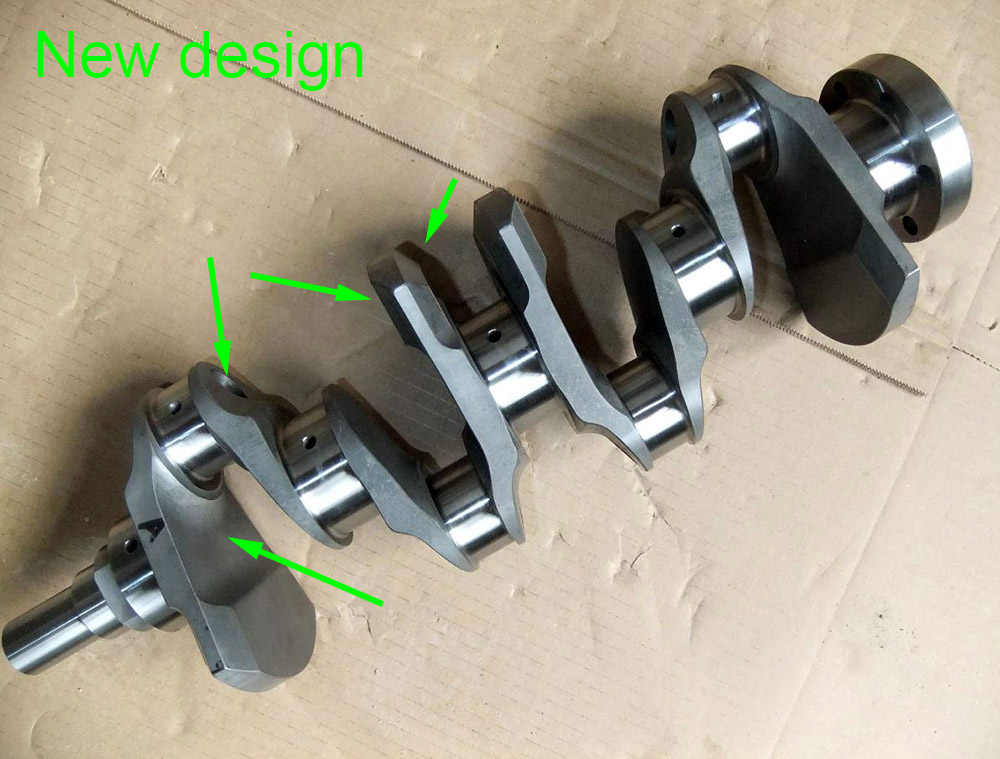
I've fired off a mail to see what was behind the change and if there's anything I need to be aware of. I also spotted a 99mm stroke crank is on offer (mine is 95mm for 2.2)...it may be a step too far for what I want but I'll seek Ian's opinion.
Clutch
I've found a clutch. This was a bit of a sticking point because the usual route for the MTX75 above ~350ft/lb dictates the use of either a Helix or AP Raching sintered paddle clutch, and I really didn't want that having years ago gone that route in another car build. I mentioned in my last update that the later TVRs used an AP Racing twin plate organic clutch with the Ford output shaft size/spline configuration so I sent out a few enquiries with regards torque capacity but alas, no answers received so I started looking elsewhere.
In the end I found what appears to the the perfect solution: TTV produce a twin plate organic clutch rated at 550 lb/ft and an adapter flywheel specifically for the Mk1 Focus RS (the gearbox I'm using). These are reasonably new to the market, so that and given I haven't been close to the Ford scene for a while means I don't know of anyone using them. I was in conversation with Ian today with regards starting the engine build again, and he happens to know the owners and will have a chat with them.
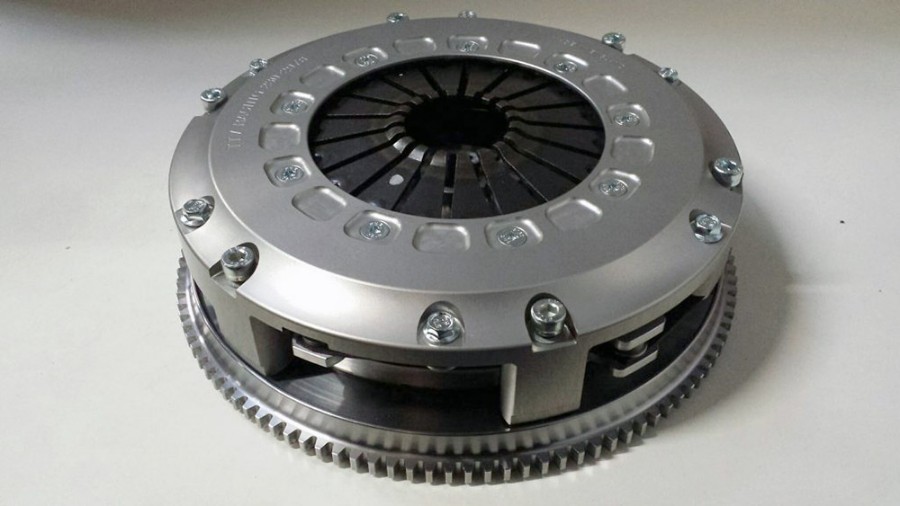
The only consideration is the price: they are more than the expensive (twin plate) clutch in the 430.
Wheels
I've decided to go with the (rare) 7J ET35 Mondeo option wheels. I did buy a set of these earlier on in the project knowing that I always liked them:
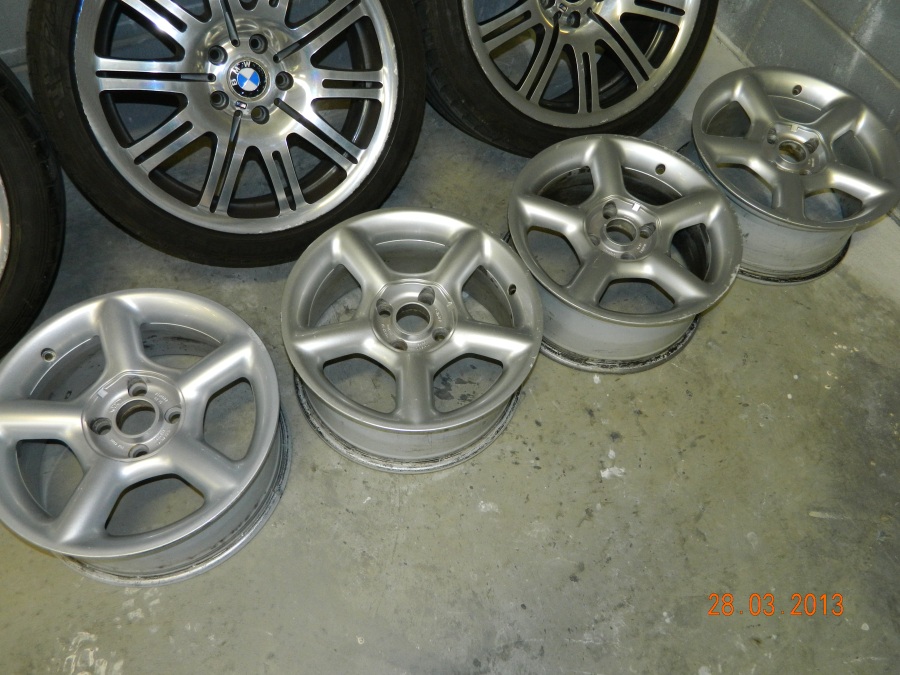
Unfortunately one of those is buckled and I'm not particularly keen on having it repaired, so I managed to find a straight replacement which is now on its way
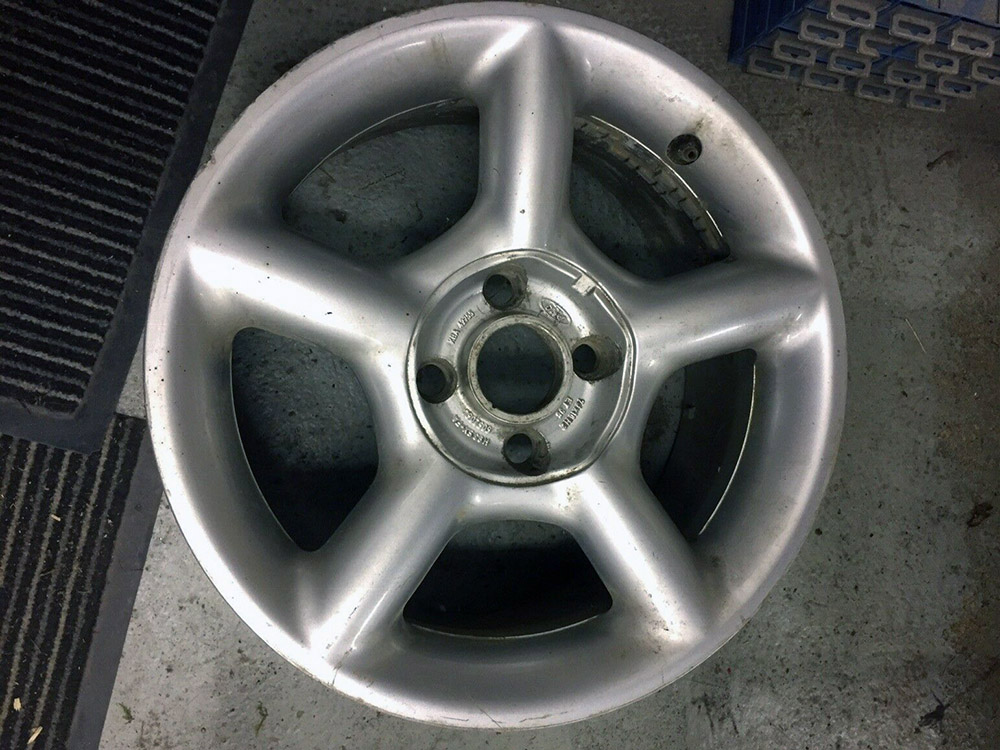
I also purchased one brand new centre cap. Next week I'm going to send the wheels for a blast and good refurb i.e. fine media blast, powder undercoat, powder colour, and paint/lacquer finish -I'll supply one new centre cap so the re-furbishers can match the exact original factory colour.
PetrolTank
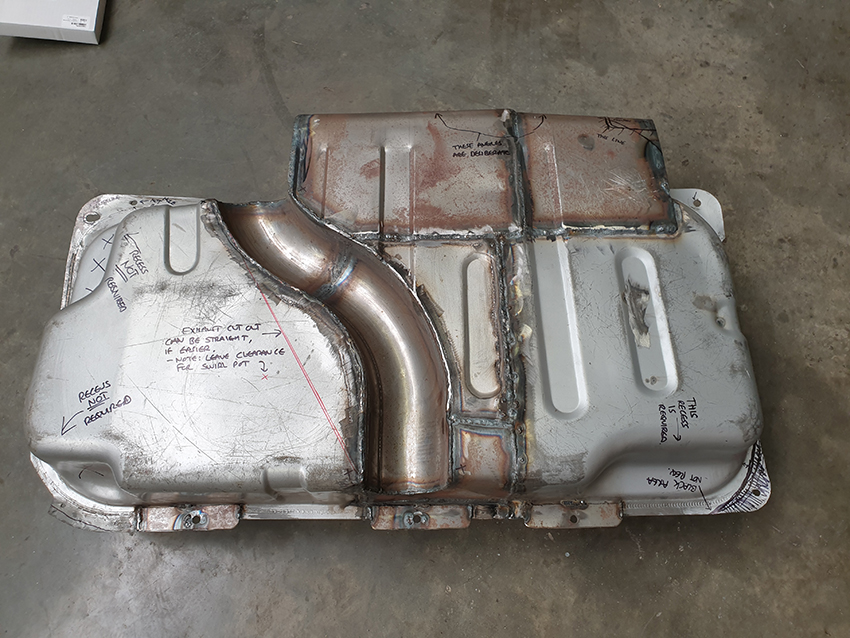
I have a friend building a high spec Mk4 Escort RST who would like my WRC Inconel manifold for his build, which is based on a largely WRC spec Zetec. I happen to be taking a different route with the exhaust manifold on my car so it is surplus to requirements. He happens to be a motorsport alloy fabricator for a well-respected company so today we agreed exchange of the manifold for a neatened up alloy version of the mock-up tank I have made. The plan is for two Bosch 044 pumps in the tank, mounted within two collector 'cubes' to prevent surge, in addition to internal baffling. The exhaust cut out will be a diagonal in order to simply the fabrication.
I'll send off my mock-up tank next week.
- Excursion
- Bulletin Board User
- Posts: 15265
- Joined: Thu Jan 01, 1970 1:00 am
- Location: Skynet
- Your car: Ford Fiesta
Car: 1990 Ford Fiesta XR2i
Re: MWSTEWART | 500+ BHP Project | 28/01/2019
![]() by Joris on Tue Feb 26, 2019 5:21 pm
by Joris on Tue Feb 26, 2019 5:21 pm
- Joris
- Elite Post Master
- Posts: 1540
- Joined: Thu Jan 01, 1970 1:00 am
- Location: Belgium
Re: MWSTEWART | 500+ BHP Project | 28/01/2019
![]() by luke_mk3_st on Wed Sep 29, 2021 8:02 pm
by luke_mk3_st on Wed Sep 29, 2021 8:02 pm

- luke_mk3_st
- Elite Post Master
- Posts: 1347
- Joined: Sun Mar 02, 2008 12:17 am
- Location: in the garage building something special
Re: MWSTEWART | 500+ BHP Project | 28/01/2019
![]() by Excursion on Sat Jan 01, 2022 11:05 pm
by Excursion on Sat Jan 01, 2022 11:05 pm
- Excursion
- Bulletin Board User
- Posts: 15265
- Joined: Thu Jan 01, 1970 1:00 am
- Location: Skynet
- Your car: Ford Fiesta
Car: 1990 Ford Fiesta XR2i
Re: MWSTEWART | 500+ BHP Project | 28/01/2019
![]() by tin-ribs on Sat Jan 29, 2022 9:34 pm
by tin-ribs on Sat Jan 29, 2022 9:34 pm
Good to know you’re still at it, great project
- tin-ribs
- Poster

- Posts: 101
- Joined: Wed Mar 20, 2013 8:55 pm
- Your car: fiesta rst
Re: MWSTEWART | 500+ BHP Project | 28/01/2019
![]() by Excursion on Tue Apr 02, 2024 11:37 am
by Excursion on Tue Apr 02, 2024 11:37 am
- Excursion
- Bulletin Board User
- Posts: 15265
- Joined: Thu Jan 01, 1970 1:00 am
- Location: Skynet
- Your car: Ford Fiesta
Car: 1990 Ford Fiesta XR2i
Re: MWSTEWART | 500+ BHP Project | 28/01/2019
![]() by dontpannic on Tue Apr 02, 2024 12:52 pm
by dontpannic on Tue Apr 02, 2024 12:52 pm

- dontpannic
- Elite Post Master

- Posts: 7245
- Joined: Thu Mar 16, 2006 5:21 pm
- Location: Orpington, Kent
- Your car: Fiesta ST / Saxo VTS track car
Car: 2007 Ford Fiesta ST
Re: MWSTEWART | 500+ BHP Project | 28/01/2019
![]() by Excursion on Wed Apr 03, 2024 9:42 pm
by Excursion on Wed Apr 03, 2024 9:42 pm
- Excursion
- Bulletin Board User
- Posts: 15265
- Joined: Thu Jan 01, 1970 1:00 am
- Location: Skynet
- Your car: Ford Fiesta
Car: 1990 Ford Fiesta XR2i
Re: MWSTEWART | 500+ BHP Project | 28/01/2019
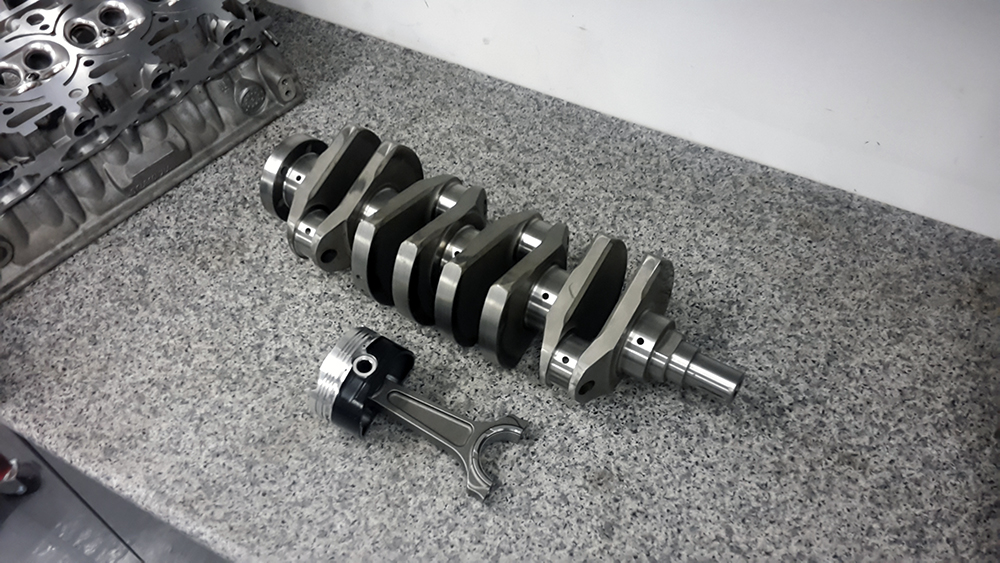
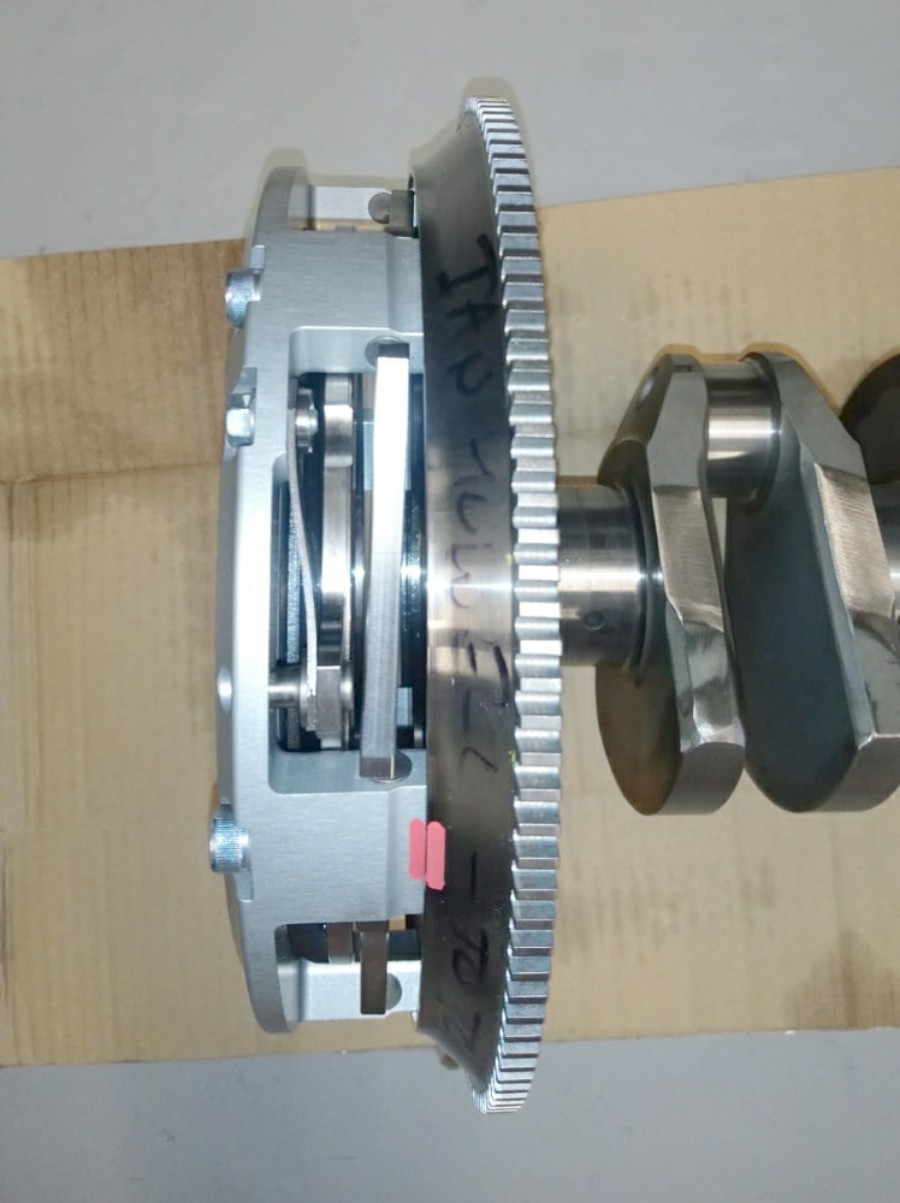
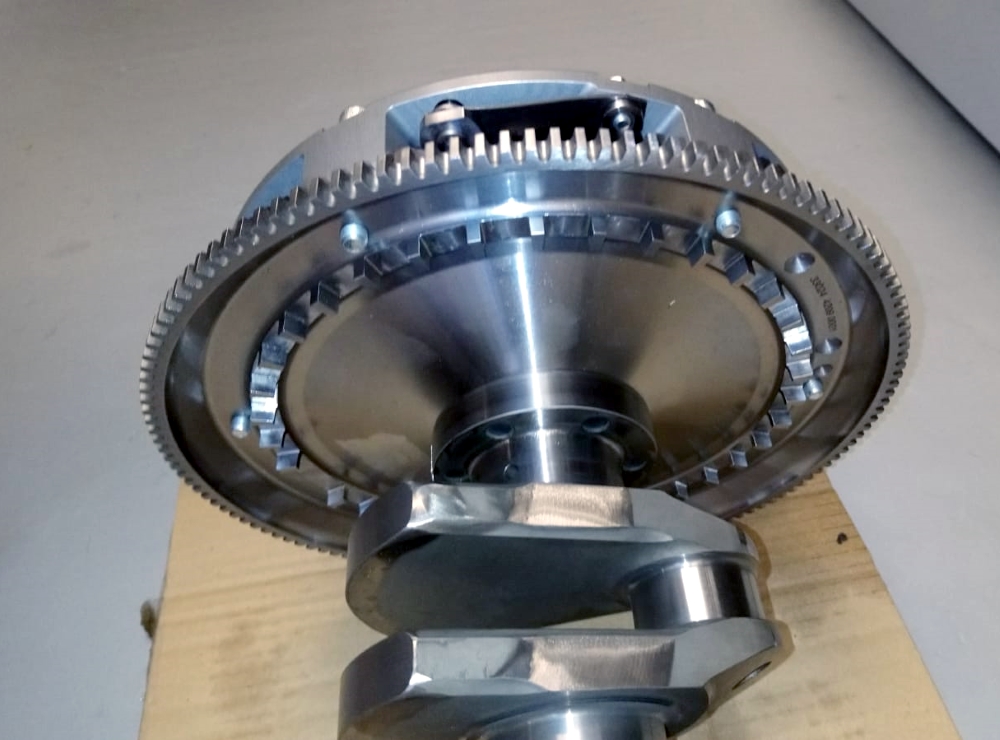
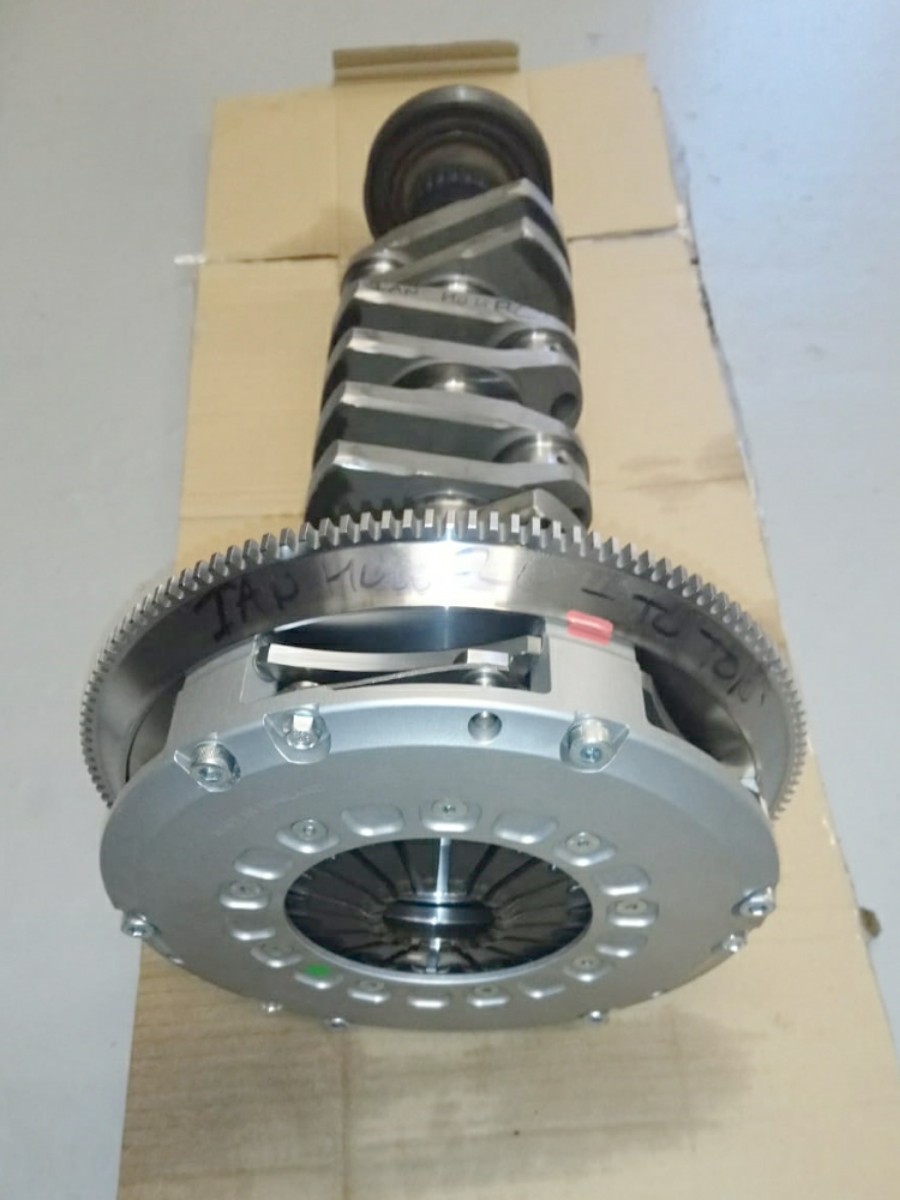
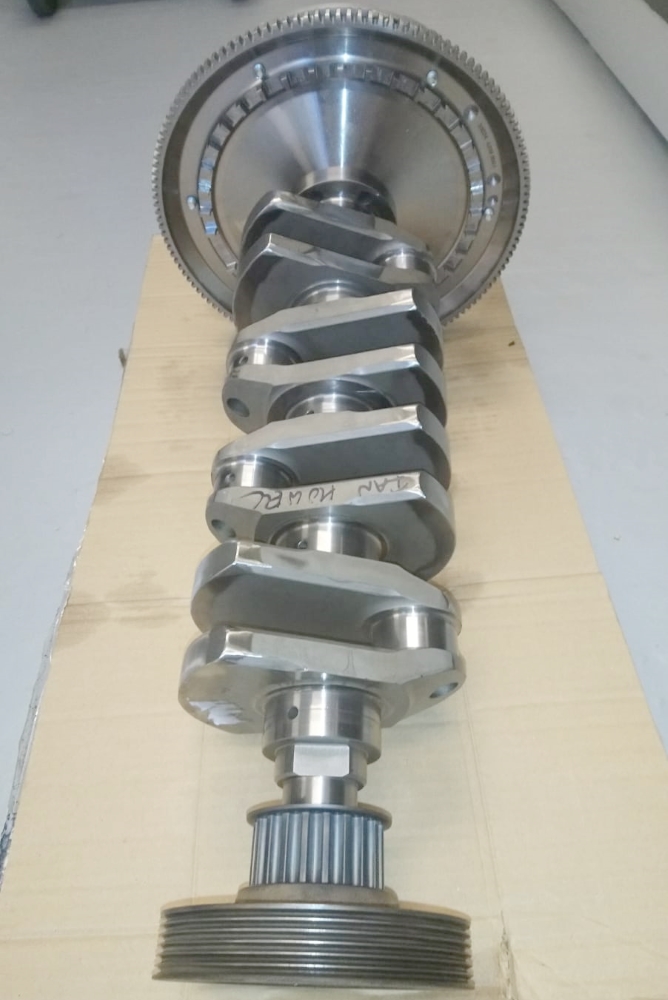
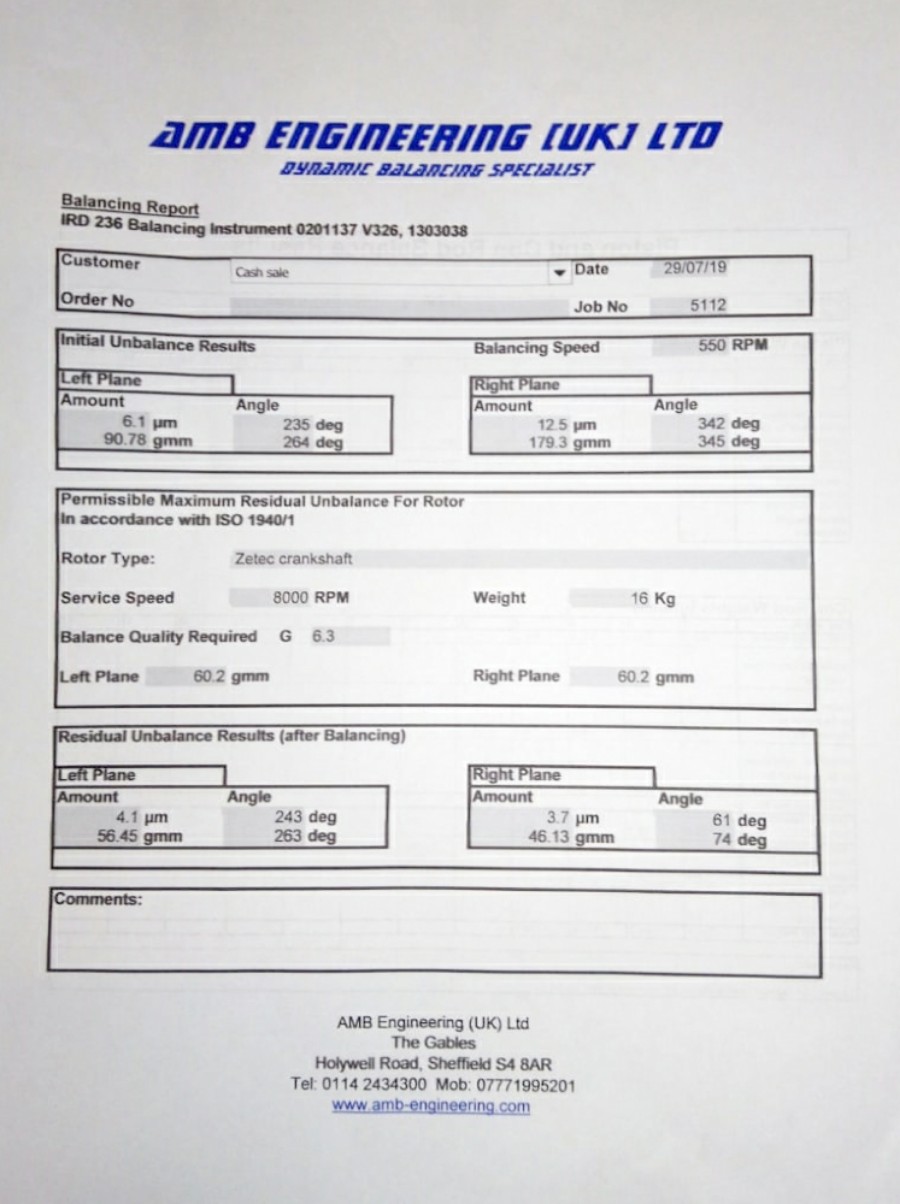
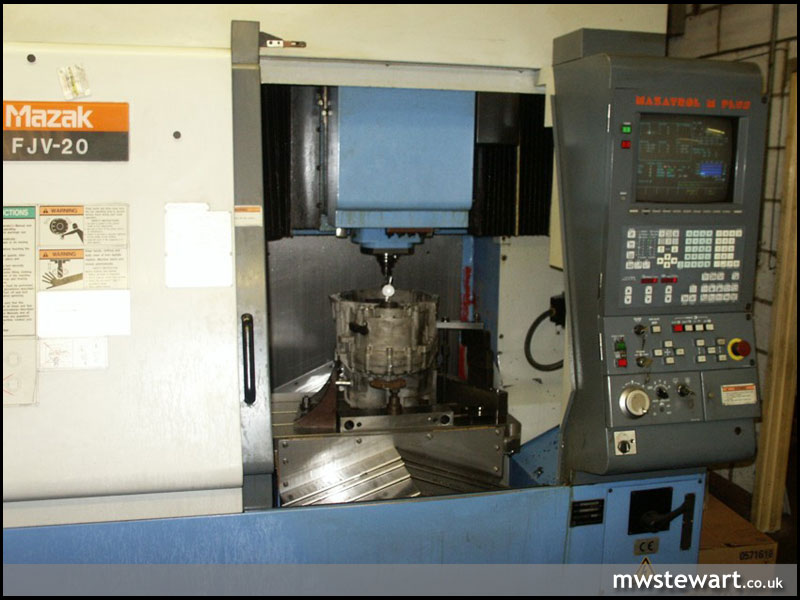
![]() by Excursion on Wed Apr 10, 2024 1:38 pm
by Excursion on Wed Apr 10, 2024 1:38 pm
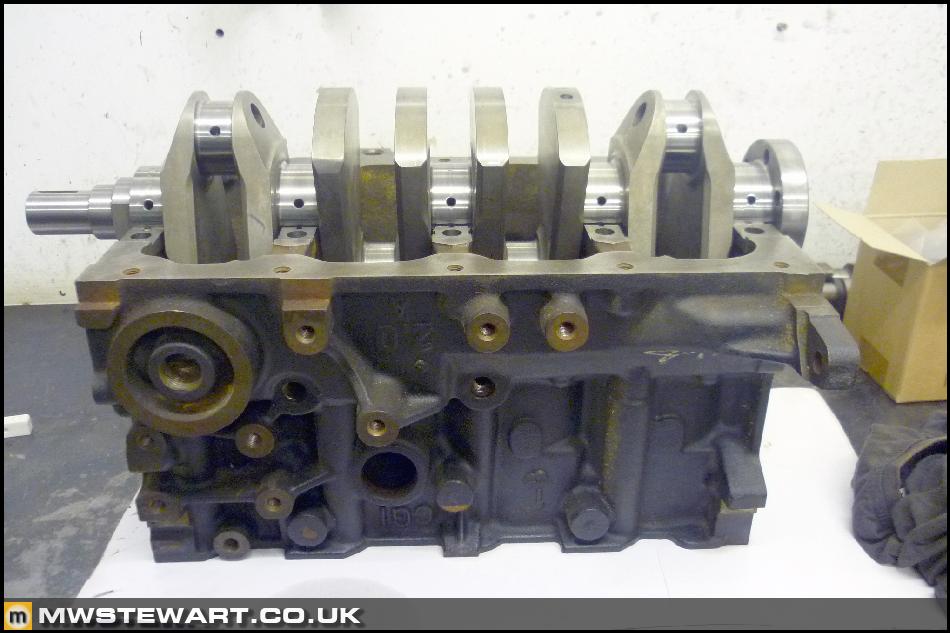
My crank, rod, and piston package. I'm sticking with it - the counterweights will be machined when sent for balancing.
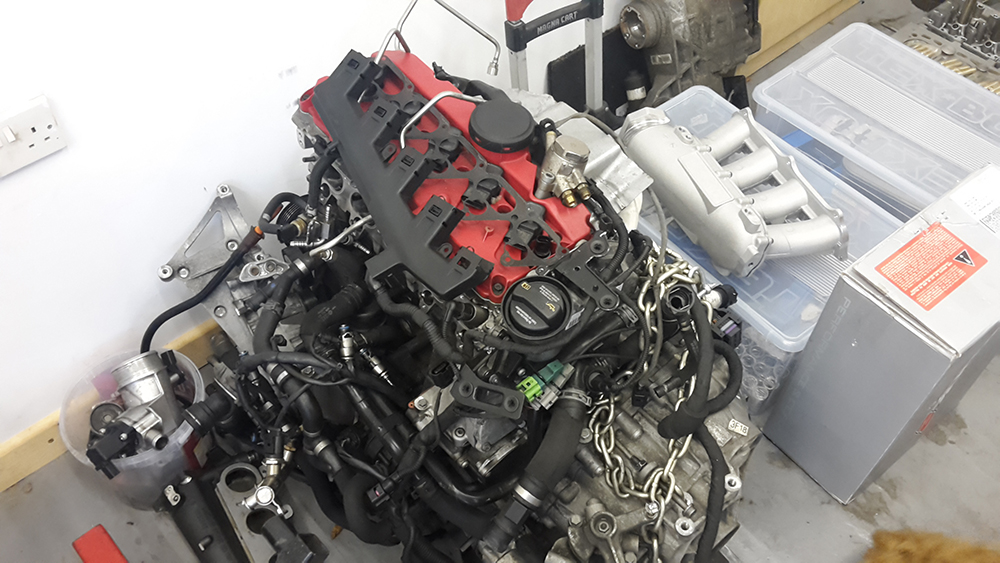
Ian's own 700+bhp TT RS engine.
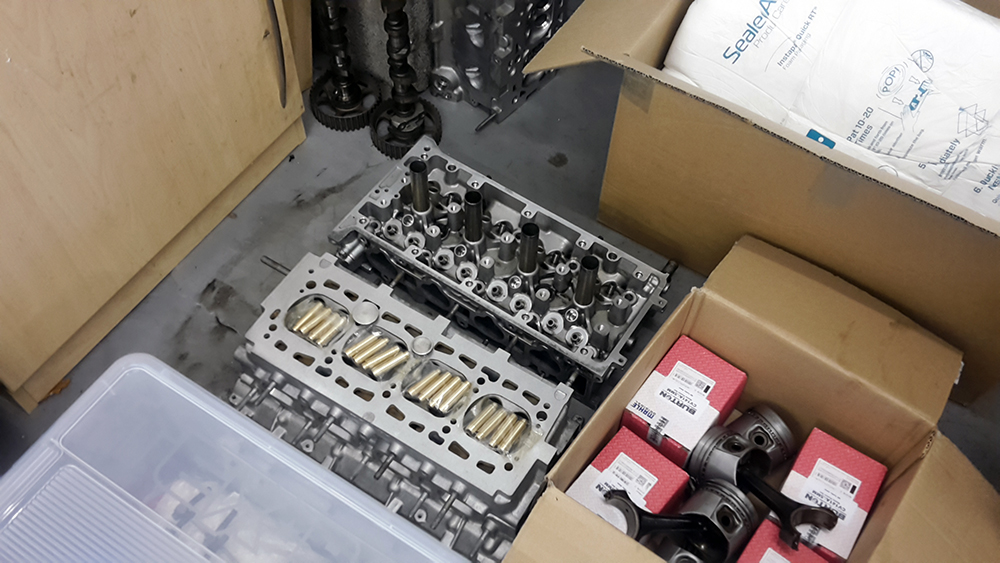
Lanica Delta Integrale engine (front) in for a rebuild, and a ~500bhp Honda VTEC build (back).
Zetec heads with oversize valves etc.
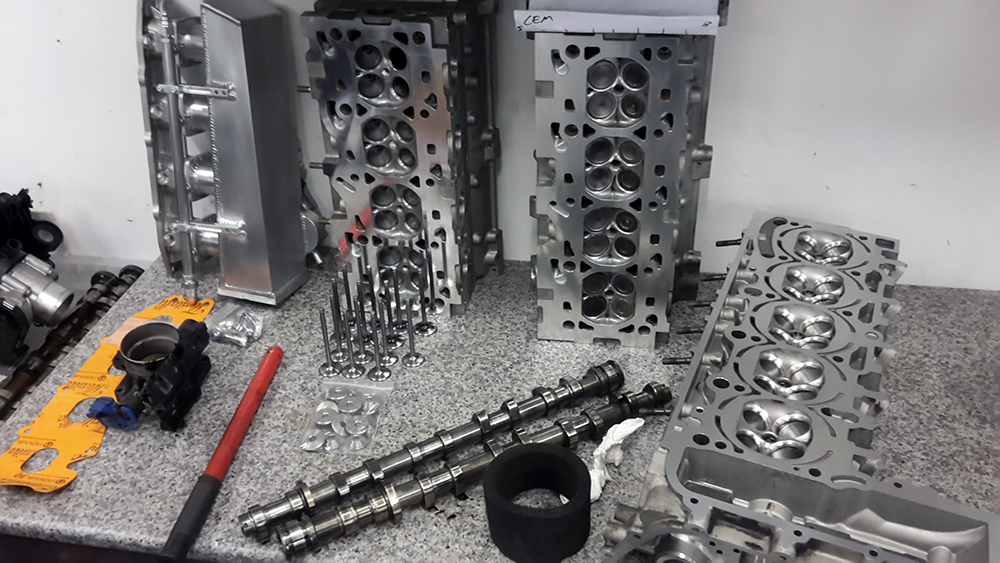
A new ~400 spec Zetec that's back in for a clean up (it has been stored by the customer in a damp environment since Ian built it.)

- Excursion
- Bulletin Board User
- Posts: 15265
- Joined: Thu Jan 01, 1970 1:00 am
- Location: Skynet
- Your car: Ford Fiesta
Car: 1990 Ford Fiesta XR2i
Re: MWSTEWART | 500+ BHP Project | 28/01/2019
![]() by Excursion on Wed Apr 10, 2024 1:39 pm
by Excursion on Wed Apr 10, 2024 1:39 pm

- Excursion
- Bulletin Board User
- Posts: 15265
- Joined: Thu Jan 01, 1970 1:00 am
- Location: Skynet
- Your car: Ford Fiesta
Car: 1990 Ford Fiesta XR2i
Re: MWSTEWART | 500+ BHP Project | 28/01/2019
![]() by Excursion on Wed Apr 10, 2024 1:39 pm
by Excursion on Wed Apr 10, 2024 1:39 pm
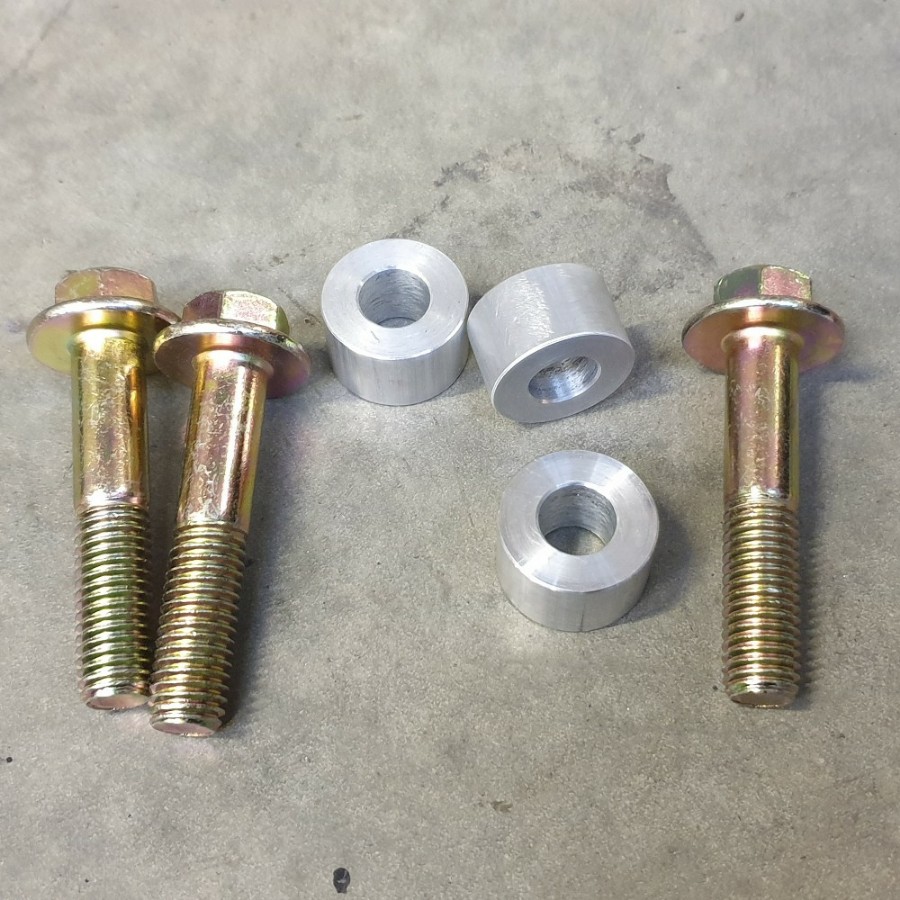
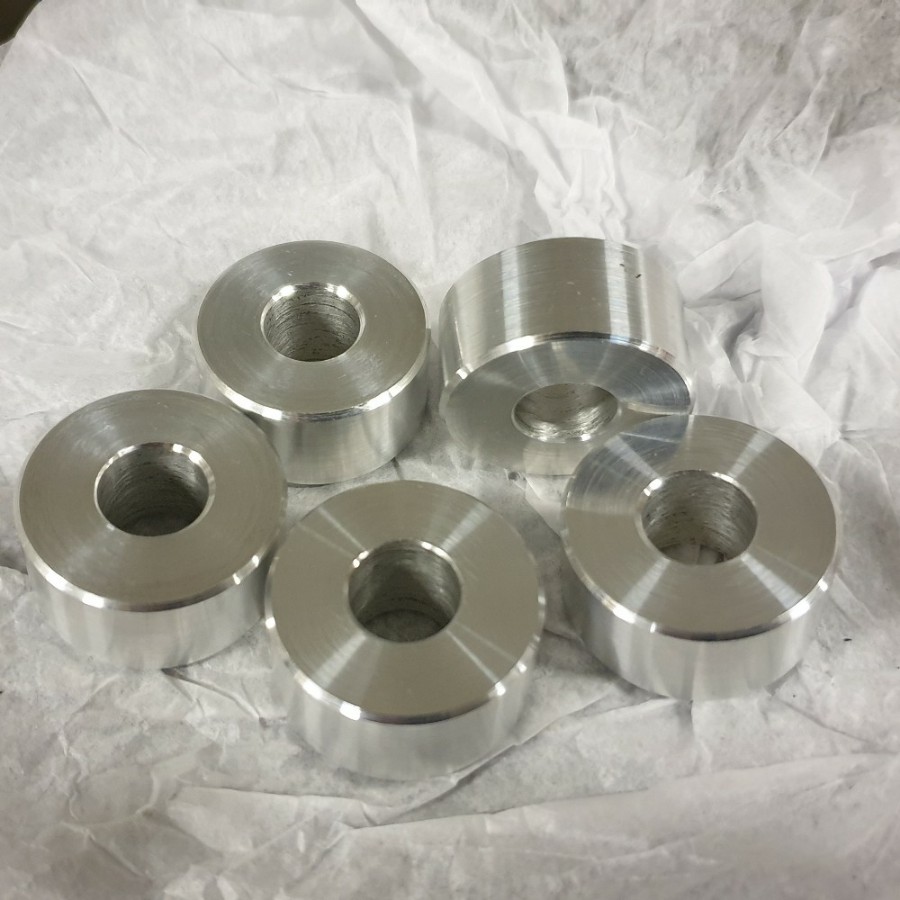
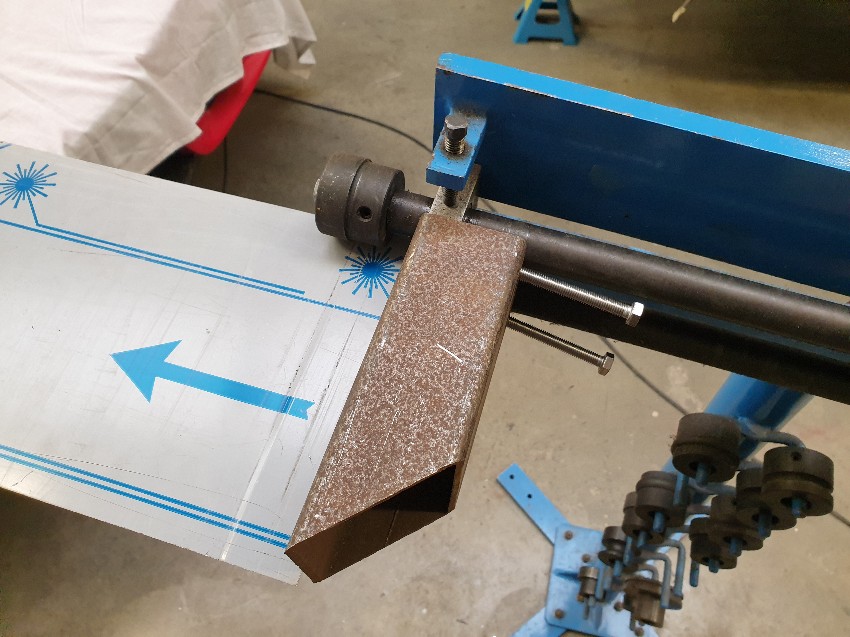
When I originally fabricated the engine mounts my measurements were based on the standard Mk3 positions, but because I'm no longer using the under-slung gearbox mounting cradle I realised that I can lower the engine a little bit.
The Focus mounts are easy to space so I've gone for 15mm. The gearbox mount spacers are 25mm diameter but I will swap for 30mm.
The sump is the lowest point but it is still above the chassis brace.
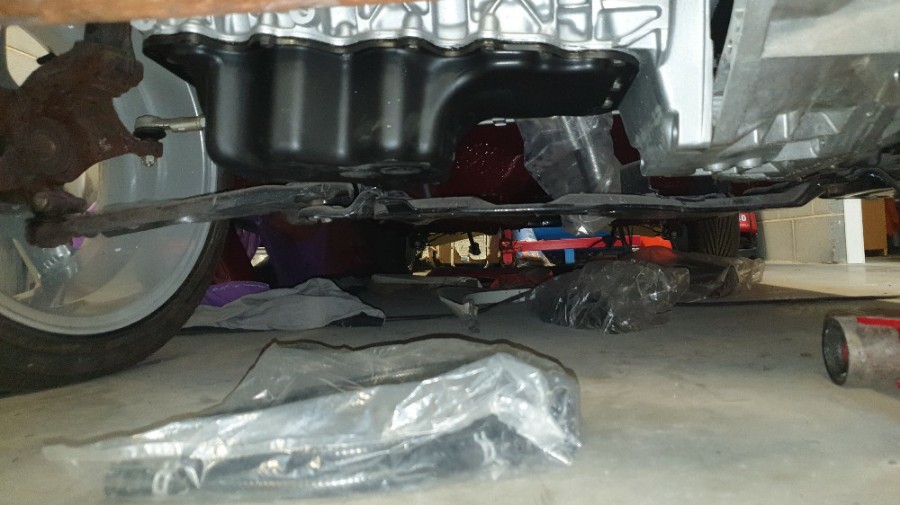
I now have the engine mount to space.
- Excursion
- Bulletin Board User
- Posts: 15265
- Joined: Thu Jan 01, 1970 1:00 am
- Location: Skynet
- Your car: Ford Fiesta
Car: 1990 Ford Fiesta XR2i
Re: MWSTEWART | 500+ BHP Project | 28/01/2019
![]() by Excursion on Wed Apr 10, 2024 1:40 pm
by Excursion on Wed Apr 10, 2024 1:40 pm
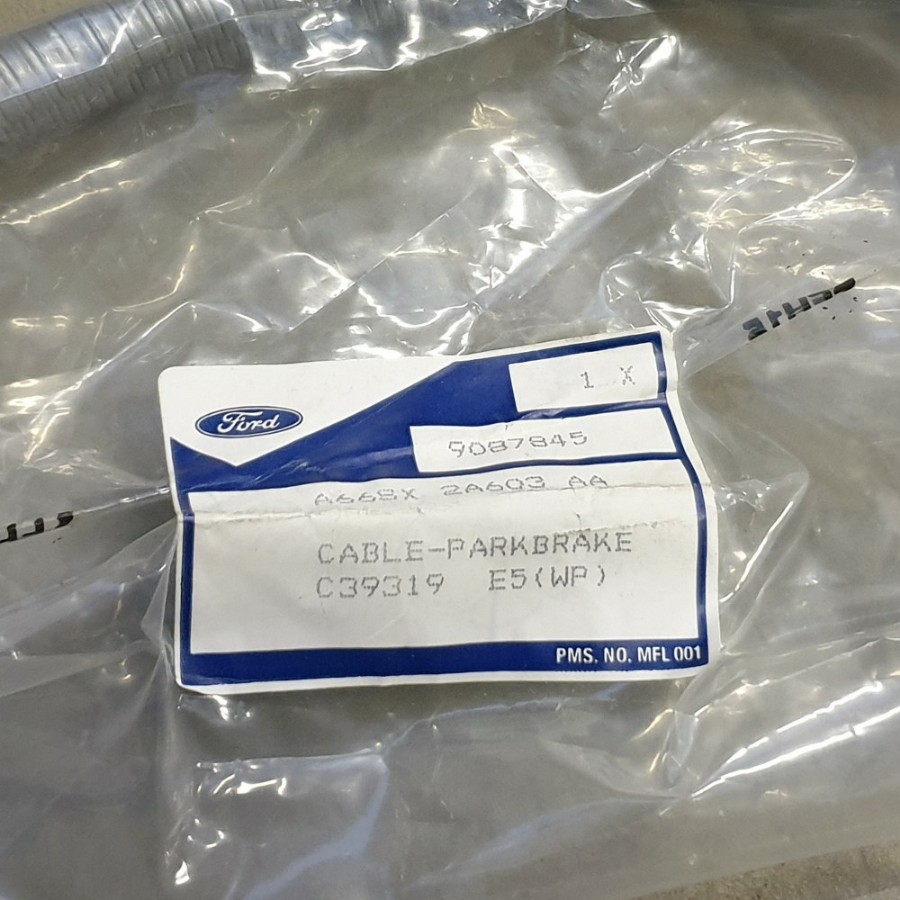
Next on to the handbrake cable, and I was pleased to find that I had a new Racing Puma cable in stock. These fit the Fiesta floor pan and suit the Lucas handbrake calipers for rear discs. I believe that this cable was discontinued a while ago.
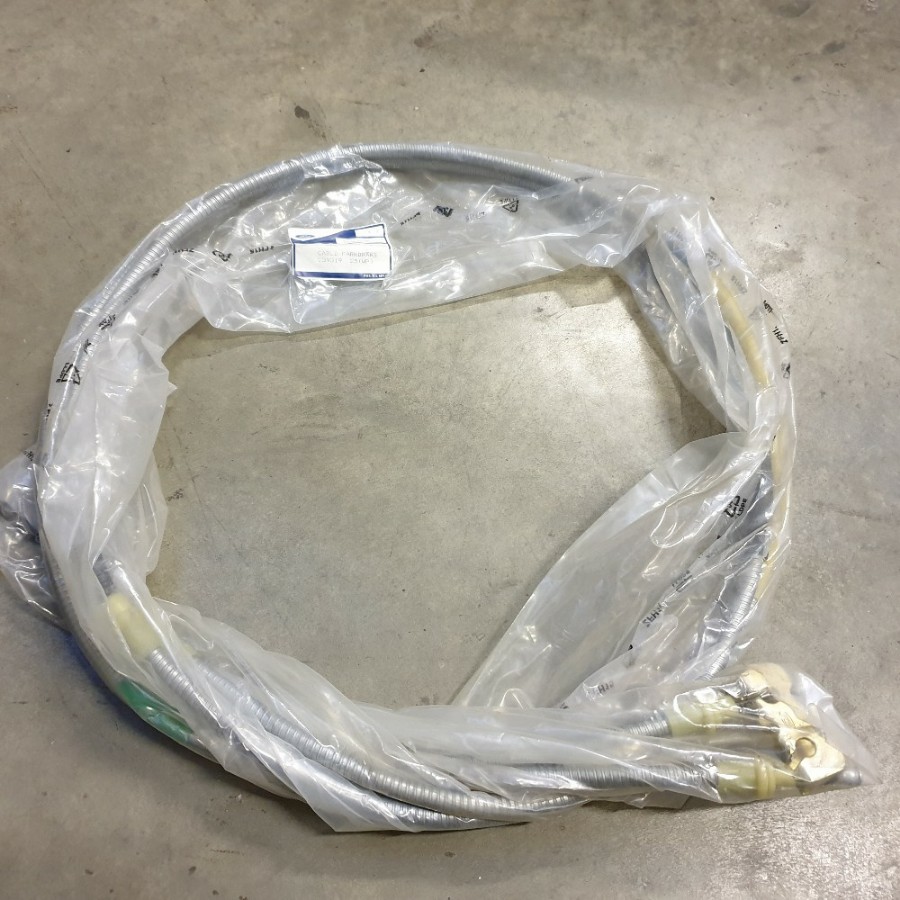
Ford buffs will be familiar with 909 prefixed part numbers which originated in Boreham and were assigned to motorsport or special build parts. For some reason around the time of the Racing Puma production a 908 prefix was introduced.
Cable fitted and gaiter in place. I missed a trick here by not having the handbrake and gear gaiter trimmed in the seat leather. I may send them away during lockdown.
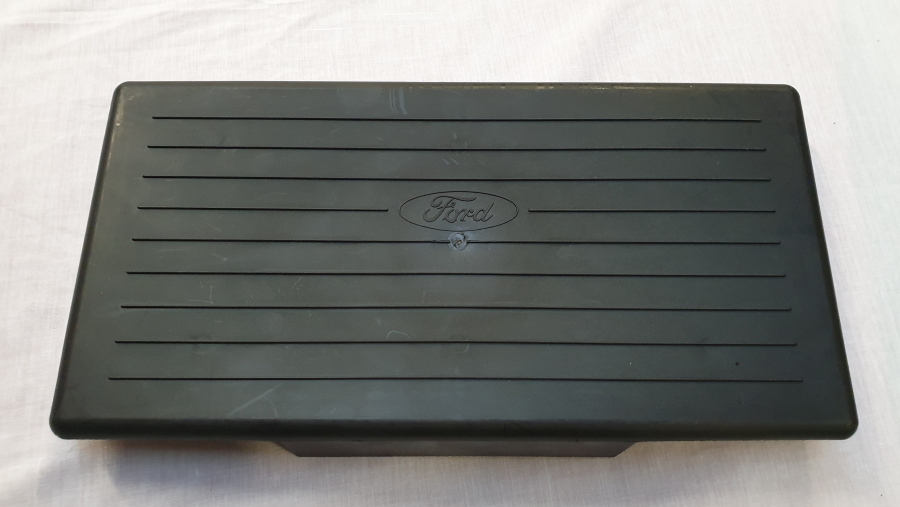
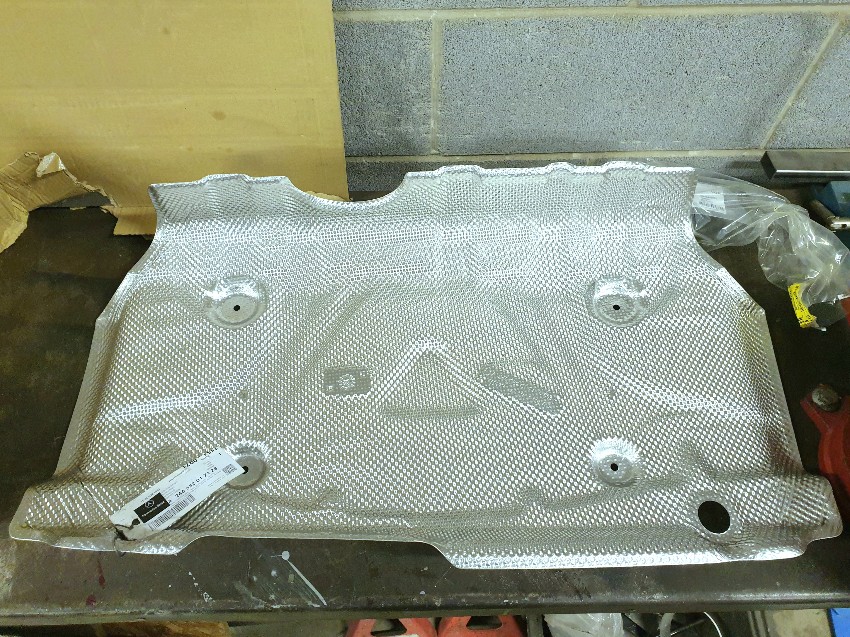
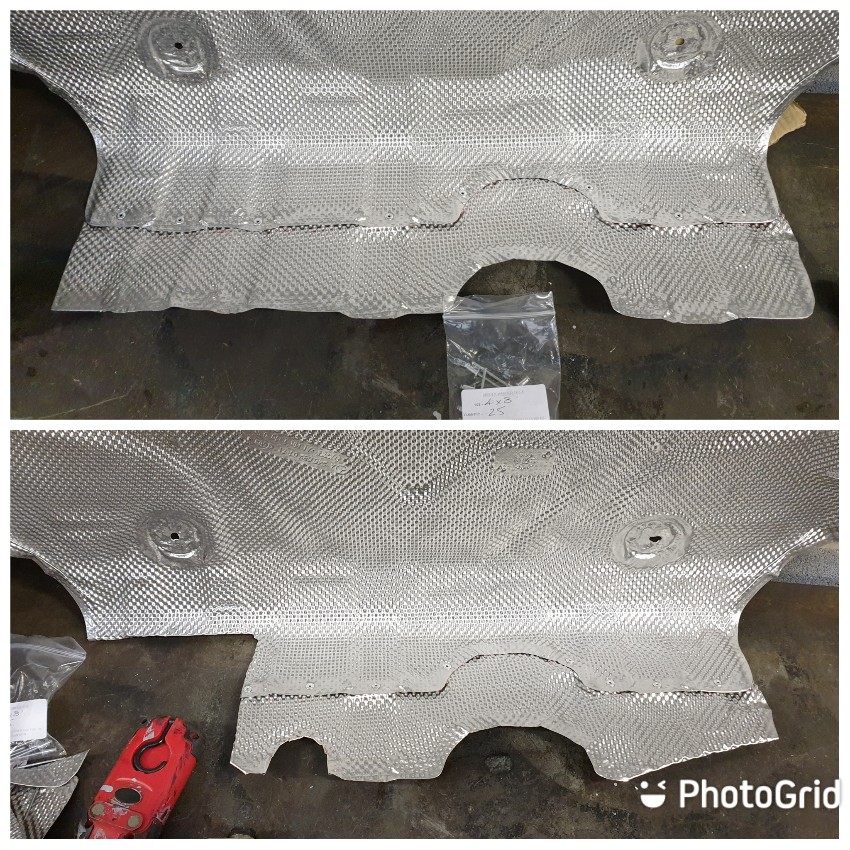
I found a couple of rare parts for the Mk3: a Ford boot liner, and an engine undertray which was fitted to the very first XR2i's to leave the factory after which it was discontinued in short order.
- Excursion
- Bulletin Board User
- Posts: 15265
- Joined: Thu Jan 01, 1970 1:00 am
- Location: Skynet
- Your car: Ford Fiesta
Car: 1990 Ford Fiesta XR2i
Re: MWSTEWART | 500+ BHP Project | 28/01/2019
![]() by Excursion on Wed Apr 10, 2024 1:40 pm
by Excursion on Wed Apr 10, 2024 1:40 pm
It was decision time:
1) Fit a small frame ABS system from a later Fiesta. The benefits of this system are a compact module which is easier to package and the wiring is plug and play with the Mk5 engine bay loom that I'm using. The drawbacks are that the traction control version is not switchable and the rear Focus hubs that I've used would require machining for a different ABS sensor.
2) Fit the large frame ATE MK25 ABS system from the Mk1 Focus. The benefits are the availability of a switchable TC module (I've pre-wired for this) and the ABS sensors are more reliable, and more accurate. The drawbacks are that my wiring loom would require modification, as would the front hubs to suit a later ABS sensor, and also the gearbox mount and master cylinder to clear the larger module.
I decided to go for option 2. I had prepared a bracket for this option and I had in stock a very nice TC equipped module from a Mk1 Focus ST170.
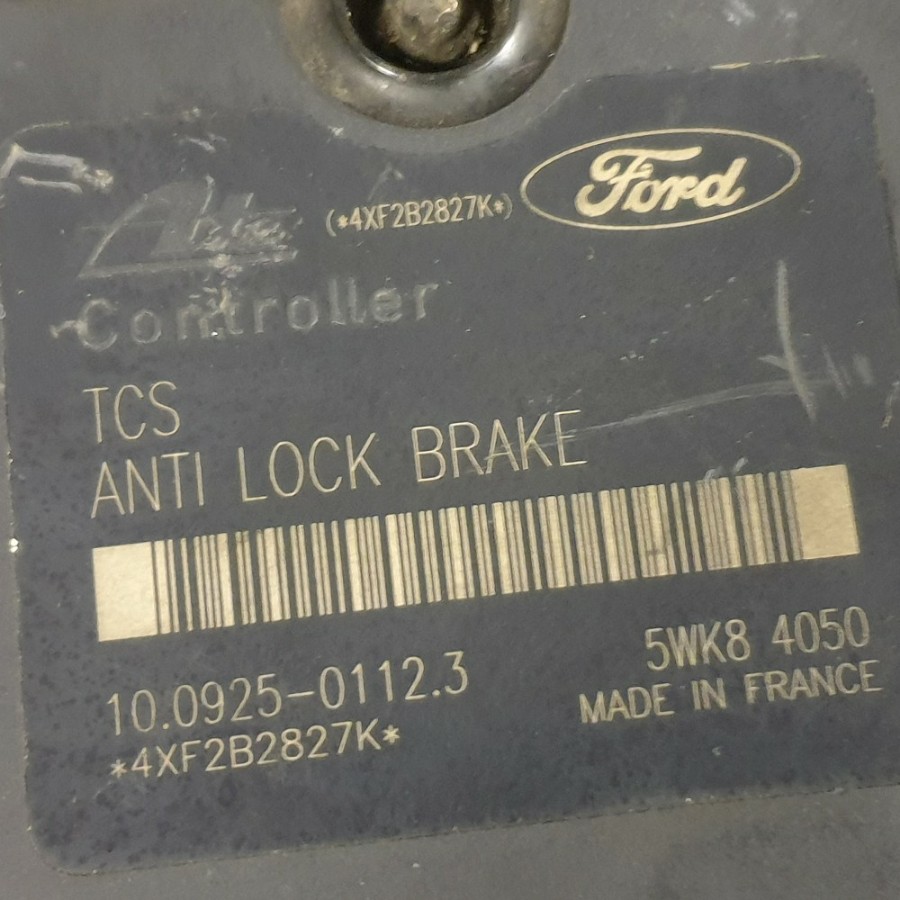
The gearbox mount now has a couple of rounded corners and a scalloped section in order to allow more clearance.
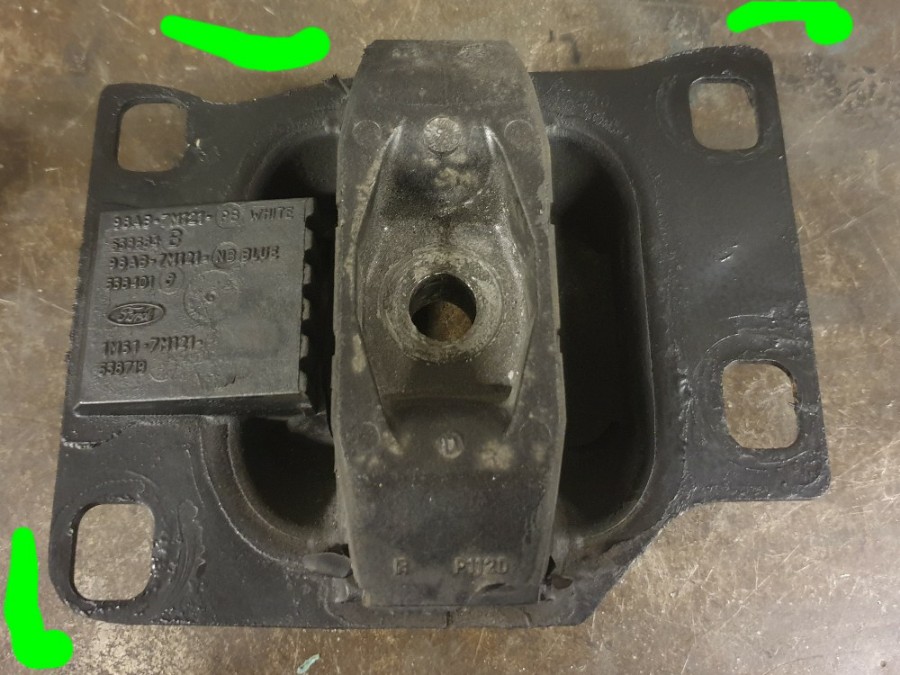
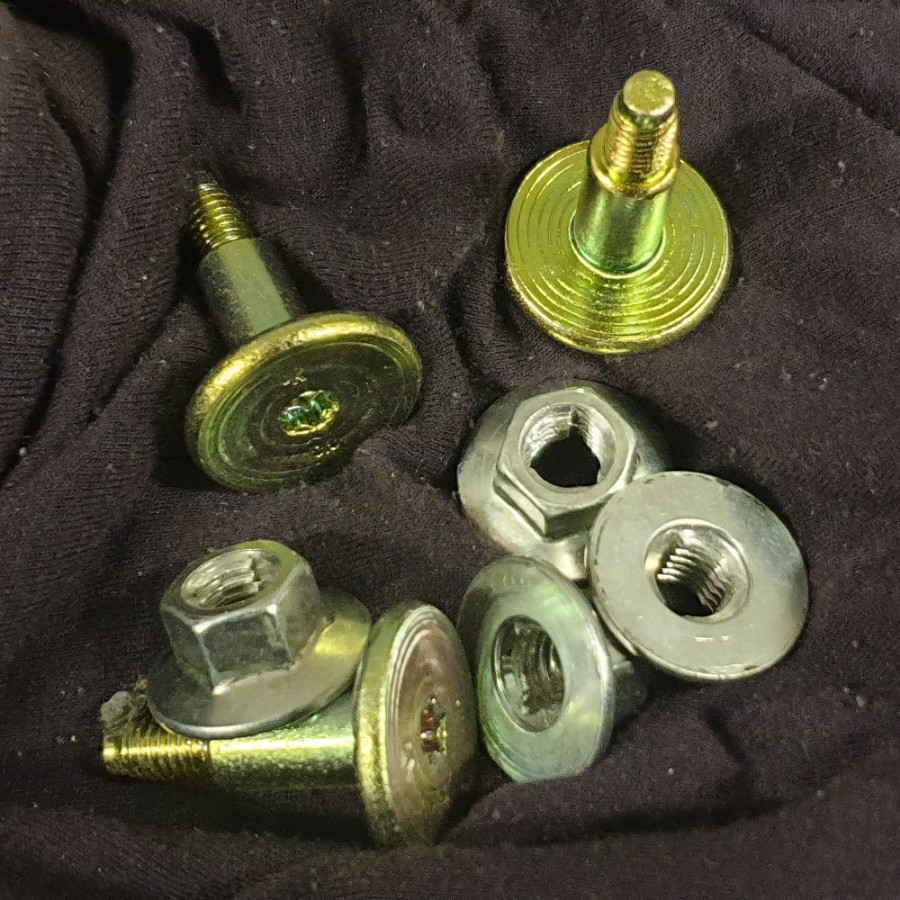
The fastenings are from the donor ST170 but have been re-plated.
In order to fit the module the servo & master cylinder are loosed off and moved out of the way. It's interesting when working on bespoke installations not only because it's satisfying when a plan comes together, but also the learning of how to maintain it.
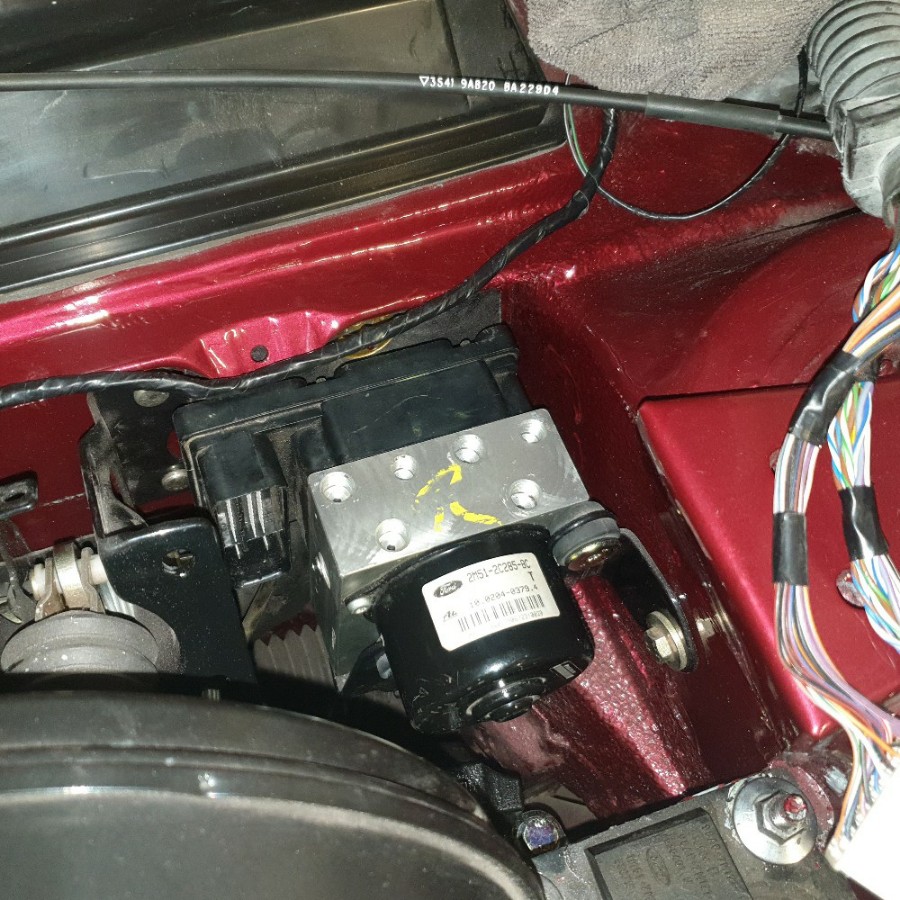
The servo & master cylinder refitted with the spacers to clear the larger ABS/TC module.
My measurements and mock-up during the chassis build appear to have worked; there is 5mm clearance between chassis mount, module, and servo.
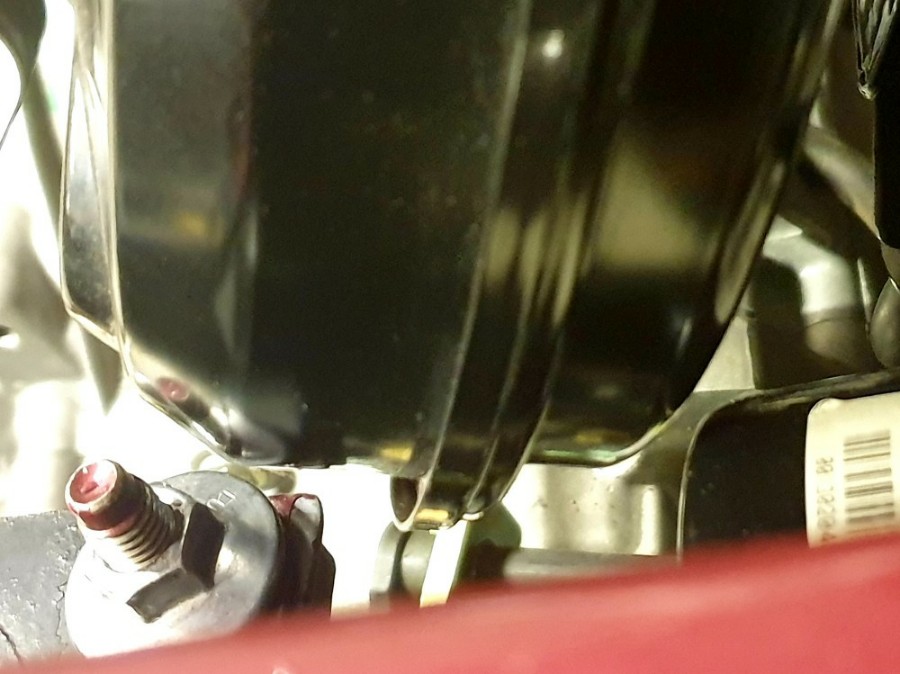
Now I can move on to plumbing.

- Excursion
- Bulletin Board User
- Posts: 15265
- Joined: Thu Jan 01, 1970 1:00 am
- Location: Skynet
- Your car: Ford Fiesta
Car: 1990 Ford Fiesta XR2i
Re: MWSTEWART | 500+ BHP Project | 10/04/2024
![]() by Excursion on Wed Apr 10, 2024 1:41 pm
by Excursion on Wed Apr 10, 2024 1:41 pm
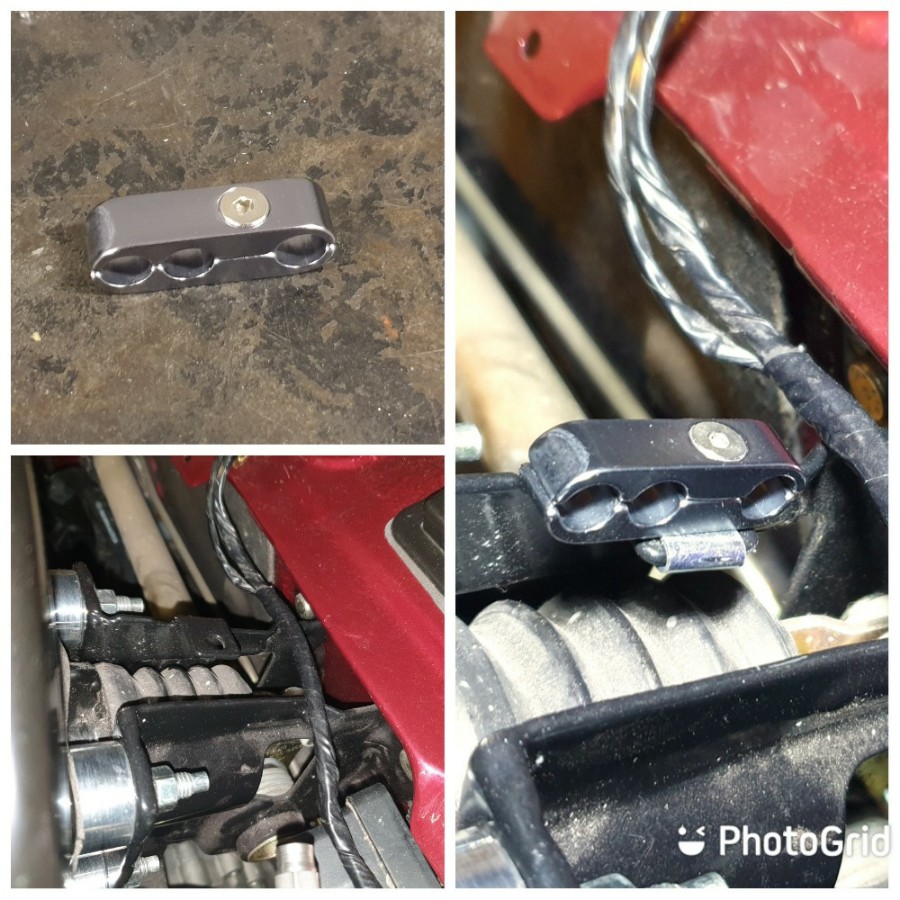
The AN3 hose was fine. I'm adding stainless rivnuts in the holes originally for the OEM plastic fittings. I always find pipe routing takes a bit of thought and time; for example a triple hose clamp drilled out to take a longer bolt in order to secure it to a hole drilled on the master cylinder bracket, over which a spire clip is mounted.
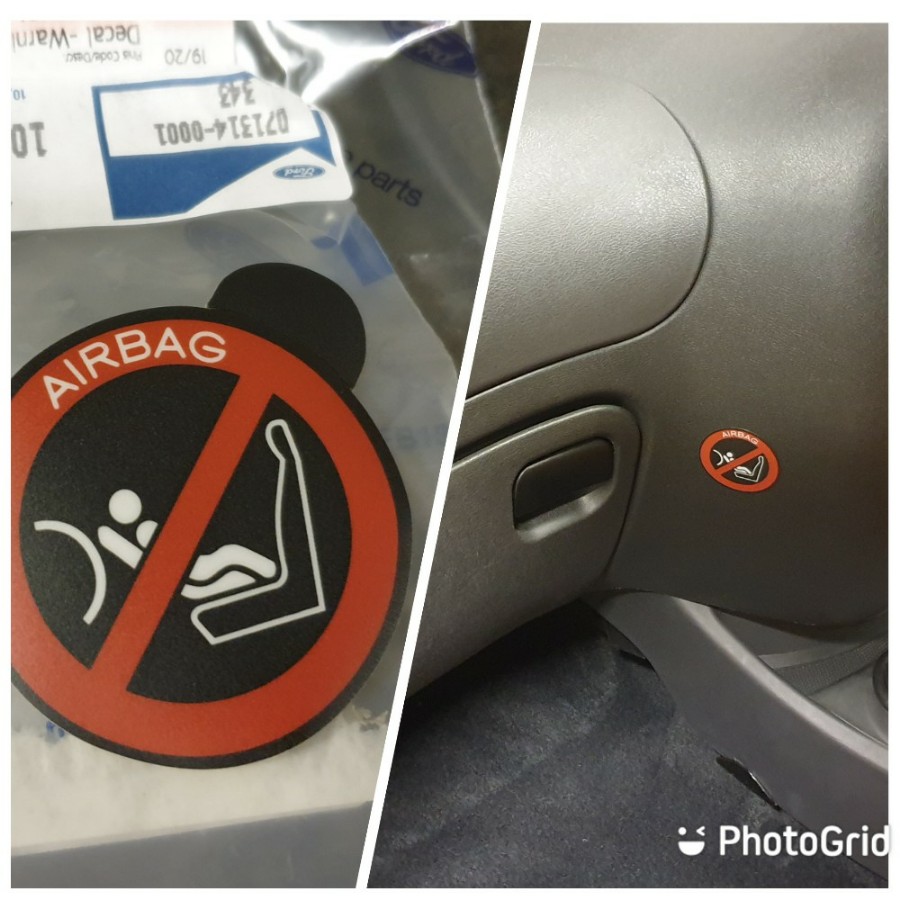
Passenger airbag warning sticker just to make things correct given that I have retrofitted one.
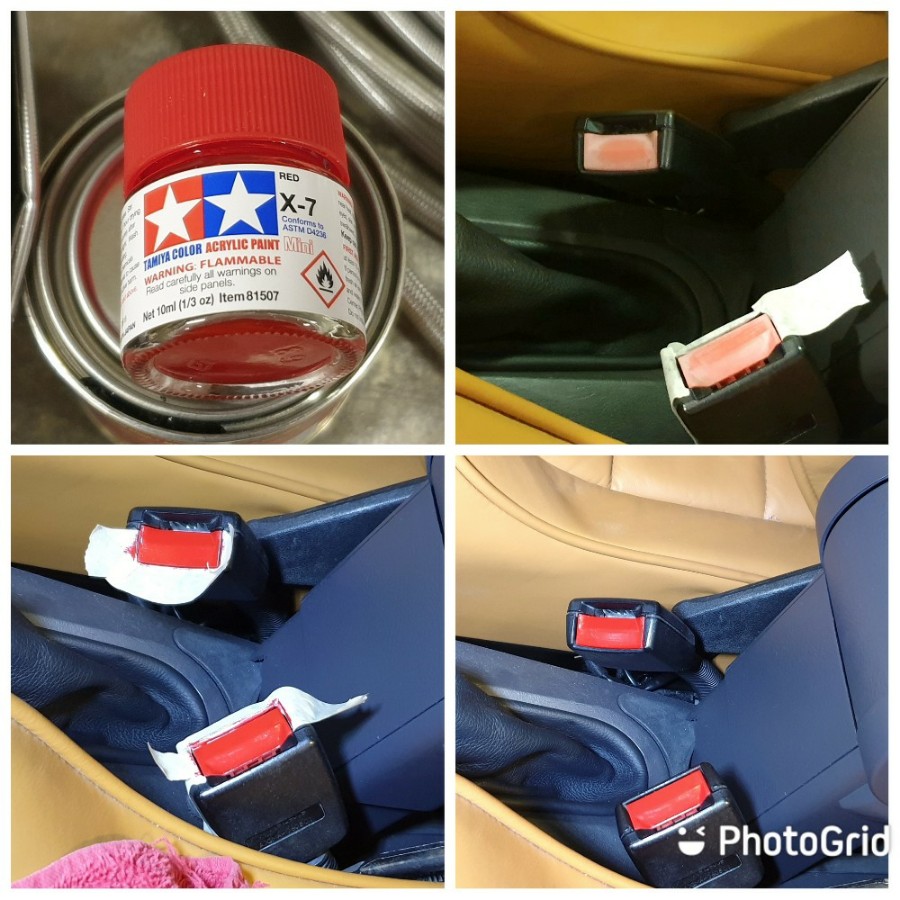
I addressed the faded seat belt clasps by painting with some Tamiya X-7 red paint.
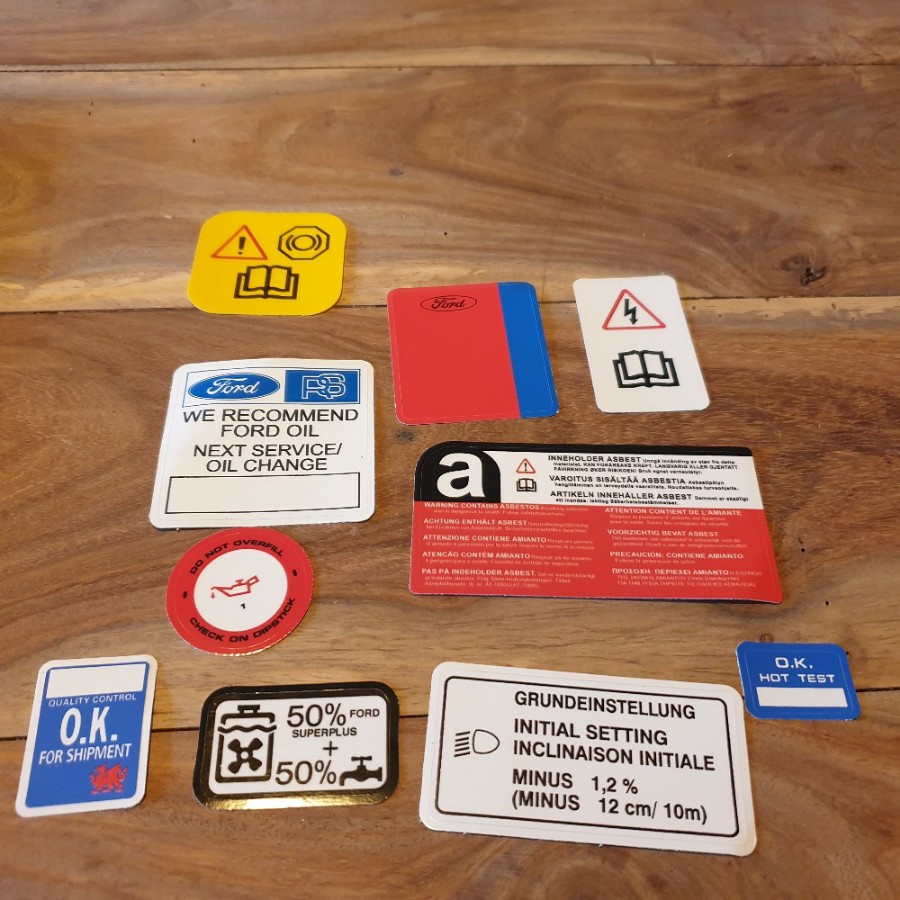
Decal kit for the engine bay.
- Excursion
- Bulletin Board User
- Posts: 15265
- Joined: Thu Jan 01, 1970 1:00 am
- Location: Skynet
- Your car: Ford Fiesta
Car: 1990 Ford Fiesta XR2i
Re: MWSTEWART | 500+ BHP Project | 10/04/2024
![]() by Excursion on Wed Apr 10, 2024 1:42 pm
by Excursion on Wed Apr 10, 2024 1:42 pm
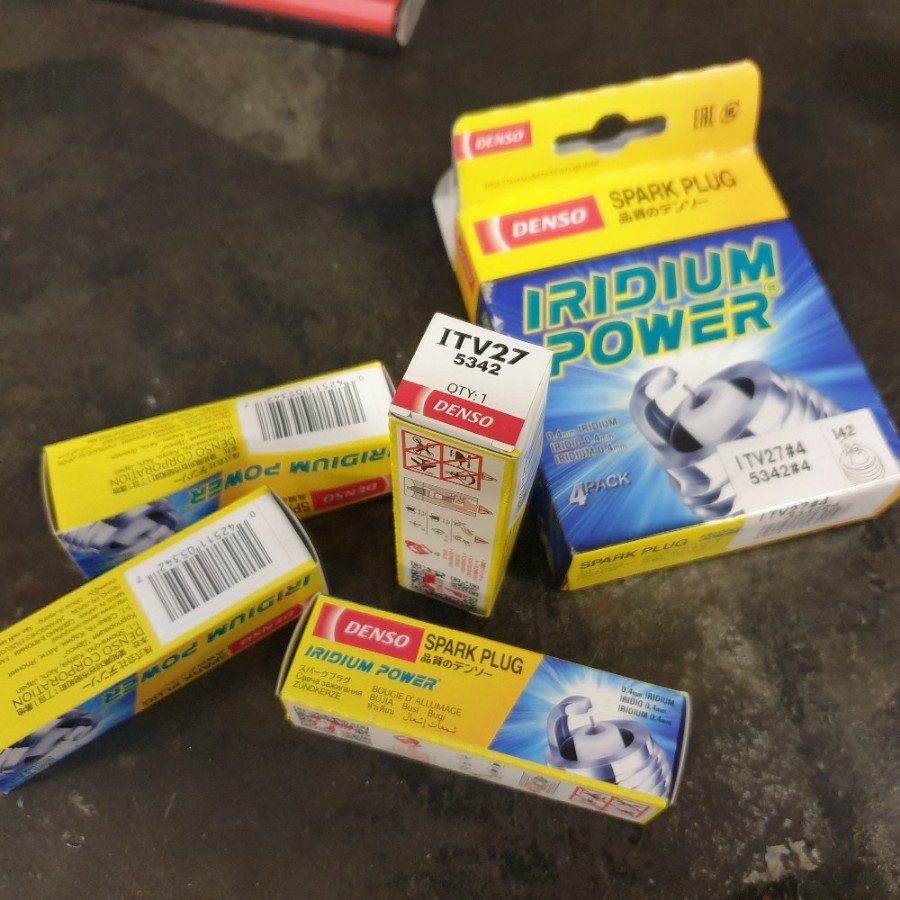
Plugs installed with a 0.7mm gap.
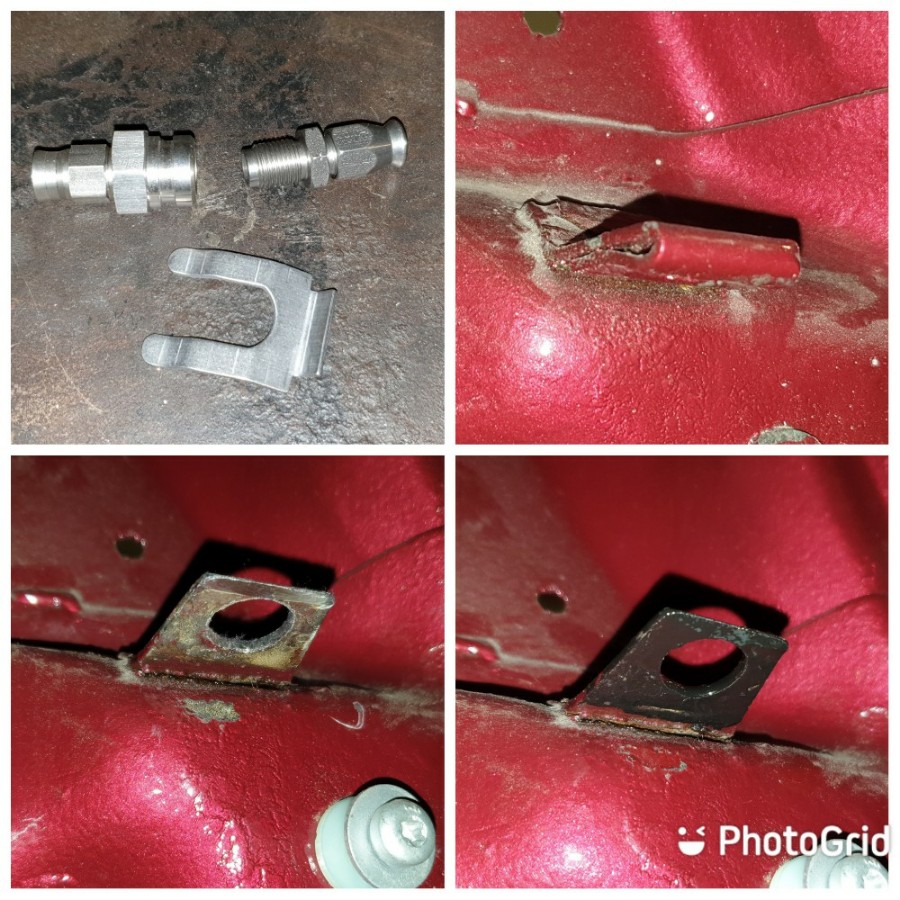
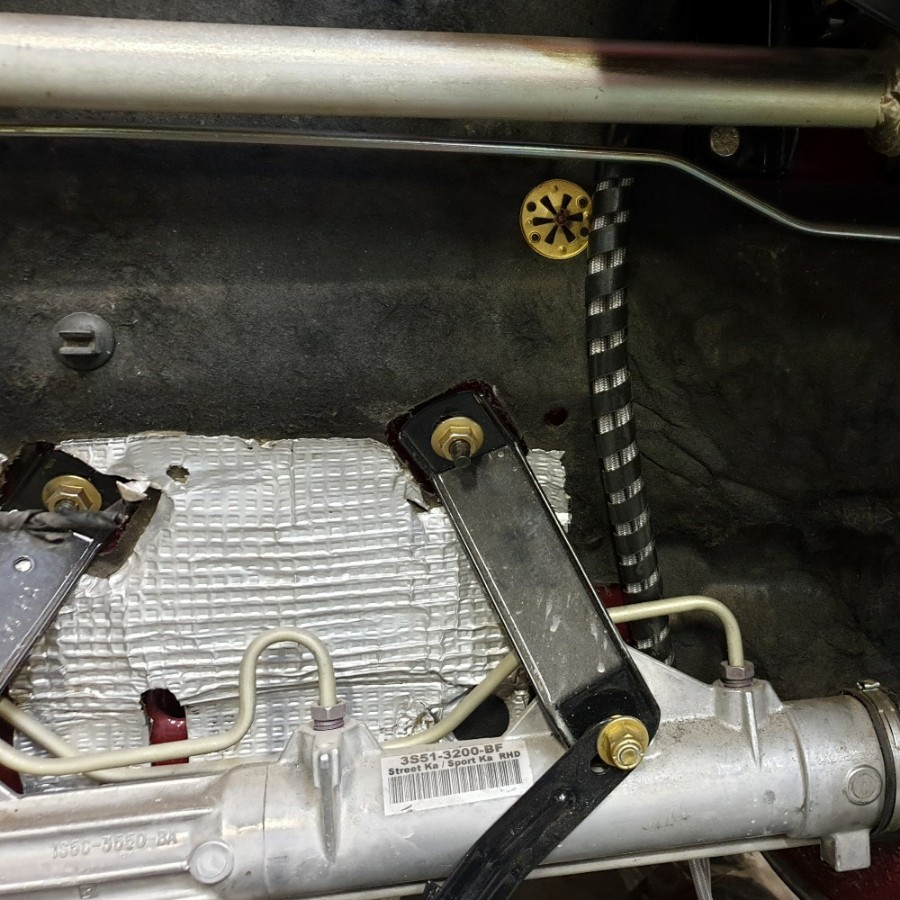
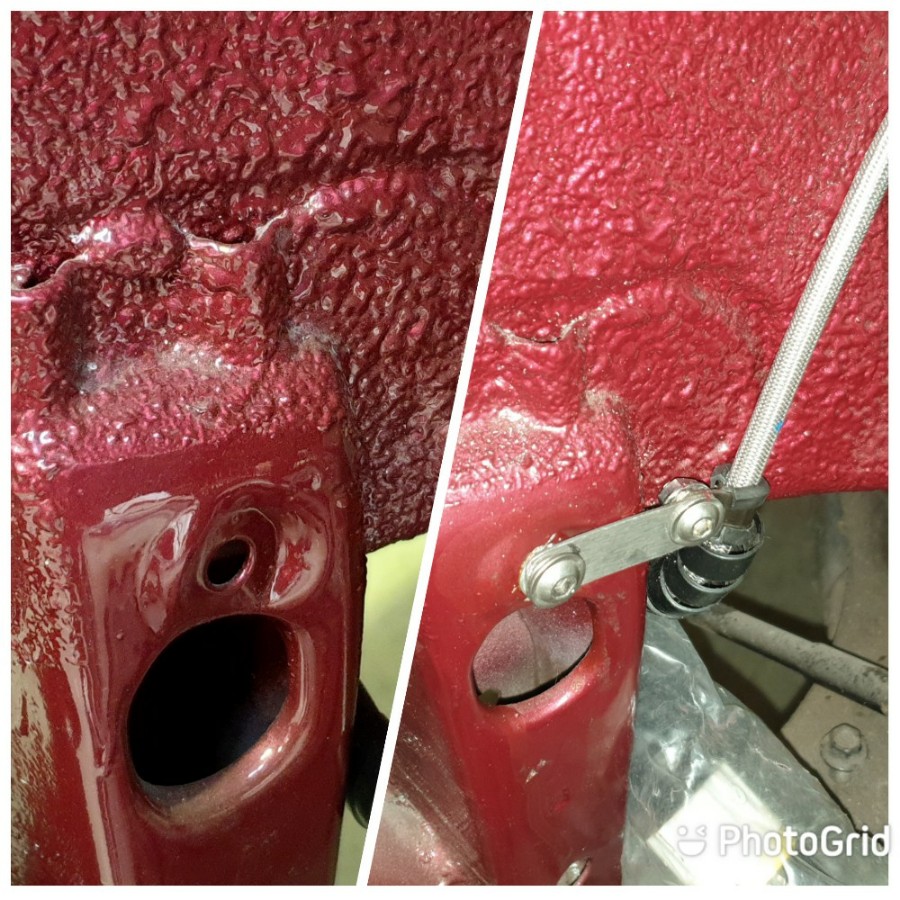
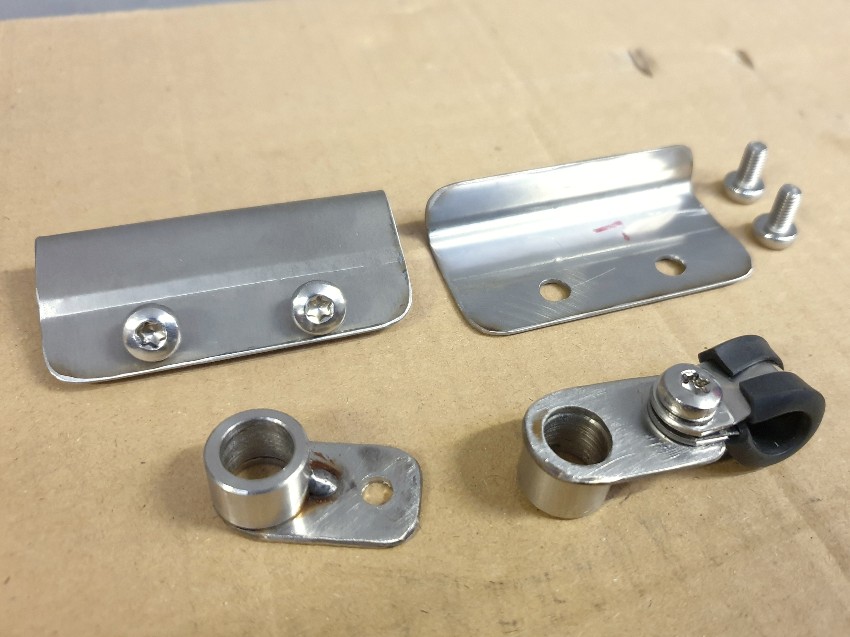
Finishing off the front brake lines: I have converted to spring clip type bulkhead fittings which I have in stainless. To convert the Ford chassis mounts I used a Dremel to cut off the lower leaf, drilled out the hole to 15mm, filed smooth, and then finished with POR15.
NSF wheelarch complete with new arch liner fittings and a liberal application of protective wax.
- Excursion
- Bulletin Board User
- Posts: 15265
- Joined: Thu Jan 01, 1970 1:00 am
- Location: Skynet
- Your car: Ford Fiesta
Car: 1990 Ford Fiesta XR2i
Re: MWSTEWART | 500+ BHP Project | 10/04/2024
![]() by Excursion on Wed Apr 10, 2024 1:42 pm
by Excursion on Wed Apr 10, 2024 1:42 pm
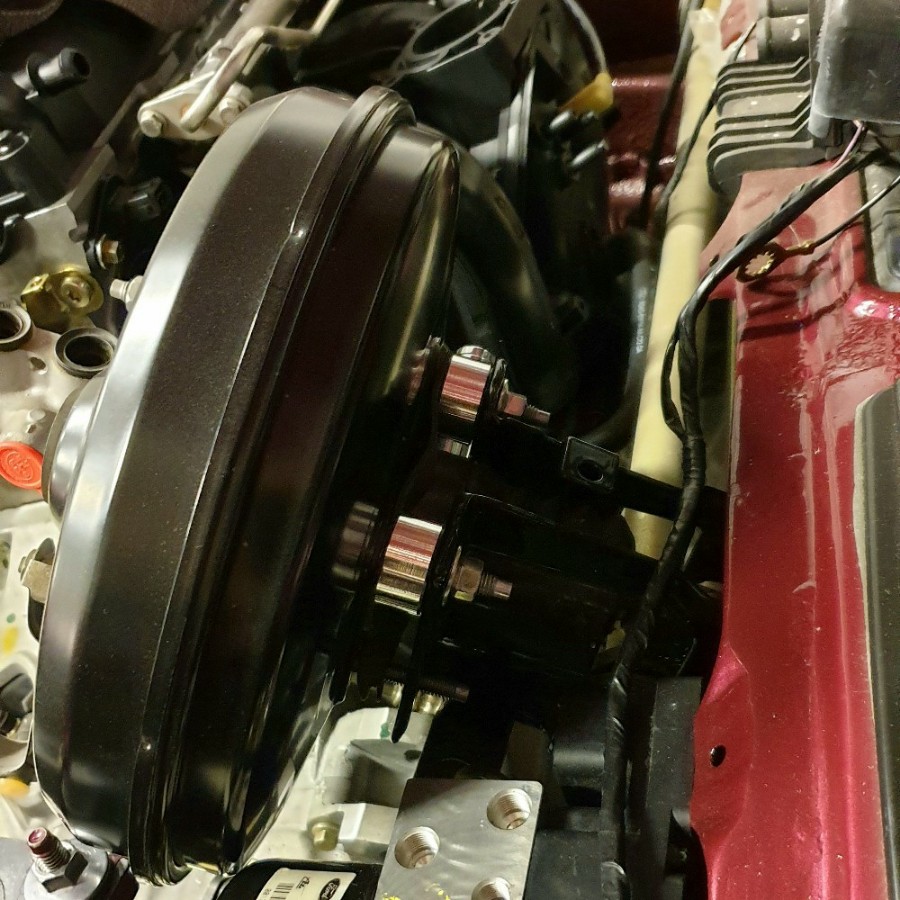
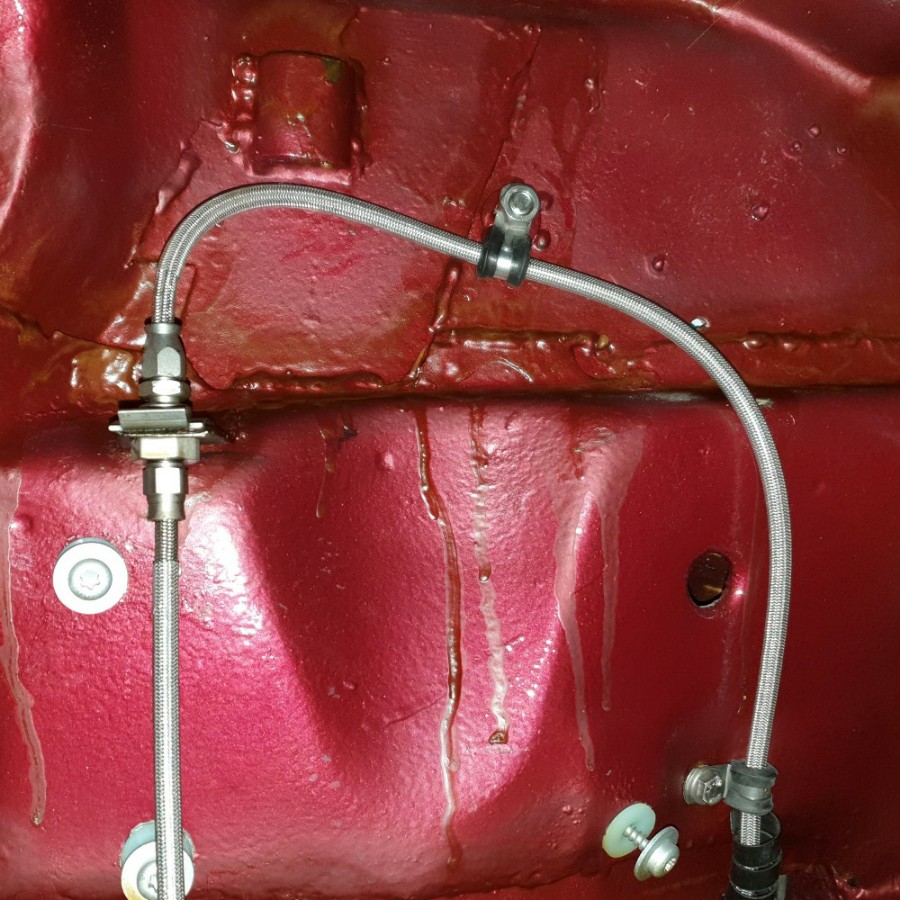
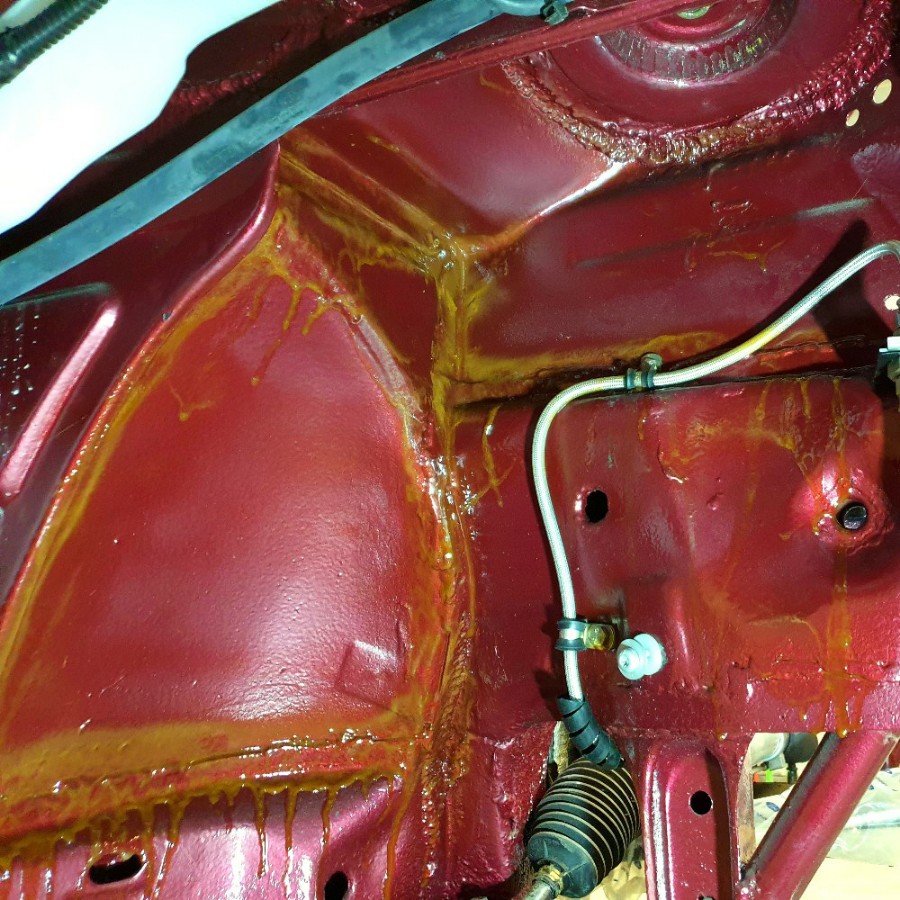
Master cylinder and module plumbed in.
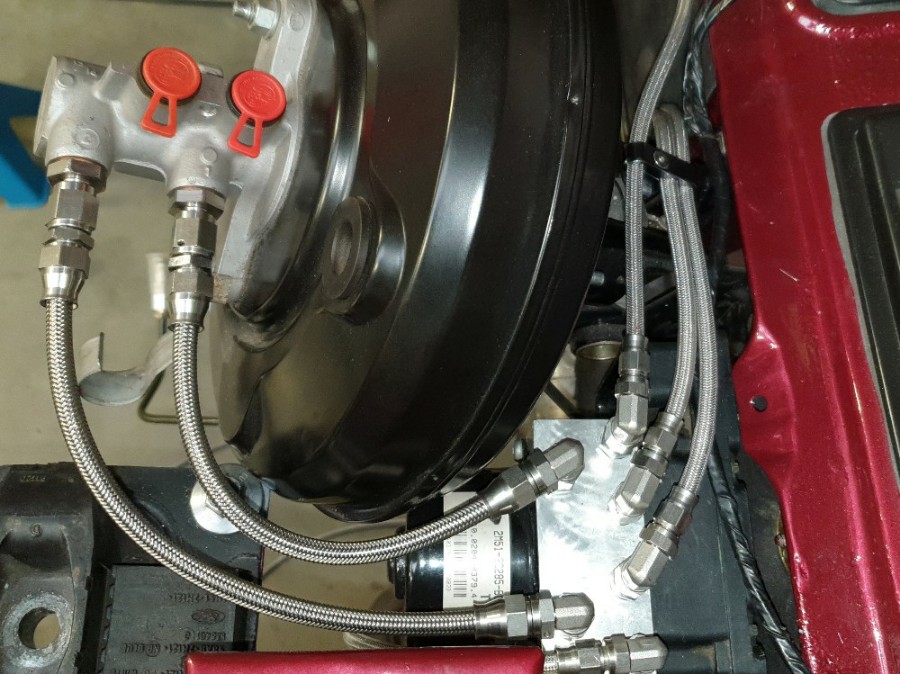
The rear lines follow the OEM route and I've wrapped them in nylon spiral wrap to keep them together.
In accordance to Colin Chapman's philosophy where possible fixings and fastening points serve more than one purpose.
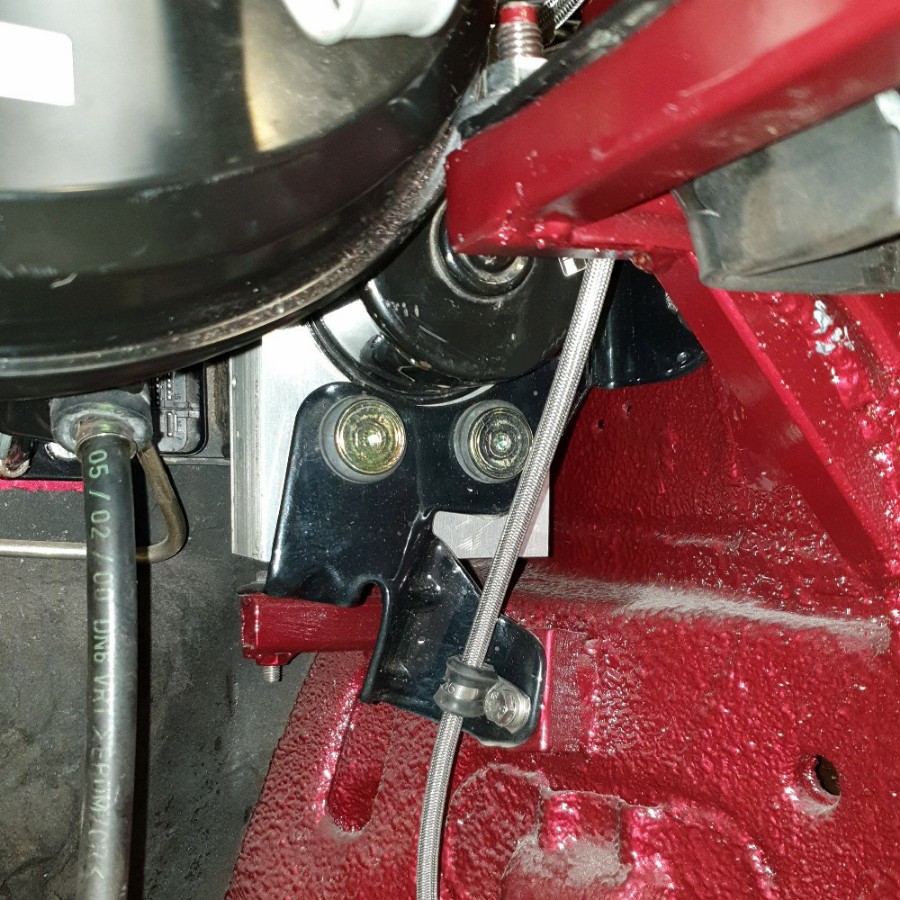
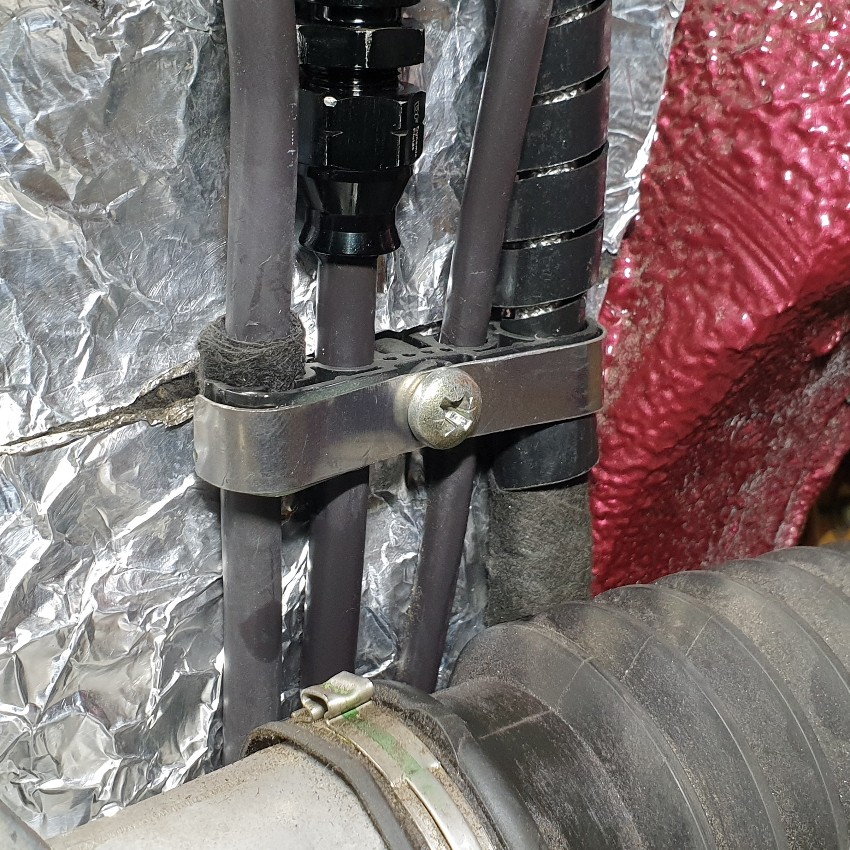
Strap bracket fabricated to keep the OSF line as close to the chassis as possible in the area of the alternator.
Liberal application of wax to all of the common rust spots.
- Excursion
- Bulletin Board User
- Posts: 15265
- Joined: Thu Jan 01, 1970 1:00 am
- Location: Skynet
- Your car: Ford Fiesta
Car: 1990 Ford Fiesta XR2i
Re: MWSTEWART | 500+ BHP Project | 10/04/2024
![]() by Excursion on Wed Apr 10, 2024 1:43 pm
by Excursion on Wed Apr 10, 2024 1:43 pm
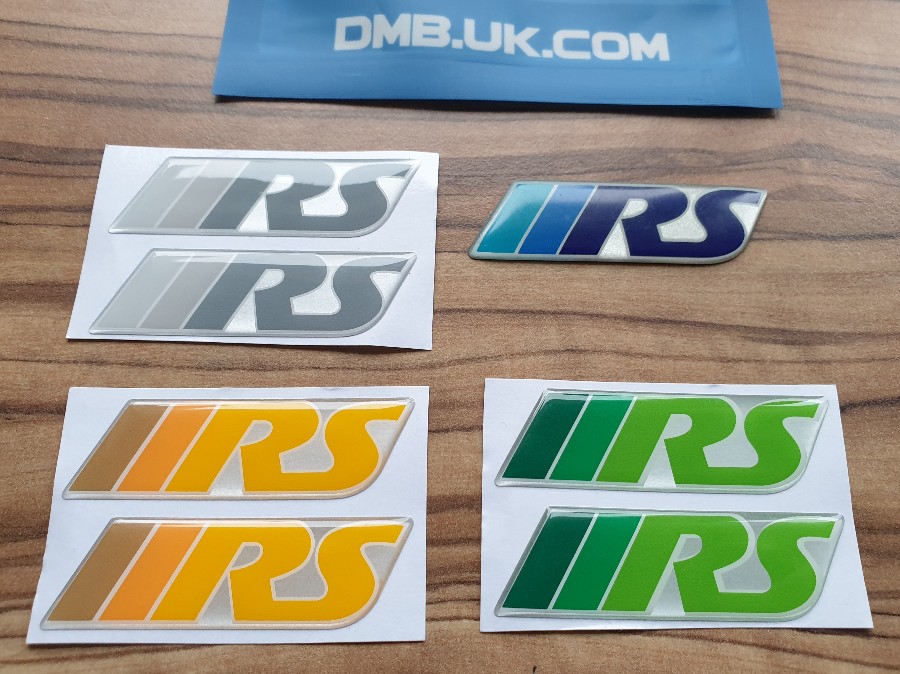
I chose DMB Graphics to produce the reproductions - initially two of each as a test - and Dave was excellent to work with sharing his colour palette to help make my electronic design production ready. There is a small tweak required to the green version should I decide to go that way.
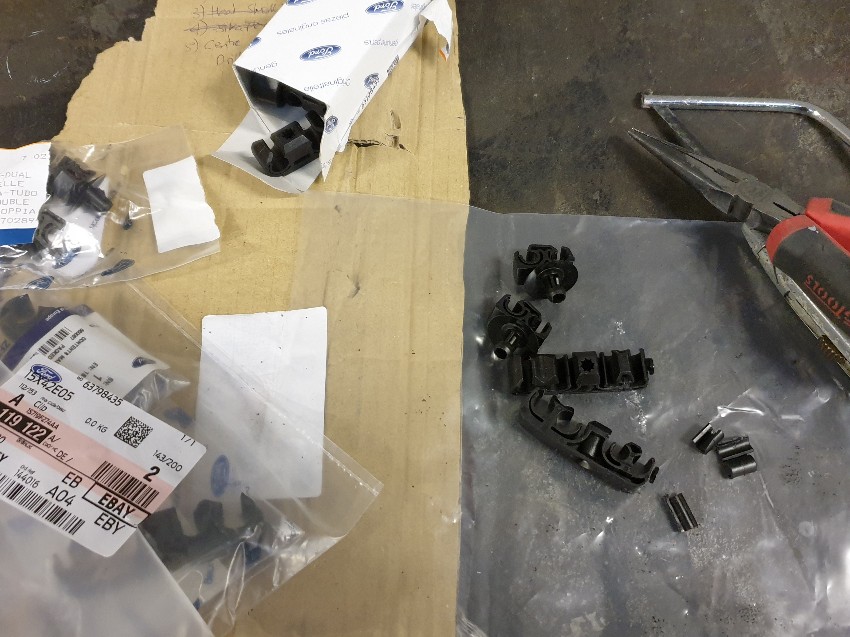
OEM Fastenings
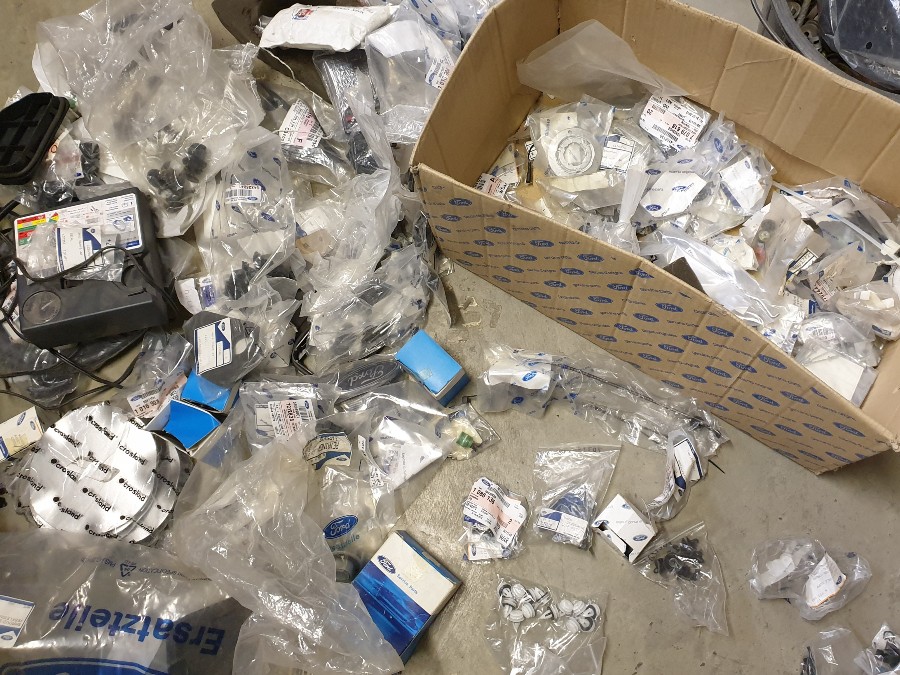
I've started to go through my box of Ford clips and fastenings to refresh my mind on what I have, which thankfully is enough to finish the car. The price these parts sell for now is significantly higher than the original retail. There were some interesting little nic-nacs available.
Fuel and Rear Brake Lines
The original fuel lines are AN6 sized which is perfectly adequate for my needs so I've been through my parts store and chosen some perfect original lines: fuel feed (AN6), fuel return (AN6), and evap (AN3) hard lines. The rear brakes lines are AN3 PVC coated braided hose rather than the OEM steel lines.
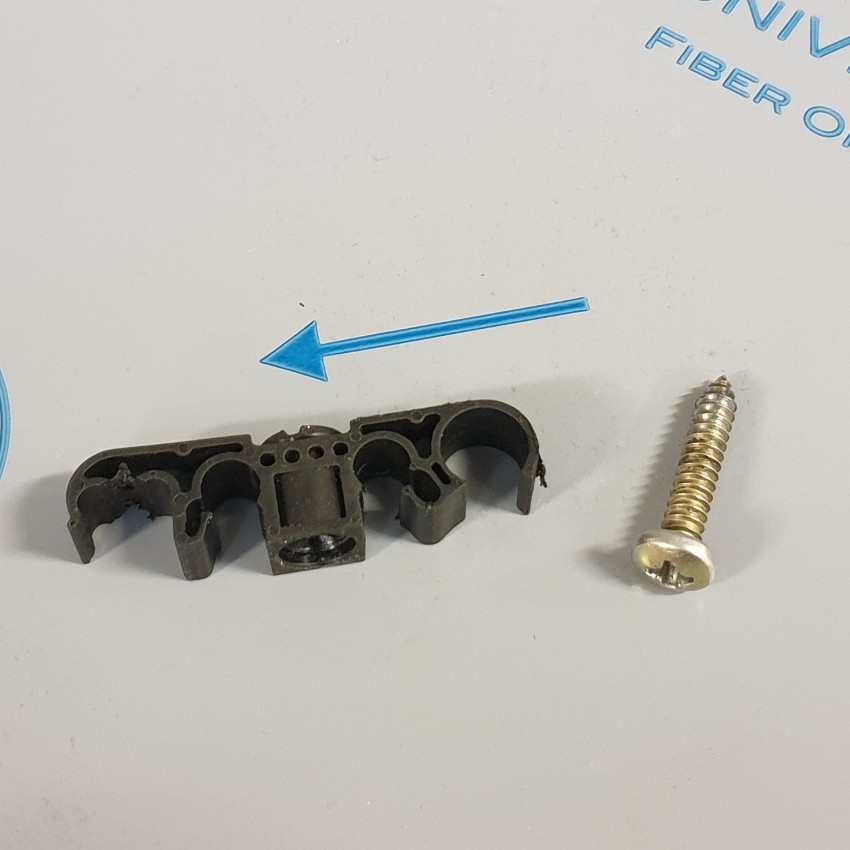
I found the original Ford fuel and brake pipe clips which I'm modifying to suit the two AN3 braided hoses in place of the original AN3 hard lines.
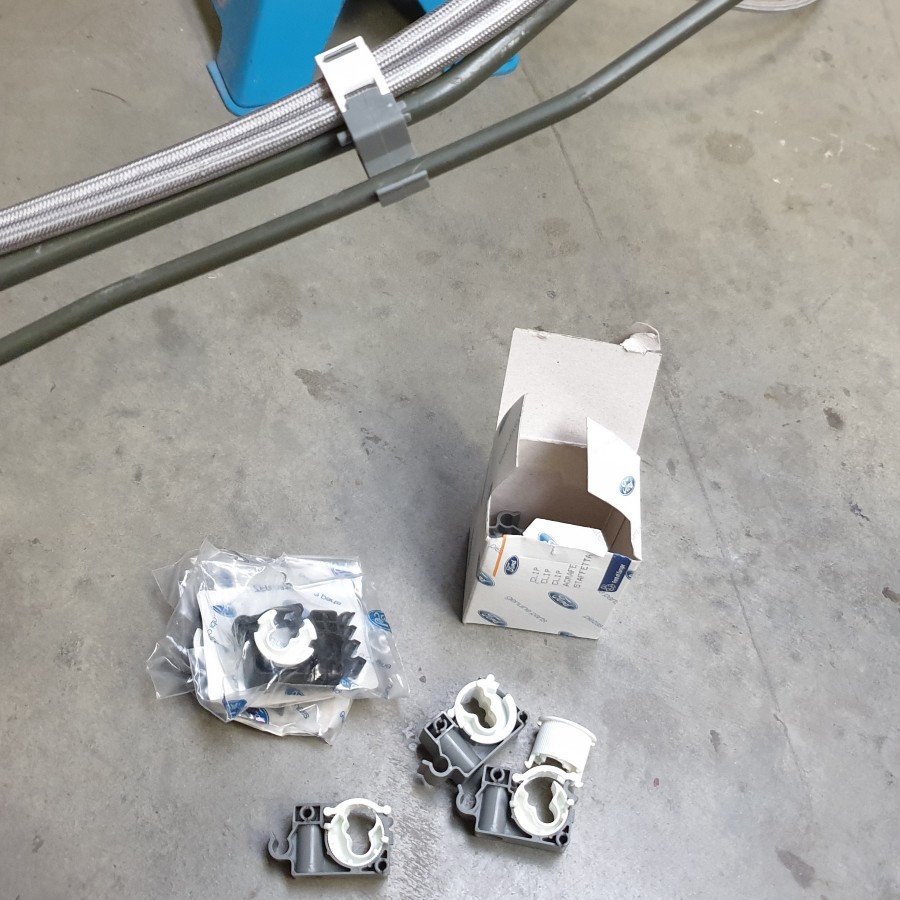
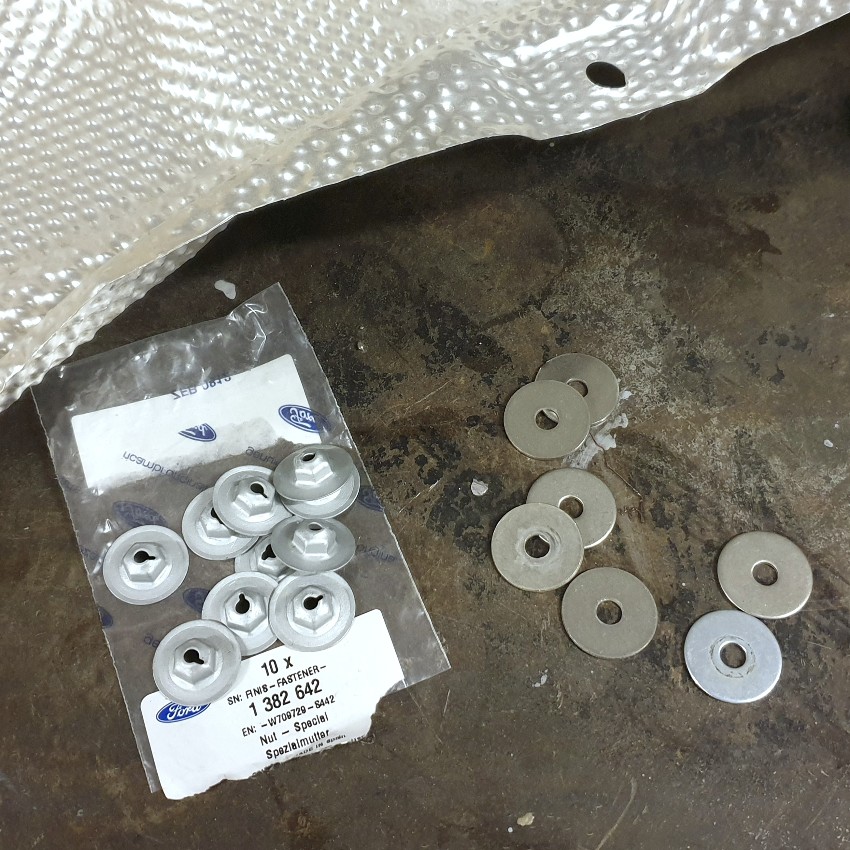
I have replaced the original metal fastenings with nylon types from a later model.
Misc
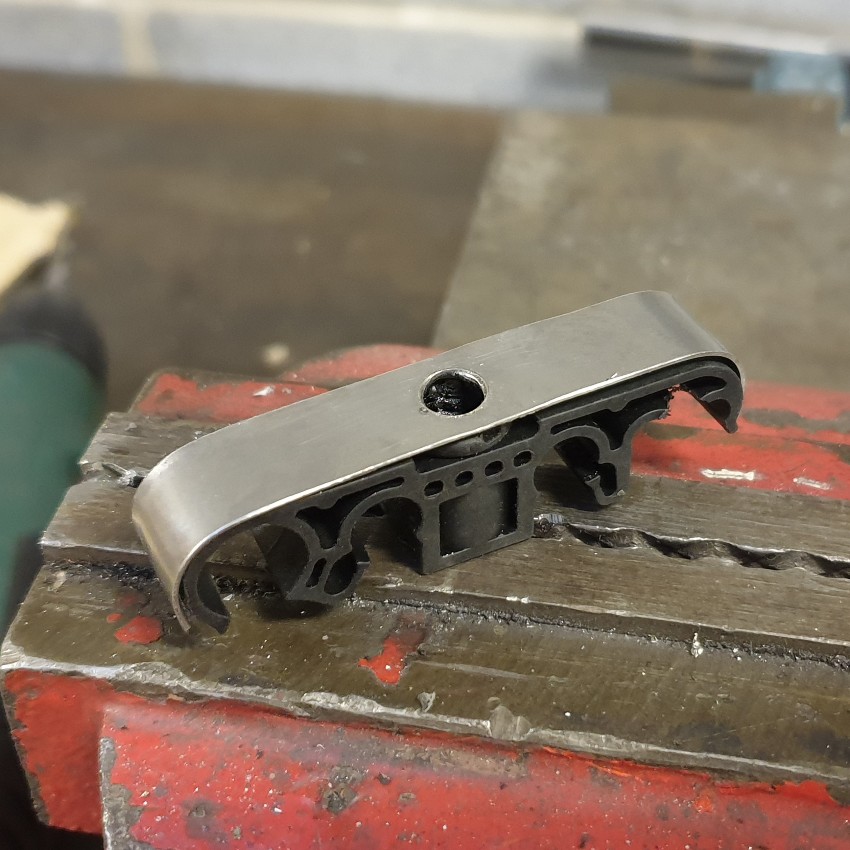
New OEM heat shield modified to suit my unique exhaust route.
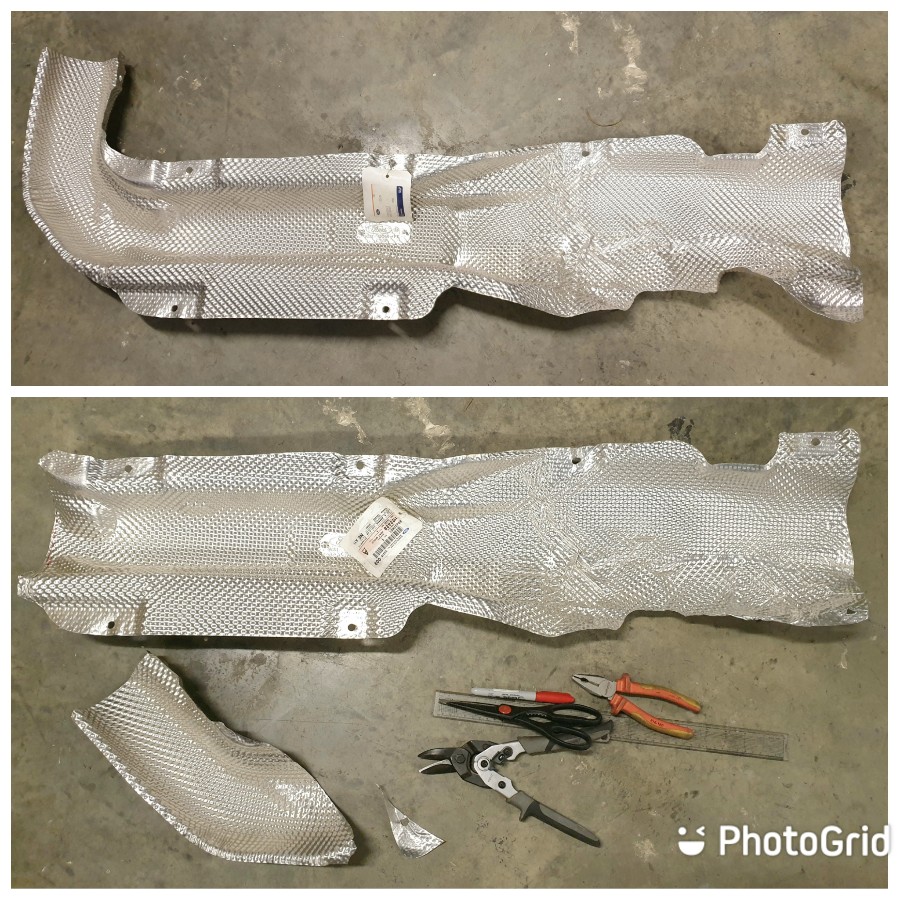
The handbrake cable is galvanised but they normally end up rusty, so I have etched primed & painted it silver.
Engine Installation
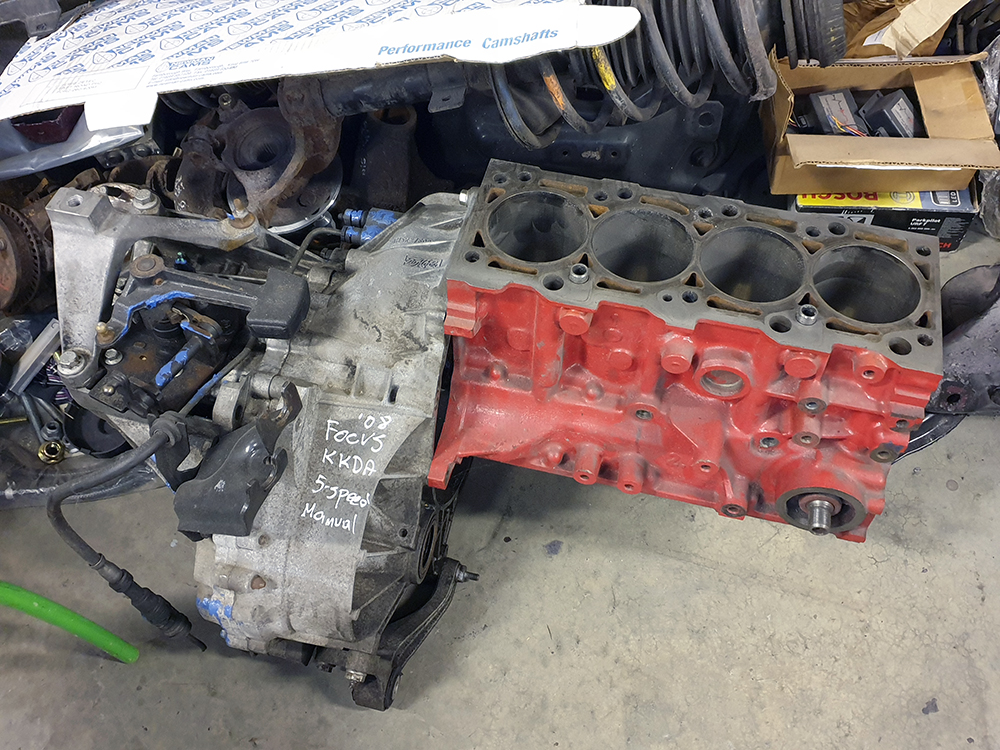
I now have a third MTX75 gearbox this time a Focus Mk2 TDCi version, and thanks to Ian/Area Six a block to go along with it.
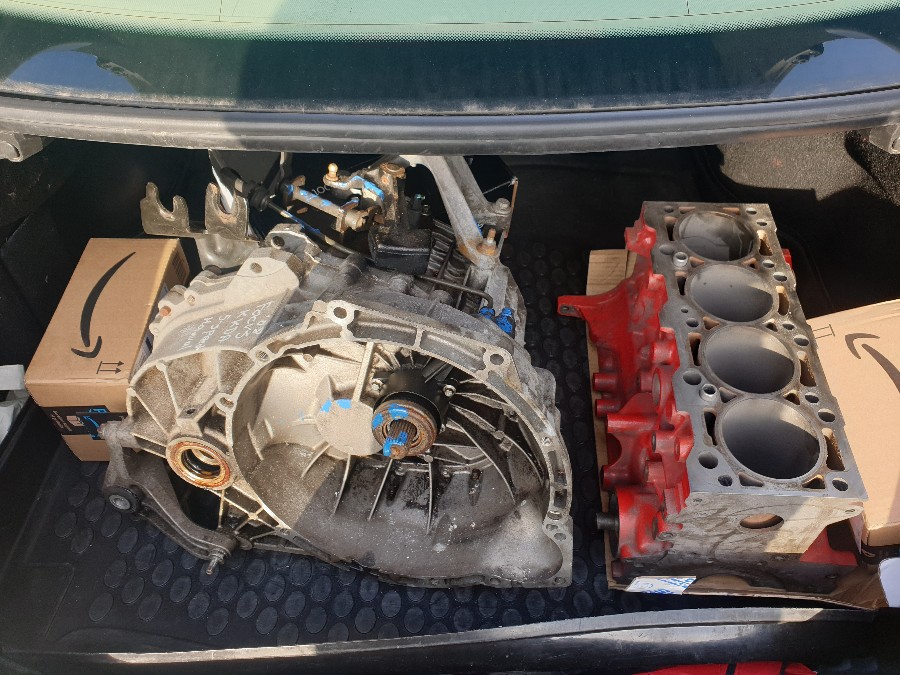
For some reason - packaging, possibly - the 'Black Top' Zetec is mounted tilted forwards by several degrees which is not ideal for weight distribution and, hence handling. It is something that always bugged me so I've been in touch with my friend Mark who has agreed to produce a bespoke bell-housing that tilts the engine back to my specification. It will be a bolt in part meaning that there won't be further changes to my shell.
Mark built the adapter plate for my previous project: a dry sumped ST170 engine mated to a VAG 4x4 02M gearbox.
- Excursion
- Bulletin Board User
- Posts: 15265
- Joined: Thu Jan 01, 1970 1:00 am
- Location: Skynet
- Your car: Ford Fiesta
Car: 1990 Ford Fiesta XR2i
Re: MWSTEWART | 500+ BHP Project | 10/04/2024
![]() by Excursion on Wed Apr 10, 2024 1:43 pm
by Excursion on Wed Apr 10, 2024 1:43 pm
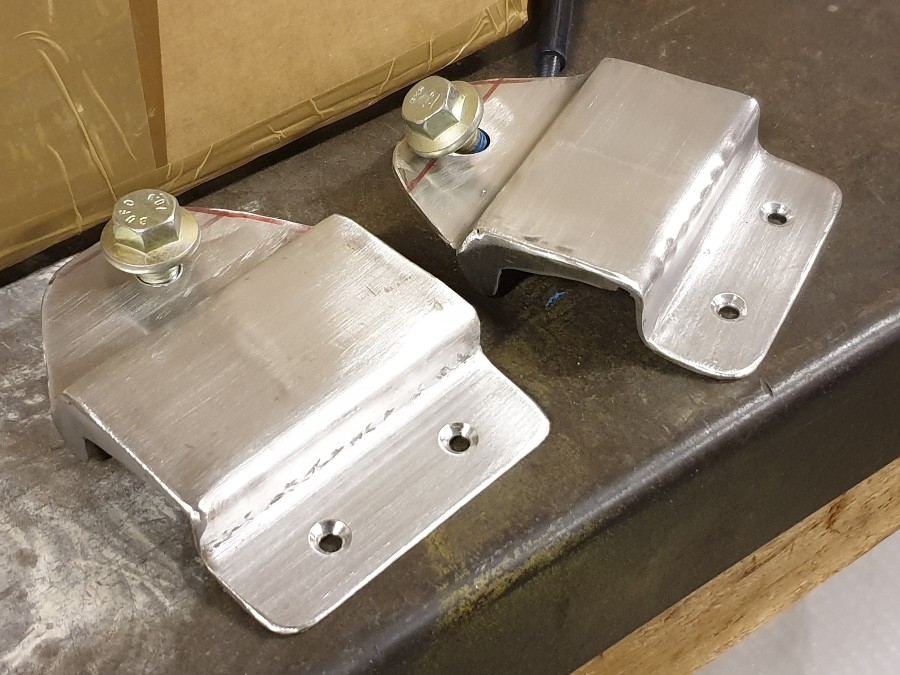
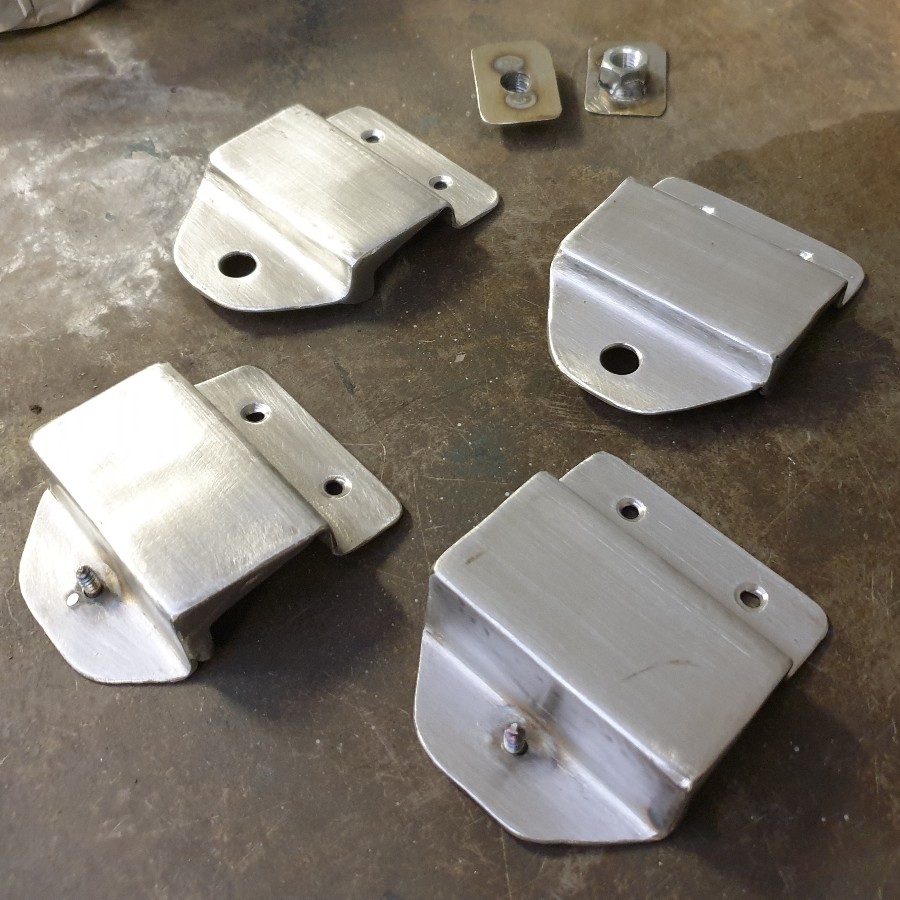
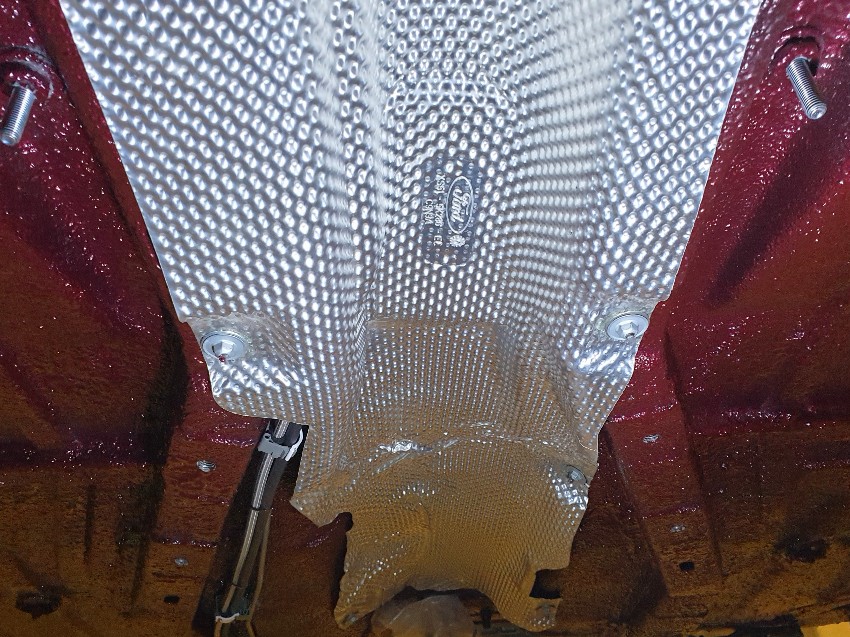
The Mk3 Fiesta standard jacking points are less than ideal being on the narrow lip of a very thin sill section. I already reinforced both sills with 25mm x 15mm box section and the finishing touch is four stainless steel jacking pads, which are a bit of a tricky shape due to the angle of the floor pan in that area.
The front jacking pads are dual function serving as an attachment point for part of the to-be-constructed underfloor chassis brace. The pads are riveted to the sills and bonded with methacrylate structural adhesive.
- Excursion
- Bulletin Board User
- Posts: 15265
- Joined: Thu Jan 01, 1970 1:00 am
- Location: Skynet
- Your car: Ford Fiesta
Car: 1990 Ford Fiesta XR2i
Re: MWSTEWART | 500+ BHP Project | 10/04/2024
![]() by Excursion on Wed Apr 10, 2024 1:44 pm
by Excursion on Wed Apr 10, 2024 1:44 pm
The front pads have a hole and accompanying captive nut/spreader plate for a chassis brace and the rears have a stud for the OEM handbrake cable clip.
Once fabrication was complete I used a poly wheel to smooth and then 40 grit to create a brushed finish.
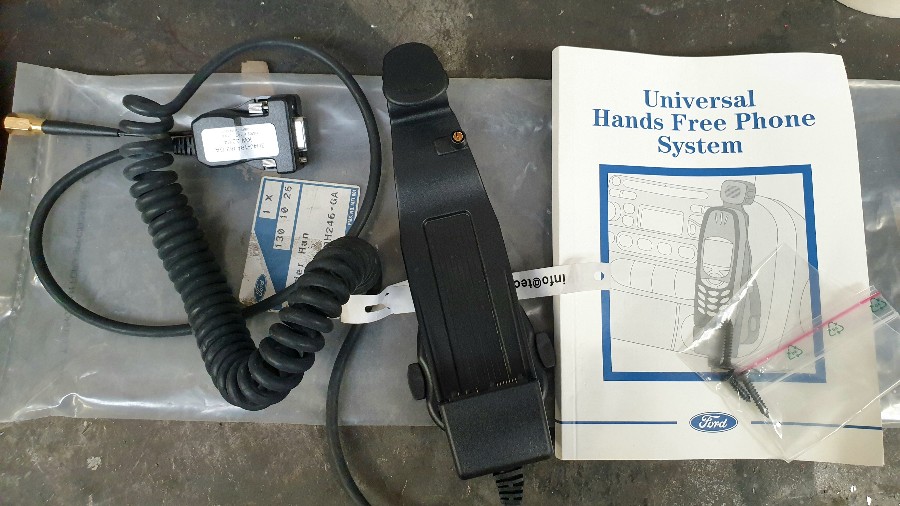
Looking to the interior and I'm piecing together a period correct (for the dashboard) Ford 'universal hands free phone system'. I've chosen the Nokia 6210 version and once the handset arrives I will send its cover to paint along another couple of interior trim pieces for refinishing in the same metallic grey as the instrument cluster bezel.
- Excursion
- Bulletin Board User
- Posts: 15265
- Joined: Thu Jan 01, 1970 1:00 am
- Location: Skynet
- Your car: Ford Fiesta
Car: 1990 Ford Fiesta XR2i
Re: MWSTEWART | 500+ BHP Project | 10/04/2024
![]() by Excursion on Wed Apr 10, 2024 1:44 pm
by Excursion on Wed Apr 10, 2024 1:44 pm
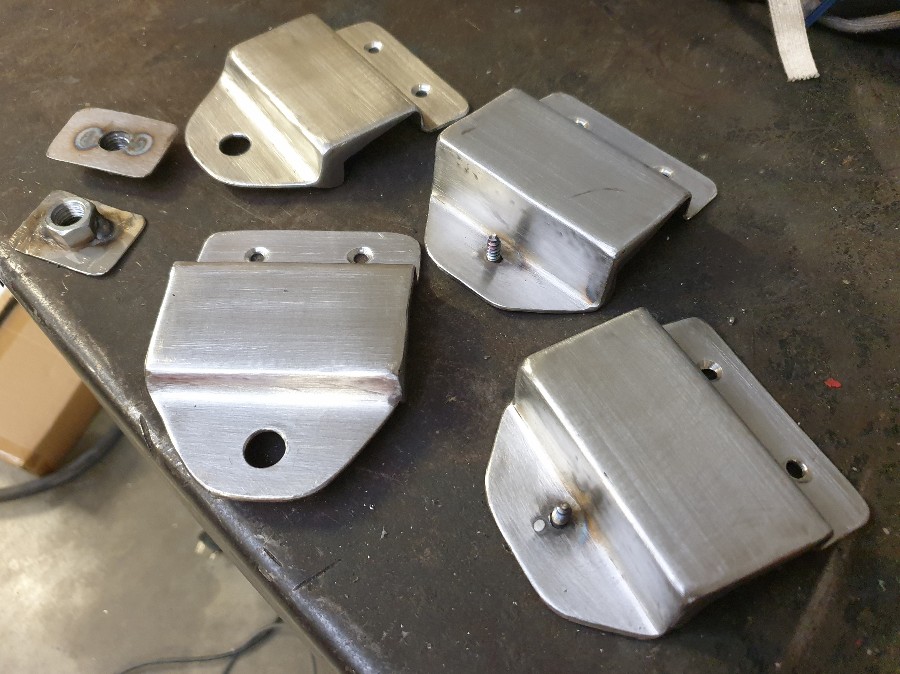
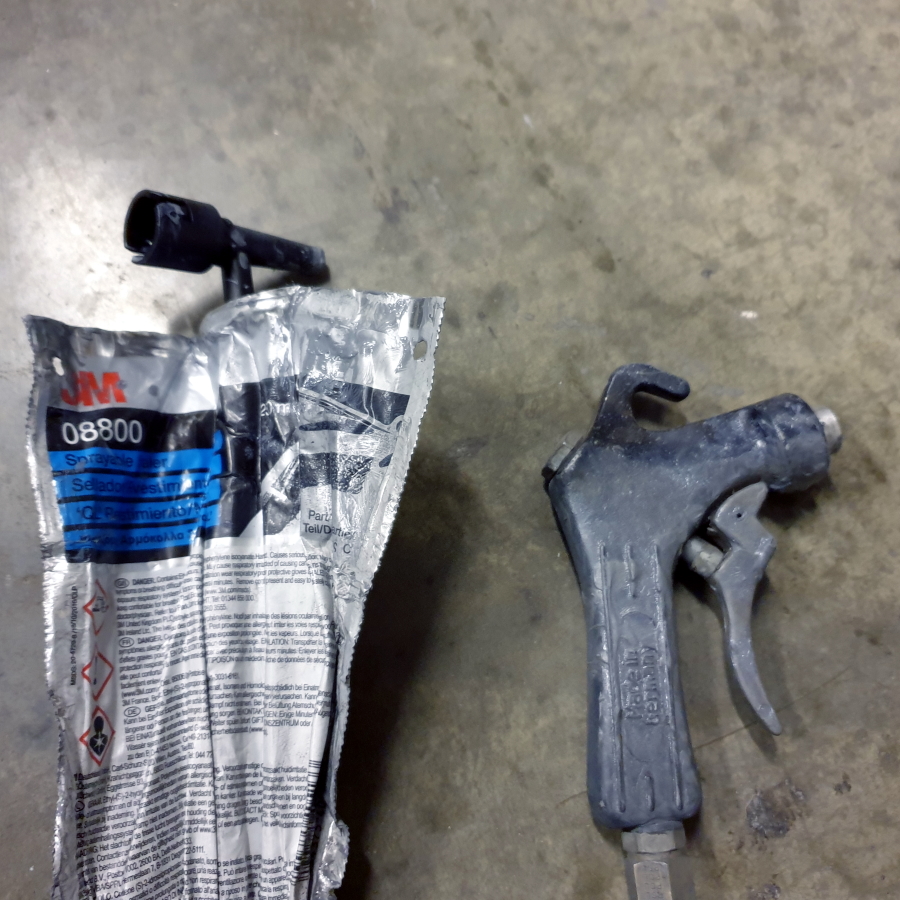
The jacking points are complete and fitted. I let them in to the existing underseal and neated up by blending with some additional 3M 08800 sealer.
Finishing involved paint and lacquer but was worth it for the finished result .The rear pads double up as a handbrake cable mount using the OEM clips.
The front pads installed showing the captive fitting for a chassis brace. I bonded the spreader plate/captive fitting to the inside of the floor with a relief in the first (new) layer of sound deadening foam for the nut, and the original felt underlay covers all of that. The fittings are undetectable underneath the carpet.


Car Phone
I had DMB make small Ford decals. I wasn't sure what size would look best so ordered different sizes. 15mm was perfect.
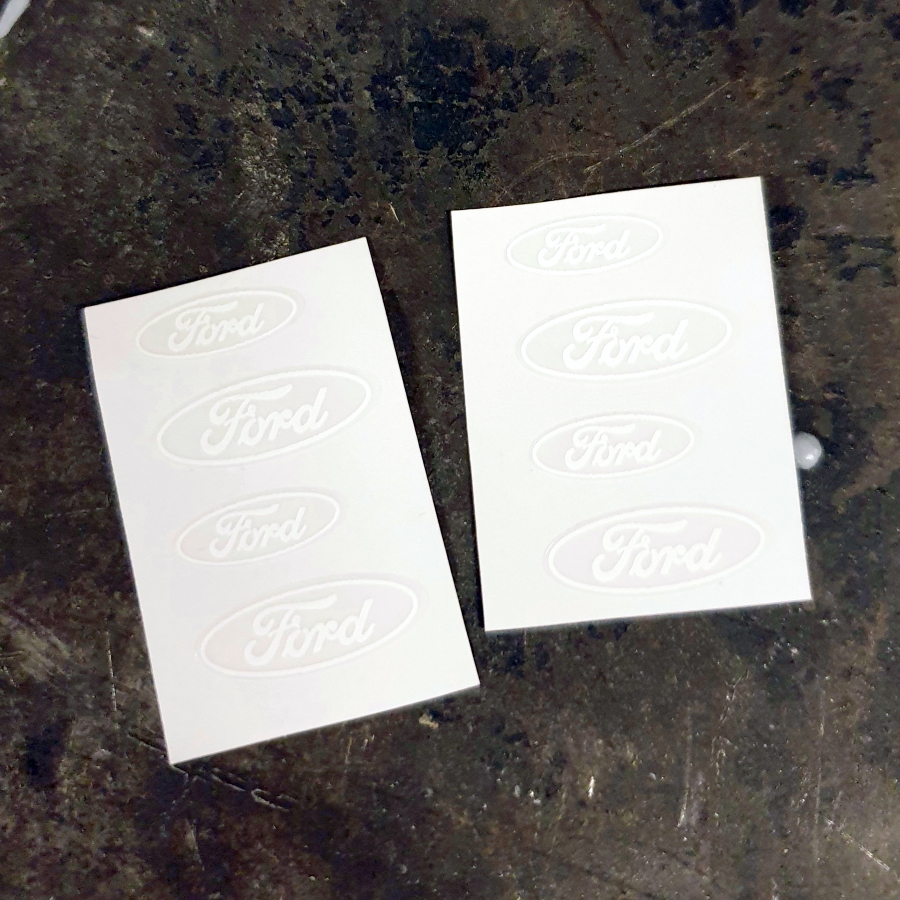
Ford oval stuck to phone mount. The Nokia 6210 arrived but is a bit tatty so I'll order a new case for it before sending to paint to be matched to the dashboard trim.
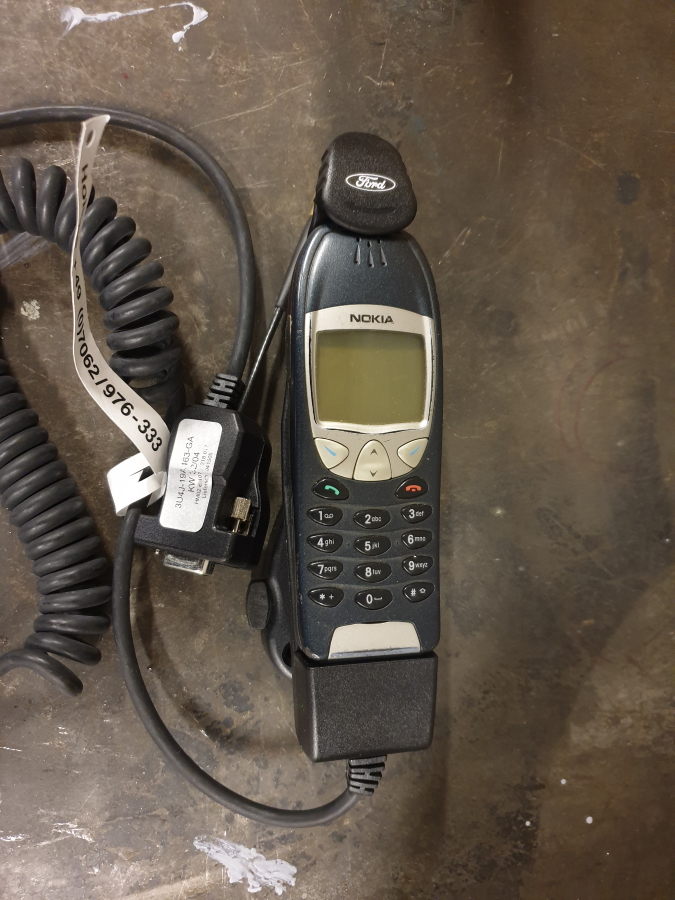
I found a dashboard bezel for the phone kit. These parts are long discontinued so I couldn't be picky when it came to the trim colour. I've ordered a can of SEM Classic Coat 17073 Medium Dark Graphite to match the dashboard; I used that product on the Golf arm rest and the match was absolutely perfect.
Misc
My Focus RS gearbox did not have a shift mechanism tower cover - I don't know if they are supposed to or not but I found a new Focus part that I will modify to fit.
I also found a genuine Ford period battery cover to suit a larger capacity battery, which I will use in place of the original ~50Ah version.
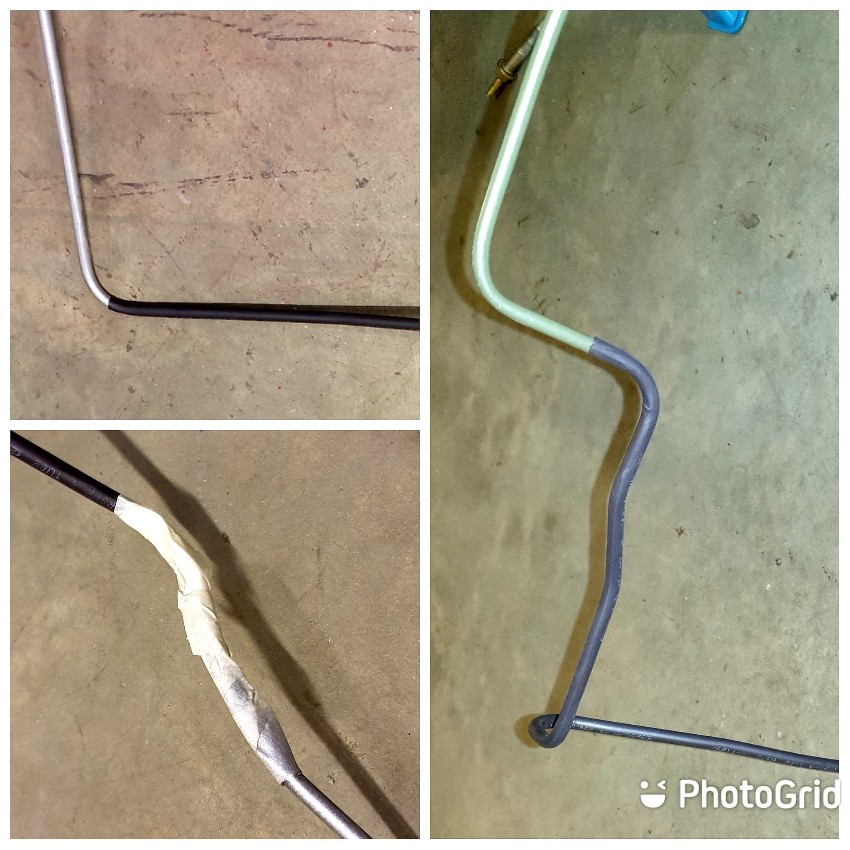
Handbrake Cable
The handbrake is from a Mk1.5 Focus, the handbrake cable from a Racing Puma, and of course the car is an earlier Fiesta so the two cables don't quite marry up. My next task is to fabricate something to join the Puma front cable to Puma rear.
In places the underside is dusty so I'll give that a clean, too.
- Excursion
- Bulletin Board User
- Posts: 15265
- Joined: Thu Jan 01, 1970 1:00 am
- Location: Skynet
- Your car: Ford Fiesta
Car: 1990 Ford Fiesta XR2i
Re: MWSTEWART | 500+ BHP Project | 10/04/2024
![]() by Excursion on Wed Apr 10, 2024 1:45 pm
by Excursion on Wed Apr 10, 2024 1:45 pm
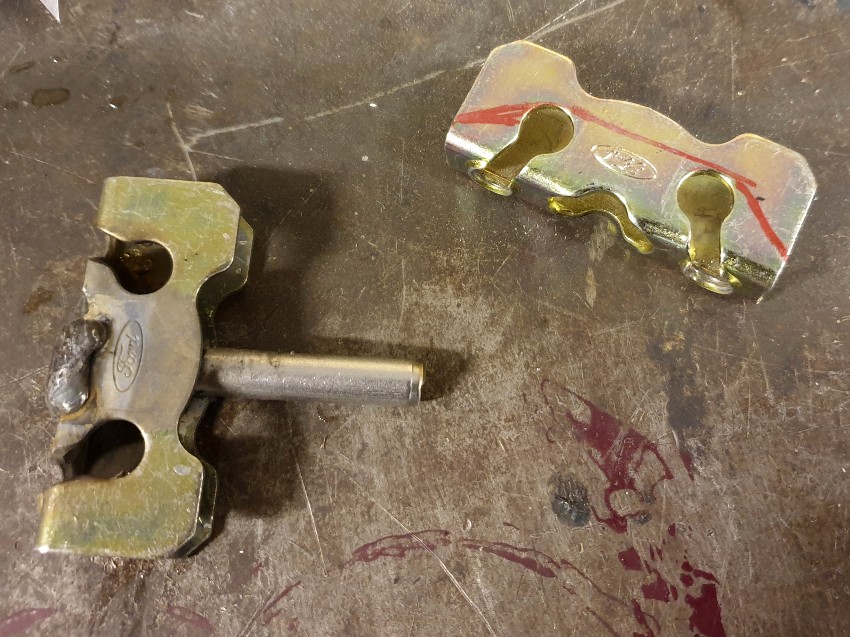
The handbrake side of the yoke needed clearance to allow the nipple to be pushed through the yoke and turned 90 degrees. To provide this clearance I heated and bent another stainless bolt to form a curve.
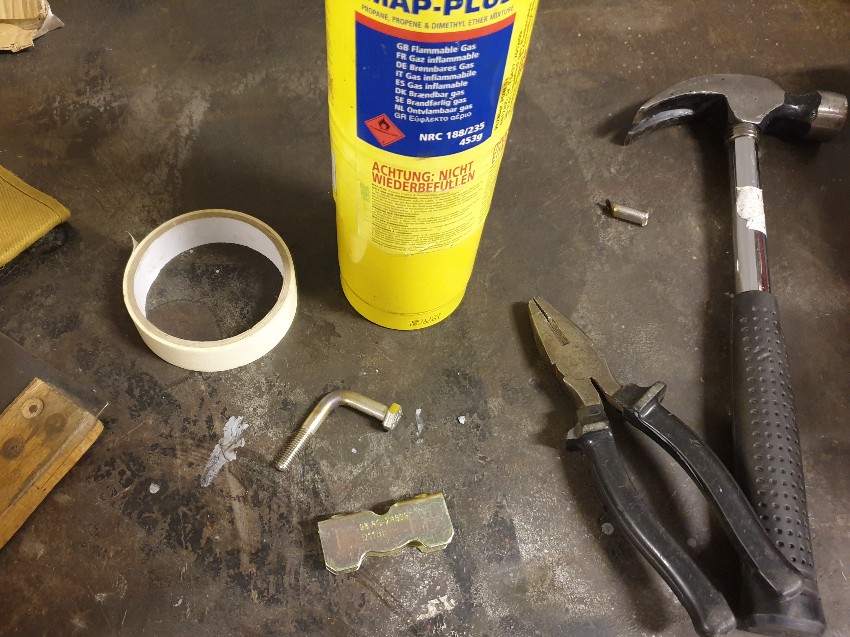
I welded the two bolt sections together which gave the required 40mm clearance between each yoke. I etch primed and finished in Plasti-kote gold. Note: not Plasti-dip which is a temporary finish.
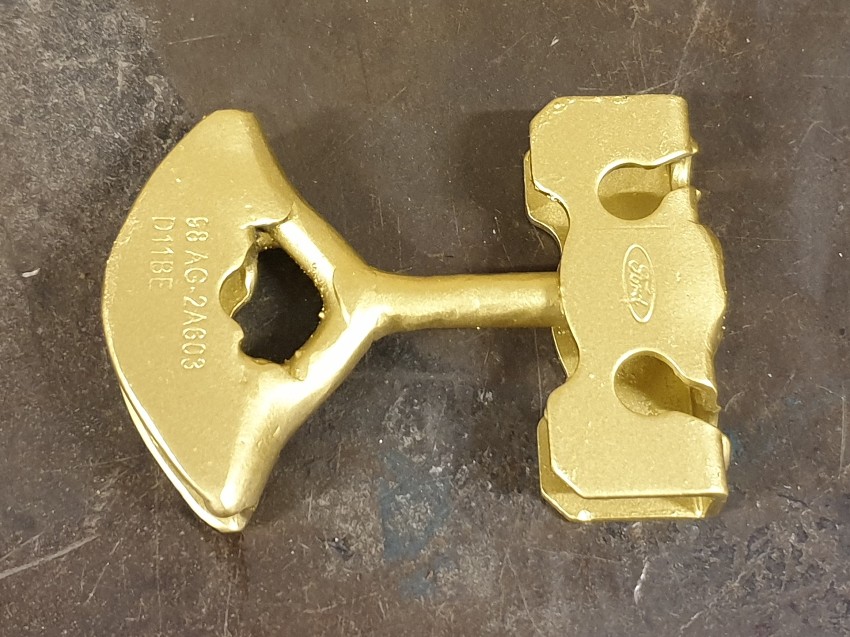
New yoke mounted and handbrake adjusted - the adjustment nut still has 90% of its travel available which will maximise the service life of the cable.
- Excursion
- Bulletin Board User
- Posts: 15265
- Joined: Thu Jan 01, 1970 1:00 am
- Location: Skynet
- Your car: Ford Fiesta
Car: 1990 Ford Fiesta XR2i
Re: MWSTEWART | 500+ BHP Project | 10/04/2024
![]() by Excursion on Wed Apr 10, 2024 1:45 pm
by Excursion on Wed Apr 10, 2024 1:45 pm
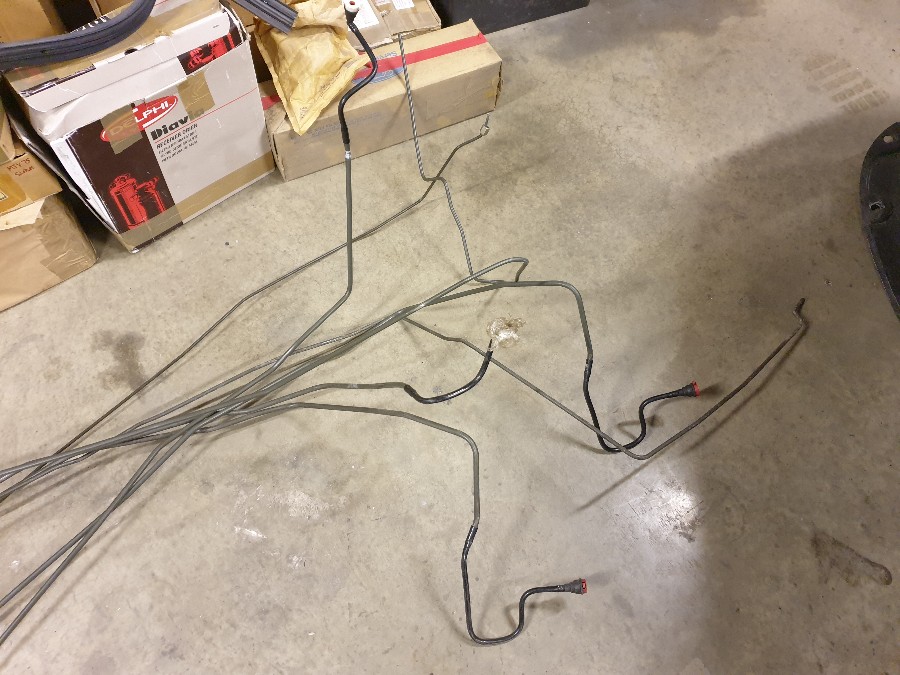
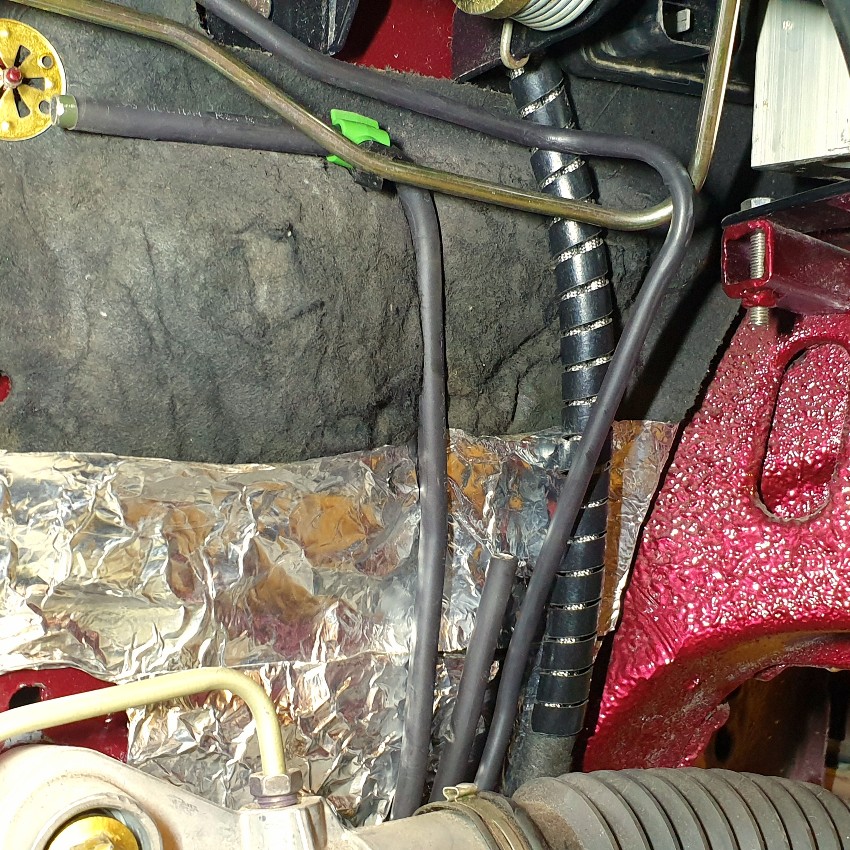
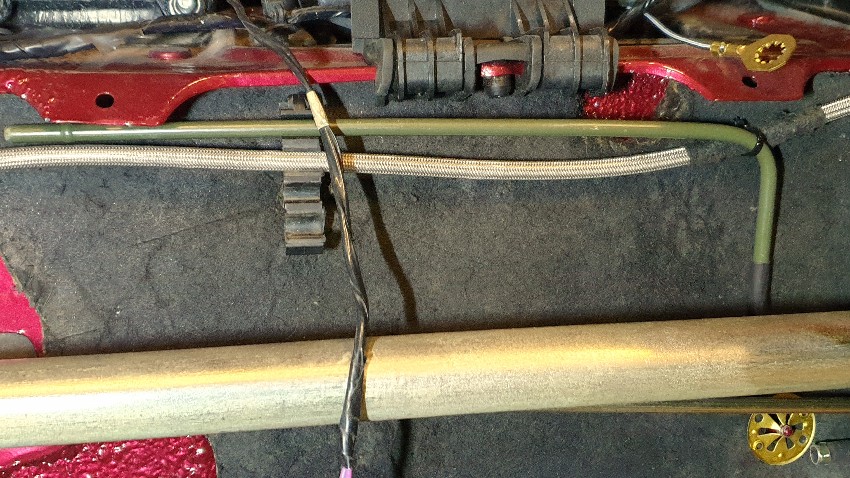
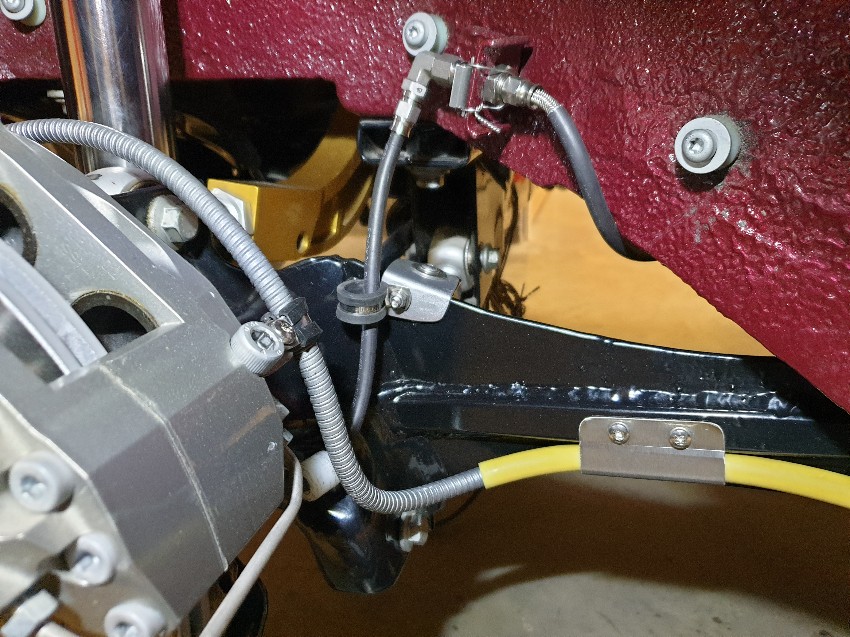
I have modified the various hard line and hose clips to suit PVC coated AN3 stainless hose which I've used in place of the original AN3 steel hard line.
I'm using the original Ford AN6 fuel lines and AN4 evap line - AN6 will flow a sufficient amount of fuel for my needs.
All original lines are steel and finished in typical olive green paint, so in order to add some protection and chaffe resistance I have covered the fuel lines in heat shrink and sprayed the evap line silver.
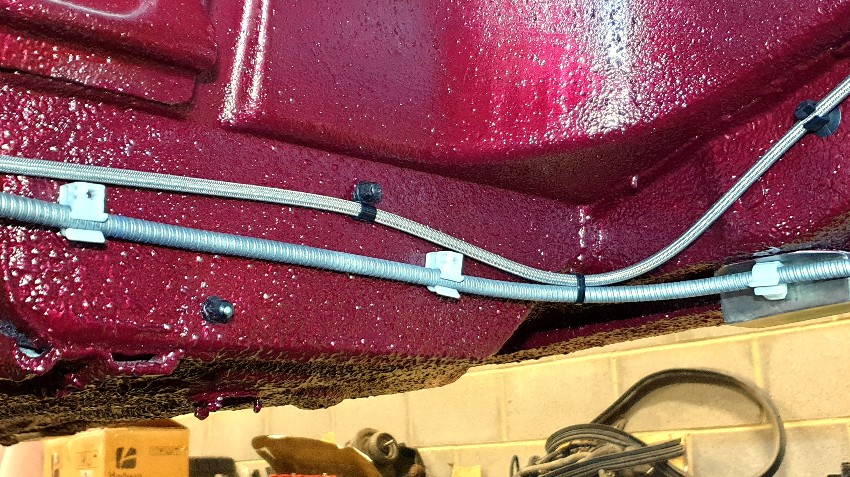
Fuel, evap, and new AN3 braided hoses in the OEM underbody pipe clips.
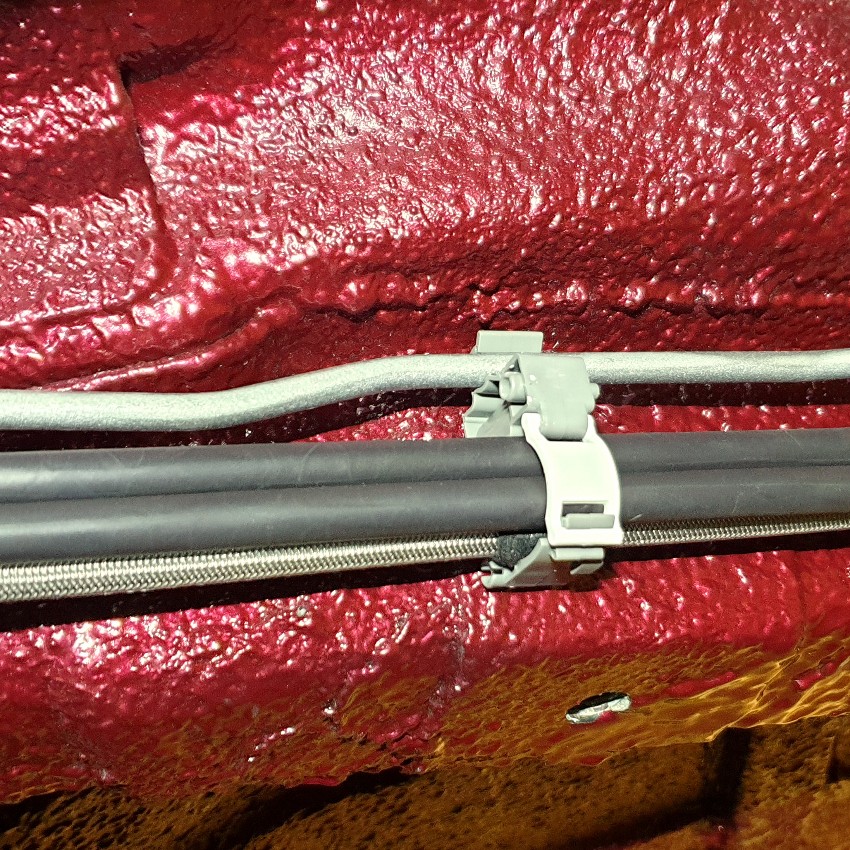
Lines fitted at the rear of the car.

Evap and fuel lines in the engine bay. New Ford pipe clips used.
- Excursion
- Bulletin Board User
- Posts: 15265
- Joined: Thu Jan 01, 1970 1:00 am
- Location: Skynet
- Your car: Ford Fiesta
Car: 1990 Ford Fiesta XR2i
Re: MWSTEWART | 500+ BHP Project | 10/04/2024
![]() by Excursion on Wed Apr 10, 2024 1:46 pm
by Excursion on Wed Apr 10, 2024 1:46 pm
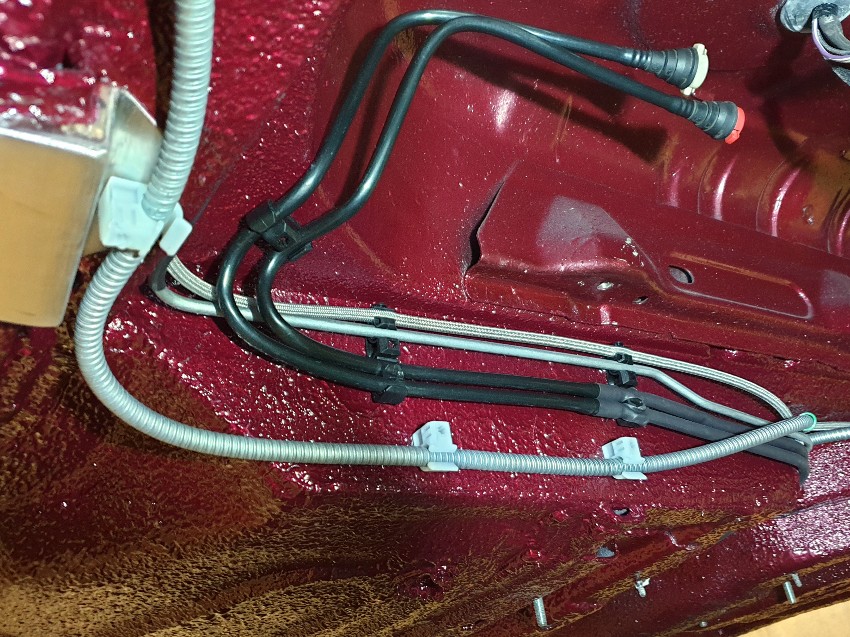
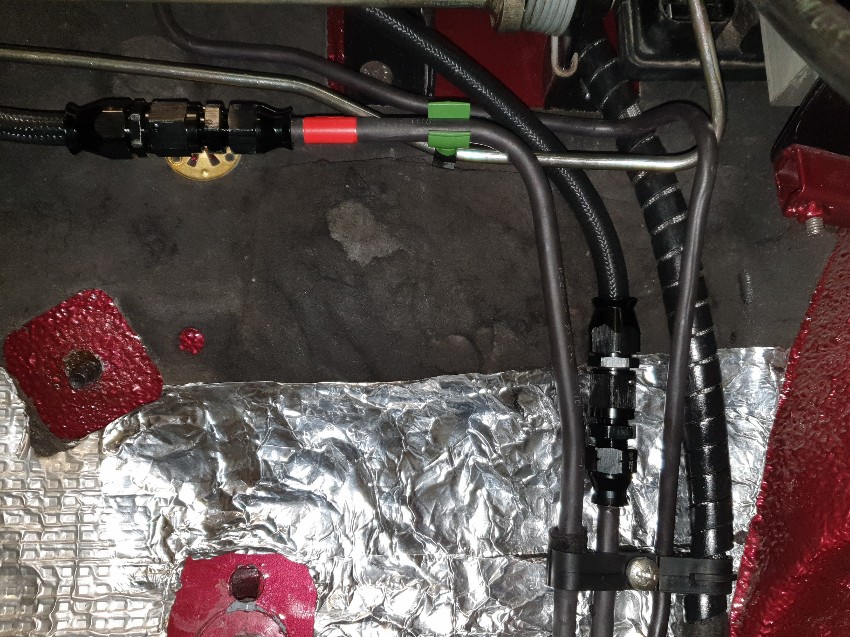
I've made up the hose to link fuel hard lines to the fuel rail. AN6 Teflon lined stainless braided hose with a black nylon outer braid which is a bit kinder to anything it comes into contact with.
AN6 hardline fittings used to connect to the normal AN6 hose fittings.
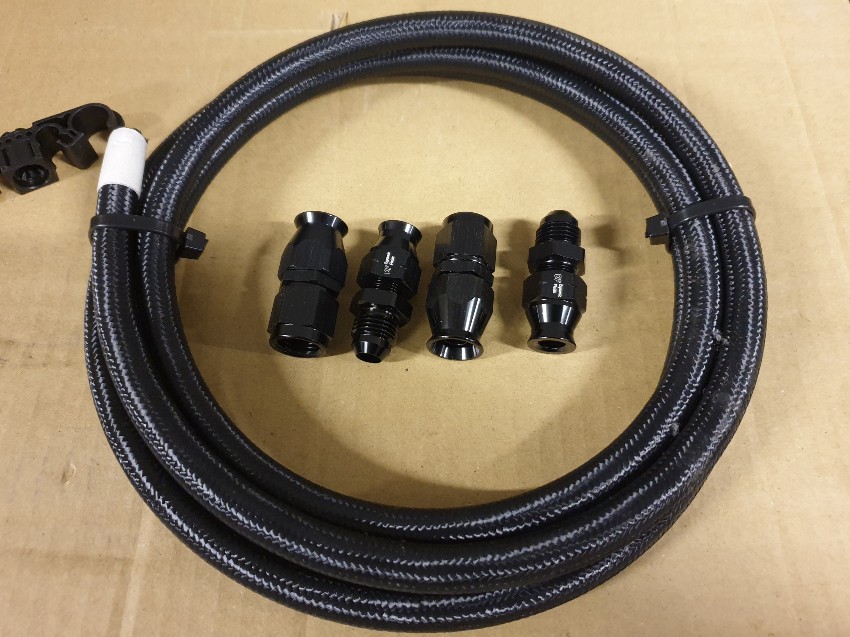
Everything in place. Red tape to signify the return as per Ford spec: white for feed and red for return. I also modified a Focus underbody fuel line clamp and used it to keep all lines tight to the bulkhead and away from the steering rack gaiter.
- Excursion
- Bulletin Board User
- Posts: 15265
- Joined: Thu Jan 01, 1970 1:00 am
- Location: Skynet
- Your car: Ford Fiesta
Car: 1990 Ford Fiesta XR2i
Re: MWSTEWART | 500+ BHP Project | 10/04/2024
![]() by Excursion on Wed Apr 10, 2024 1:46 pm
by Excursion on Wed Apr 10, 2024 1:46 pm
I used epoxy to bond the strap to the pipe clip. Problem solved.
Exhaust Heat Shield - Front
The fixing area of aluminium heat shields have a bit of a hard life: trapped water and electrolytic corrosion usually result in the aluminium shield disintegrating underneath its fastenings. Fiesta heat shields have long been NLA, so in order to preserve them I have smeared grease around both sides of the mounting points and isolated the steel fasteners from the aluminium with stainless washers.
Shield fitted.
- Excursion
- Bulletin Board User
- Posts: 15265
- Joined: Thu Jan 01, 1970 1:00 am
- Location: Skynet
- Your car: Ford Fiesta
Car: 1990 Ford Fiesta XR2i
Re: MWSTEWART | 500+ BHP Project | 10/04/2024
![]() by Excursion on Wed Apr 10, 2024 1:47 pm
by Excursion on Wed Apr 10, 2024 1:47 pm
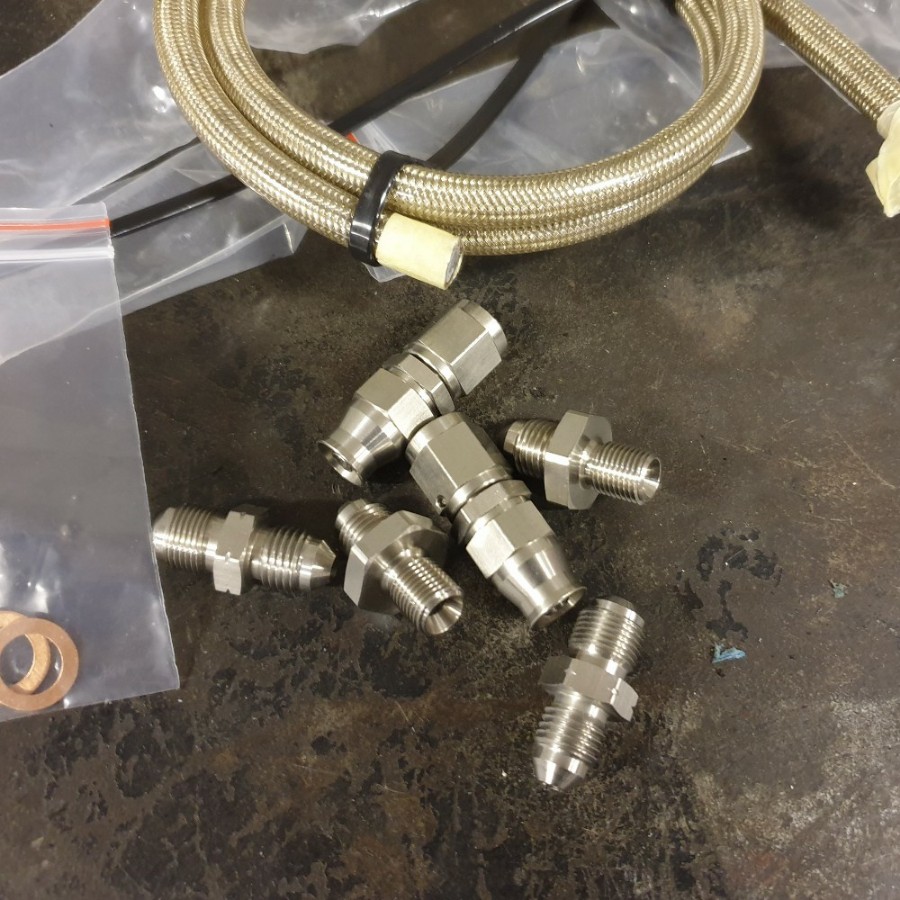
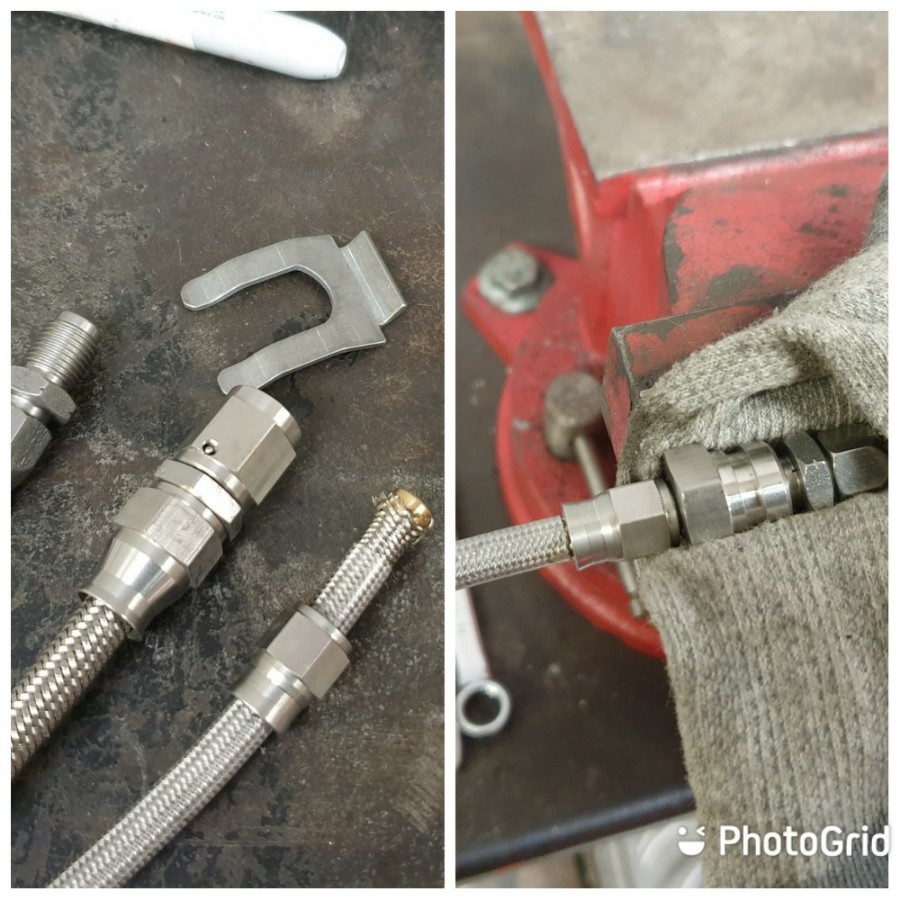
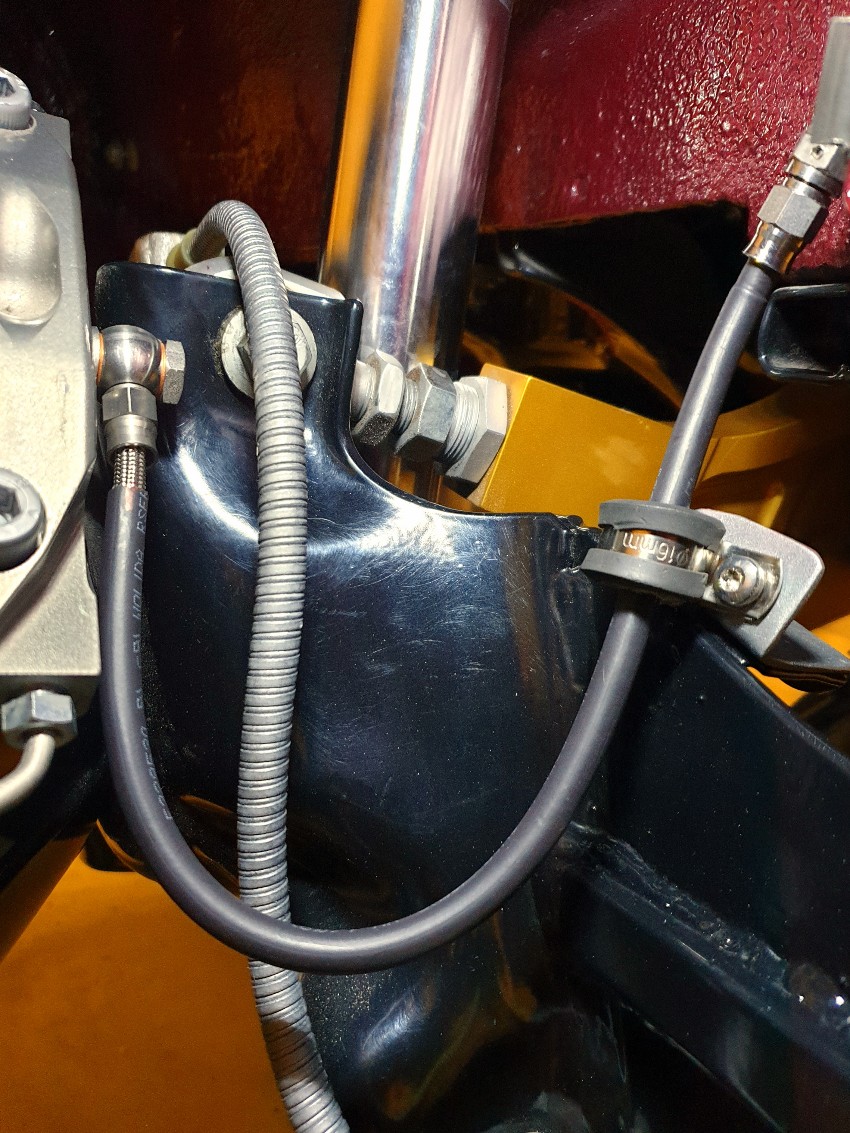
The rear lines are completely bespoke: Fiesta wheelarch mount, Focus trailing arms, and AP Racing calipers mounted in a unique location. The photo below shows what I had to work with.
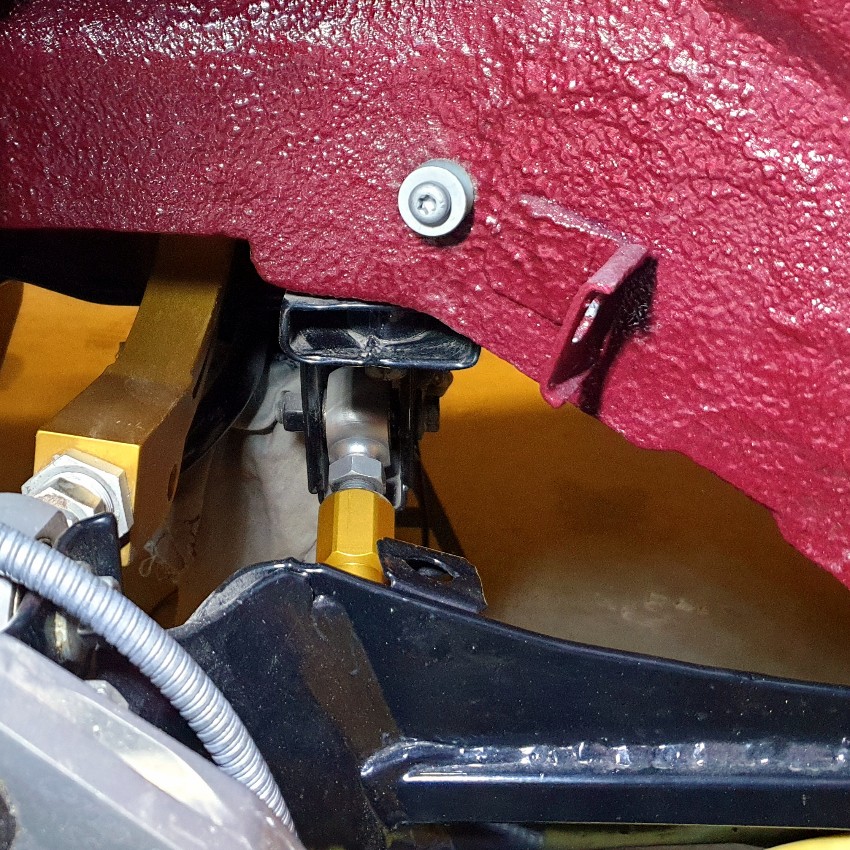
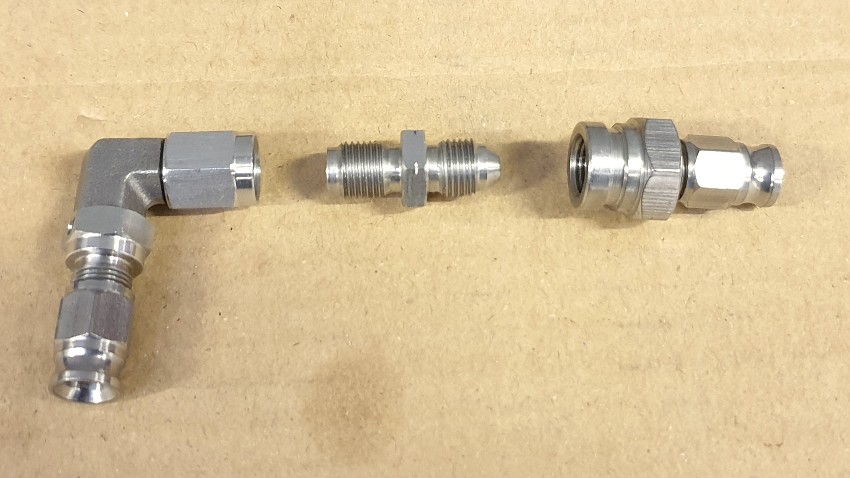
The design uses a particular set of fittings that are a mix of convex and concave seats, and required a male/male adapter to suit. All fittings are stainless steel.
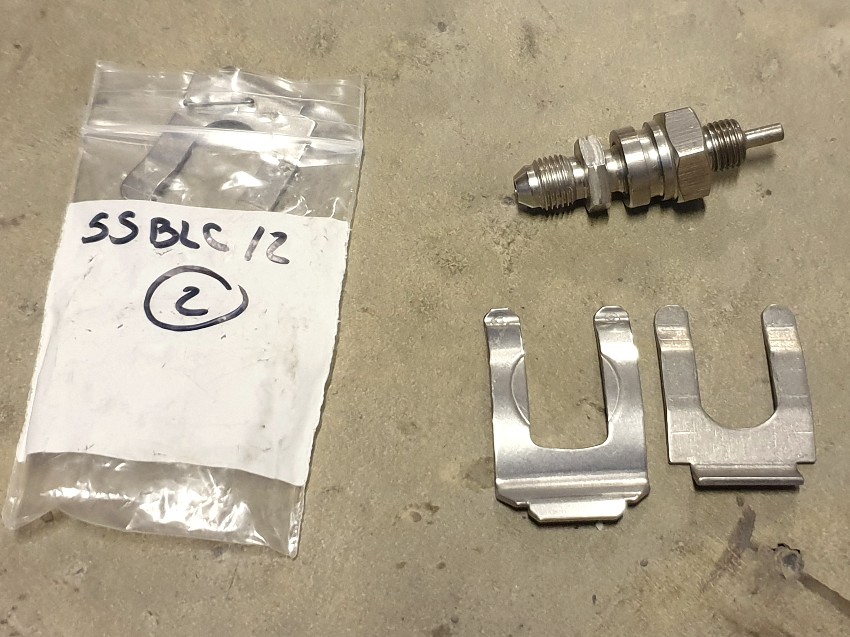
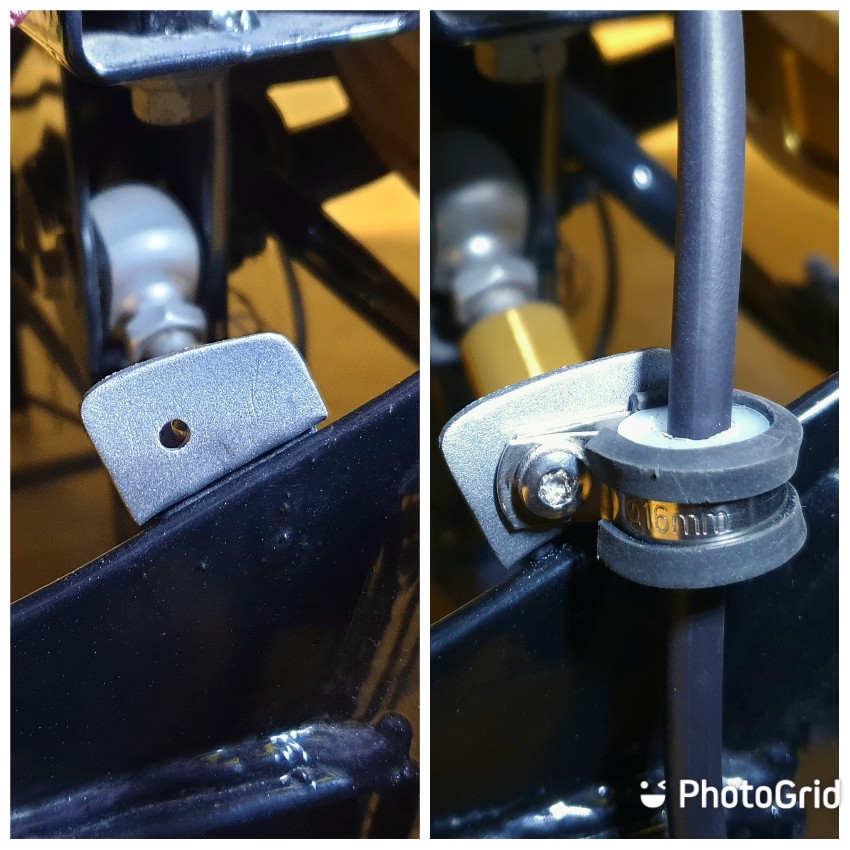
The Fiesta wheelarch bulkhead mount is keyed to prevent the fitting from twisting, so I've filed flats on the bulkhead fittings to match.
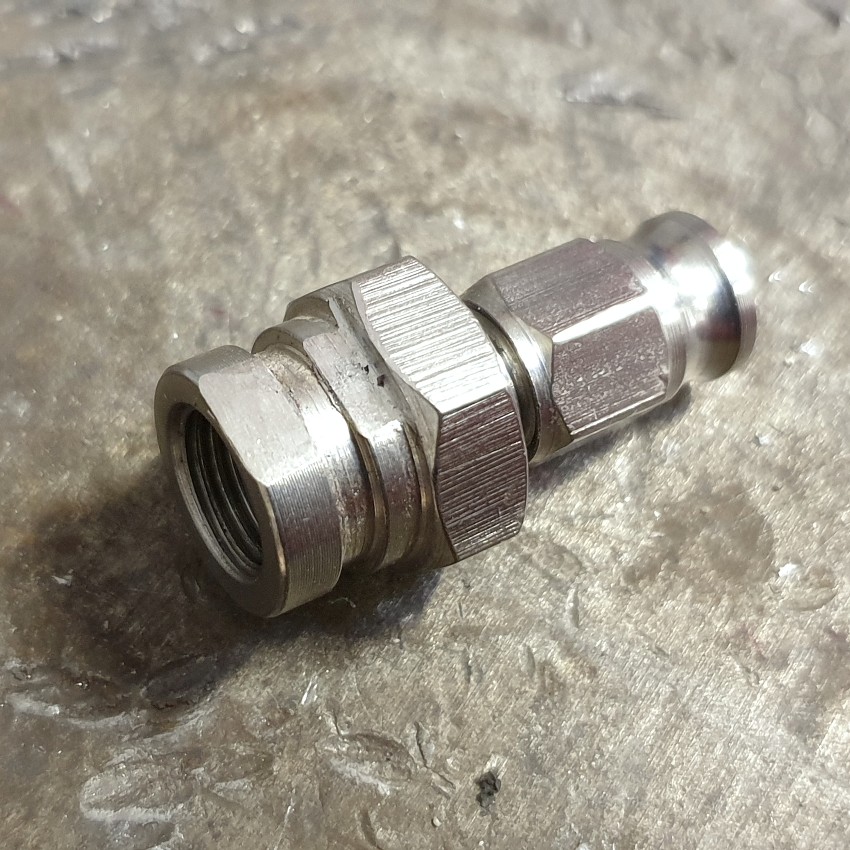
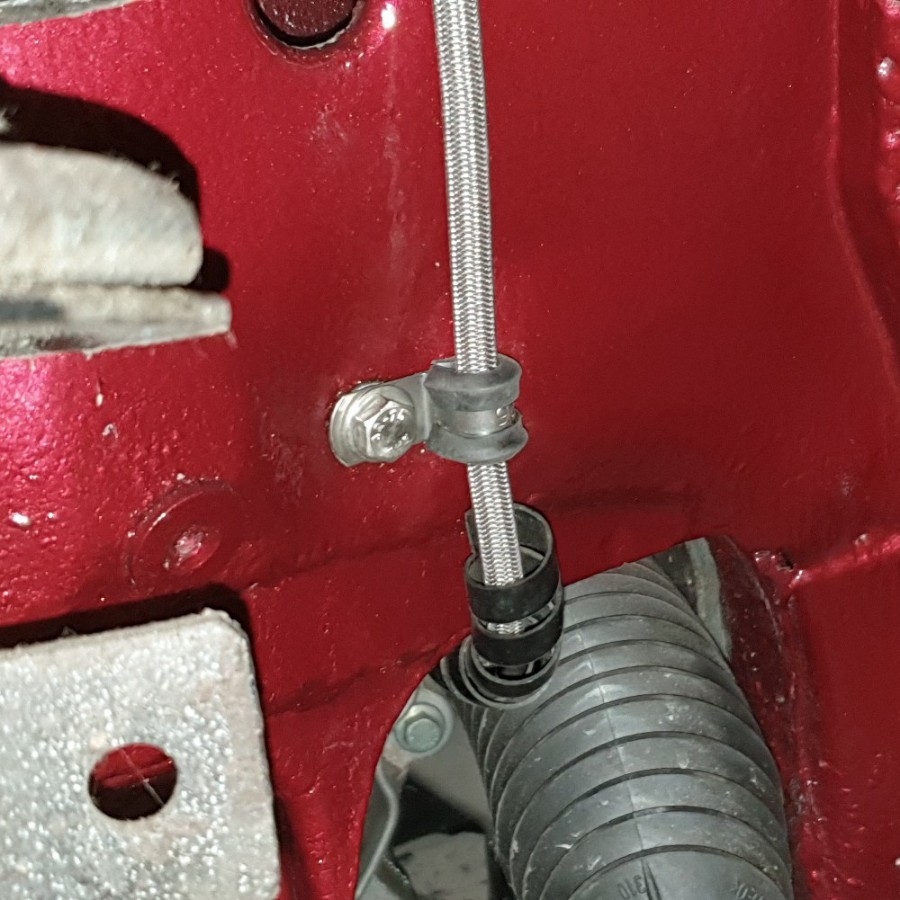
In order to make the plumbing work the bulkhead fittings will be installed in reverse orientation, but doing so leaves less room for the securing clips due to the design of the mounting bracket. I'm using stainless clips rather than OEM steel and I managed to find a second, shorter design which are a perfect fit.
I've designed a mounting bracket that allows the hose to slide through it as the suspension compresses. I made it from a Delrin bush which is held in a P clip attached to an aluminium bracket.
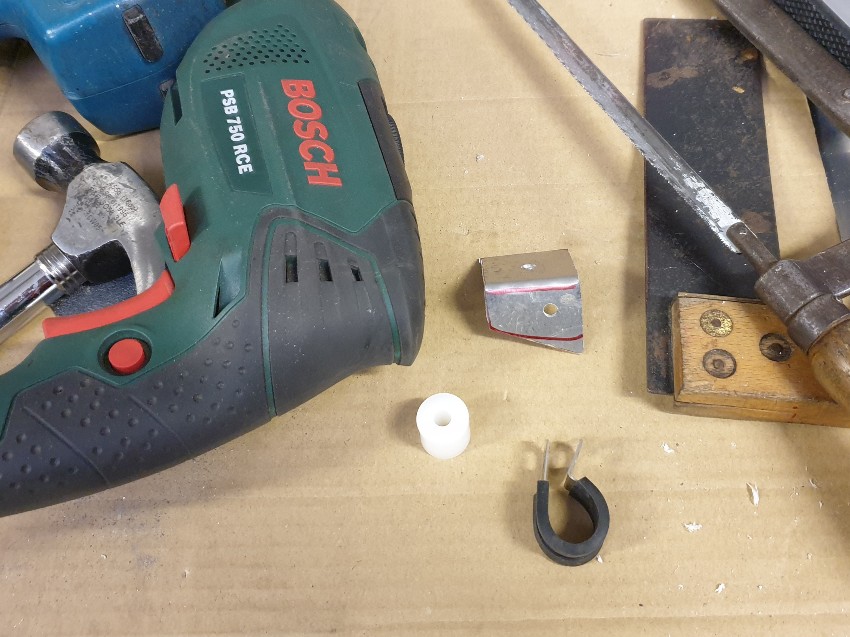
The hose brackets bolt through the original bulkhead fitting mounts on the Focus trailing arm. The brackets were etch primed and painted silver.
Hose assemblies partially complete. The stainless hose has a PVC sheath but I've added some black heatshrink in places to make it look more OEM.
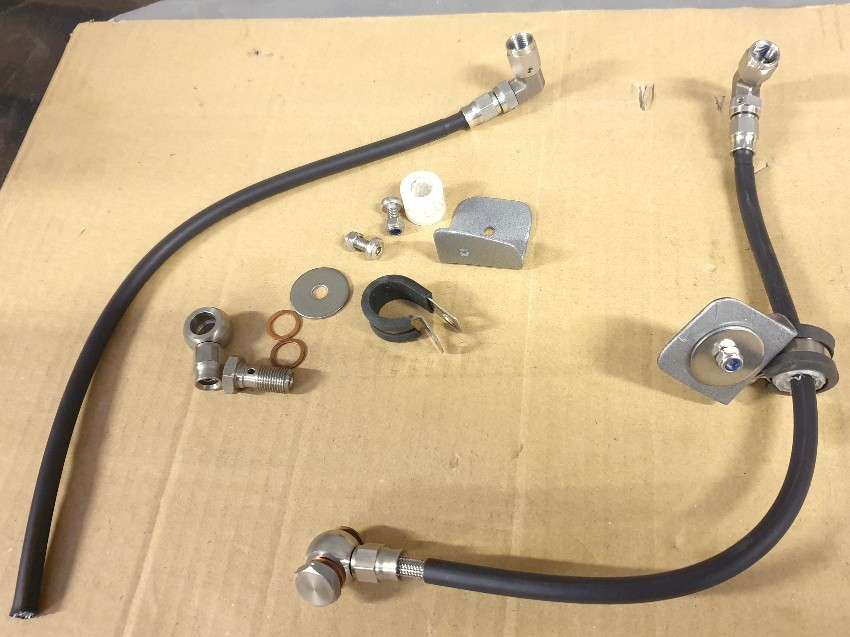
Completed.

I have lockwired the brake cable mounts. I'm thinking ahead to a top speed run should I change the gear ratios.

- Excursion
- Bulletin Board User
- Posts: 15265
- Joined: Thu Jan 01, 1970 1:00 am
- Location: Skynet
- Your car: Ford Fiesta
Car: 1990 Ford Fiesta XR2i
Re: MWSTEWART | 500+ BHP Project | 10/04/2024
![]() by Excursion on Wed Apr 10, 2024 1:47 pm
by Excursion on Wed Apr 10, 2024 1:47 pm
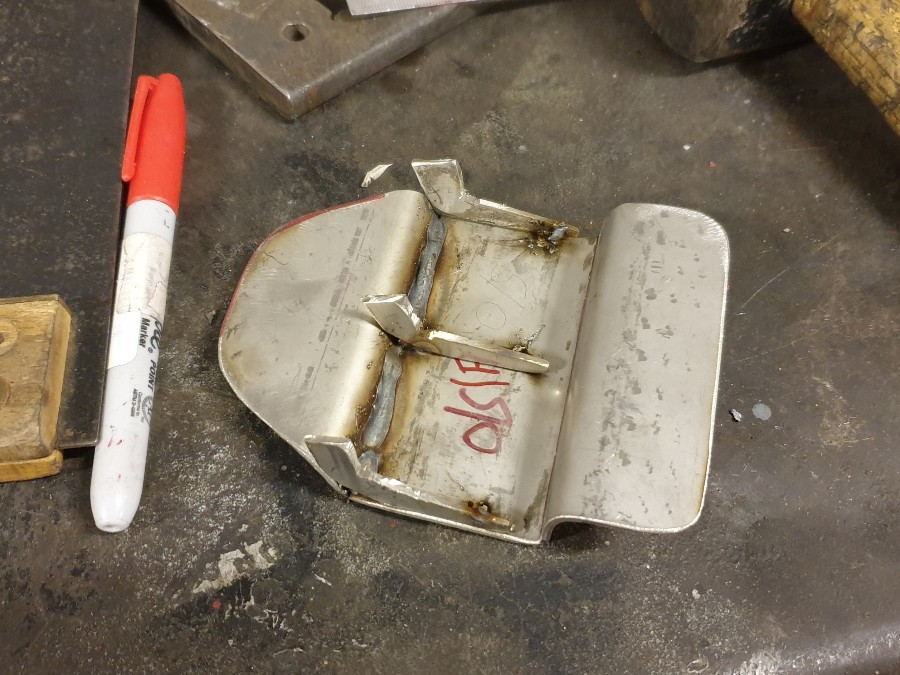
The rear silencer on my car will be mounted transversely behind the rear axle, unlike longitudinally on the O/S of the boot floor, as standard. I researched various cars with this exhaust configuration including the TT, Quattro Audis and others. In the end I decided that I could make a Mercedes-Benz CLA part work. Part number A2466820171.
With my Mercedes discount the part came in around £20 which is considerably less than those offered on eBay - with the usual mark-up. I bought two so that I could use one as a prototype.
After some time spent hammering and reshaping I was happy with the fit. I cut up the prototype shield and used it to extend the good one. The following pic shows the initial extension (top) and then the reshaping to fit my installation (bottom), including a relief to access the camber adjustment bolts on the rear subframe. All edges were folded over and hammered flat to create a smooth seam.
I used stainless peel rivets to join the extension. This was the first time that I've used them, and they were perfect for the job.
I didn't want to drill the floor, so I used 'big head' bonding studs and secured them to the boot floor with RTV. These were bent into shape to suit the contours of the boot floor.
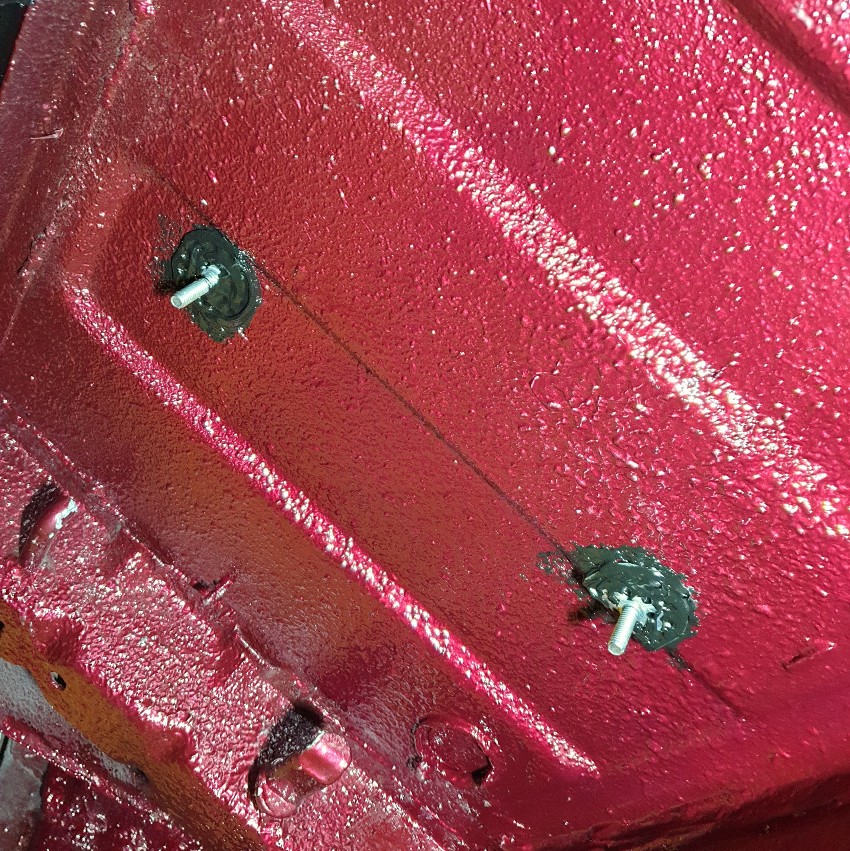
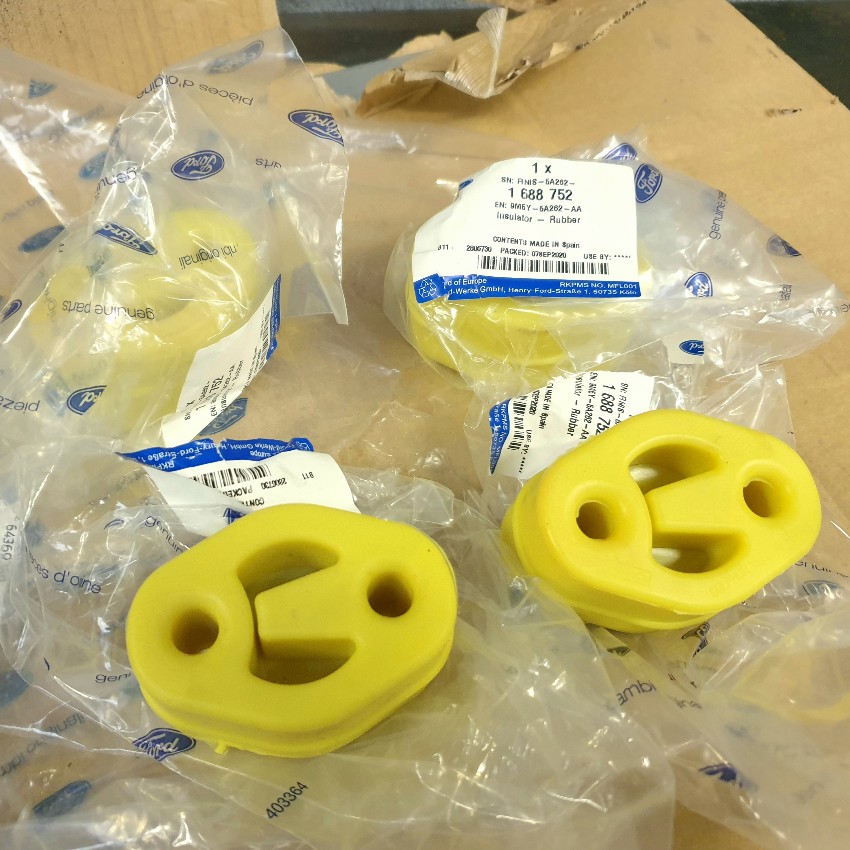
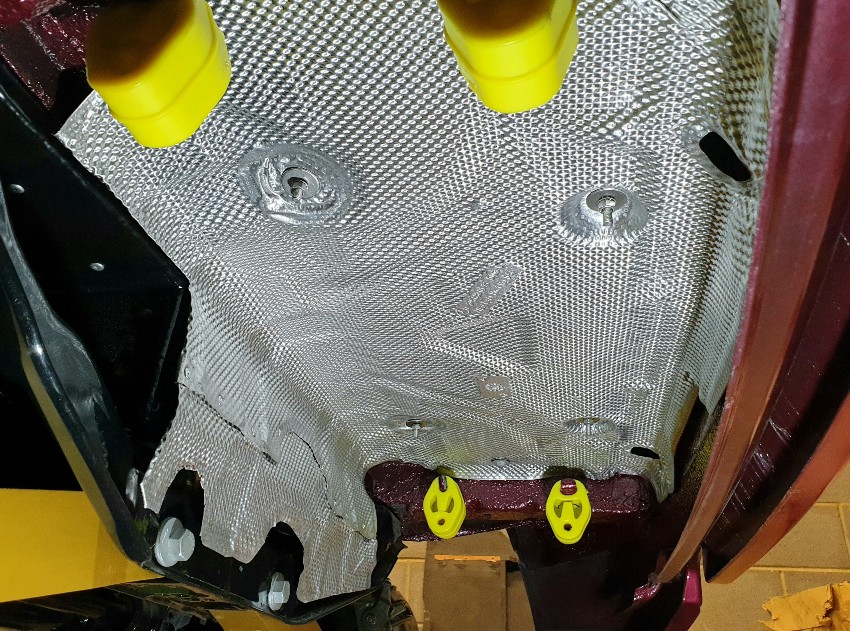
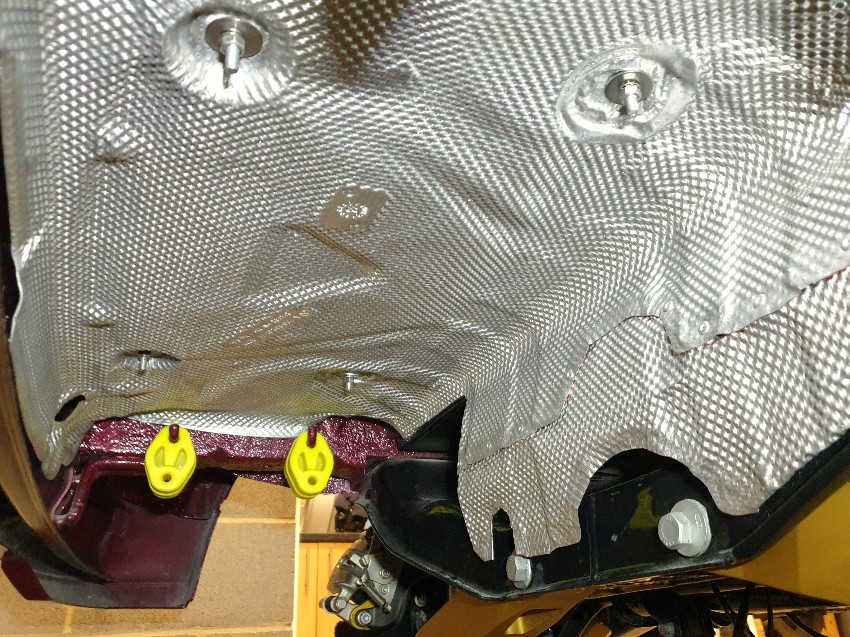
I've chosen Focus ST/RS exhaust mounts. Ford part number 1688752. These have a most unusual smell! Like liquorice mixed with surfboard wax.
Complete. When preparing the shell I had made provision for three additional exhaust mounts. I'm very pleased with how this job turned out.
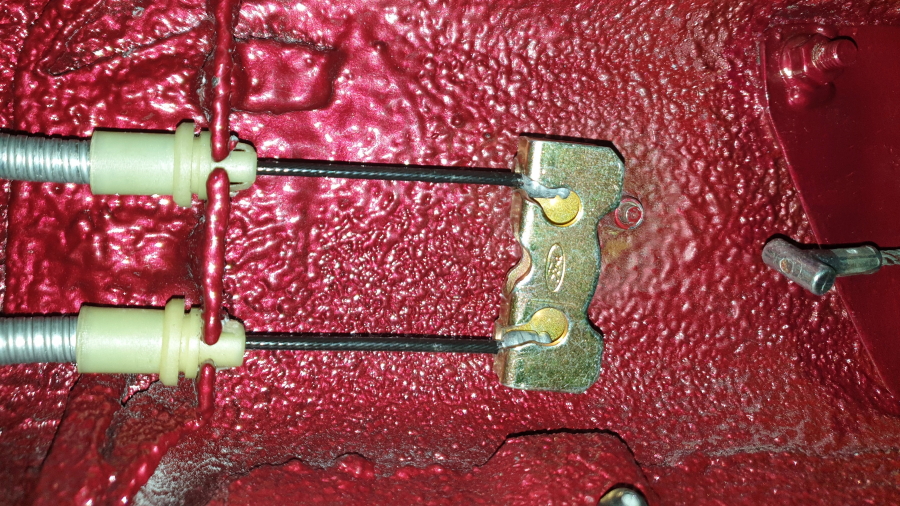
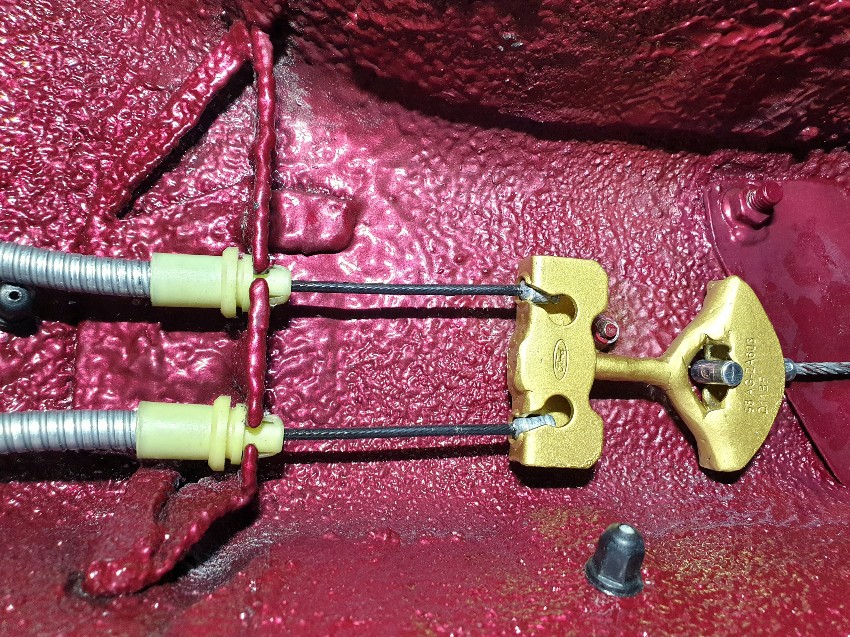
Handbrake Cable - Rear Brackets
The handbrake cable position and routing is completely unique to my car and required custom brackets. For the first time in years I made use of the bead roller - I fashioned a sightly Heath Robinson looking guard to make the job simpler.
Brackets fabricated from stainless steel.
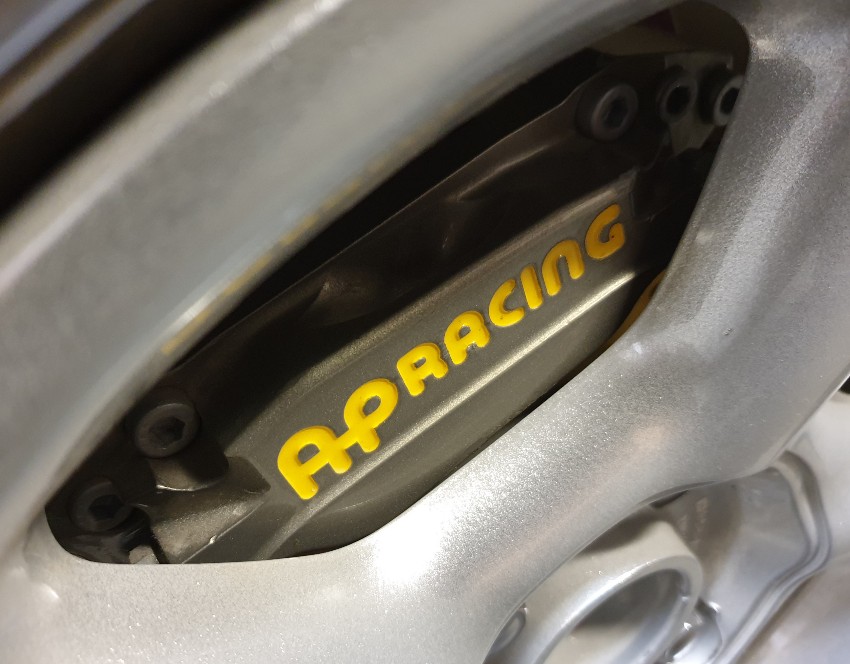
Brackets mounted. The lower bracket is drilled and tapped into the 3mm reinforcement section that I welded to the Focus trailing arm, which is a sealed section, so I took the opportunity to inject some wax. The upper mount is attached to the AP caliper mounting bolt.
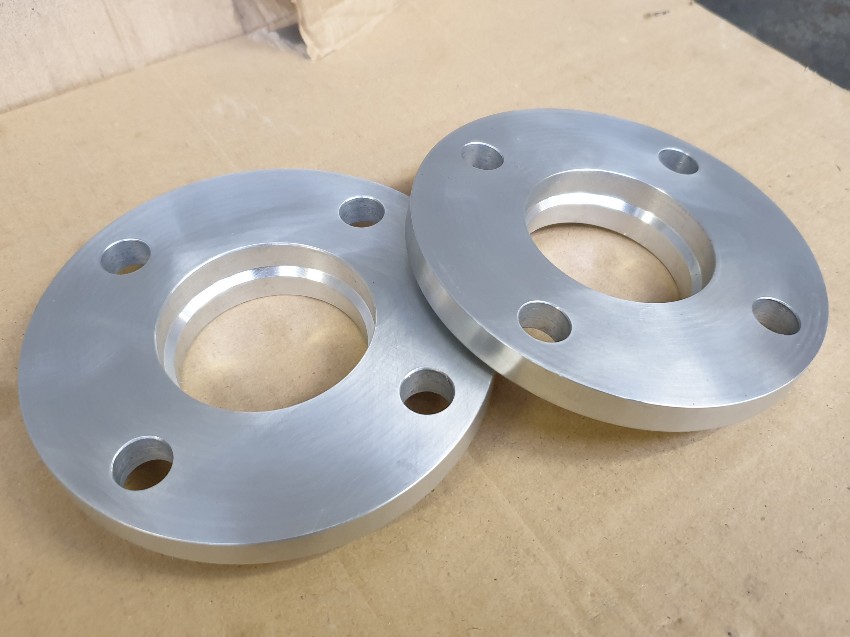
Wheel Spacers & Extended Studs
Changing to the Ford wheels has reduced caliper clearance by 10mm; 3mm due to ET35 rather than ET38, and 7mm due to the wheel design. The Team Dynamics wheels required a 3mm spacer therefore the Ford wheels require 13mm.
I couldn't find spacers in the required thickness, so I ordered 16mm and I'll have them milled to spec. I've ordered longer studs to suit - for reference these are M12 x 1.5, 13mm spline, 42mm thread. I really dislike the spaced wheel look but thankfully due to the rolled and flared arches I can still retain a decent inset within the wheel arch.
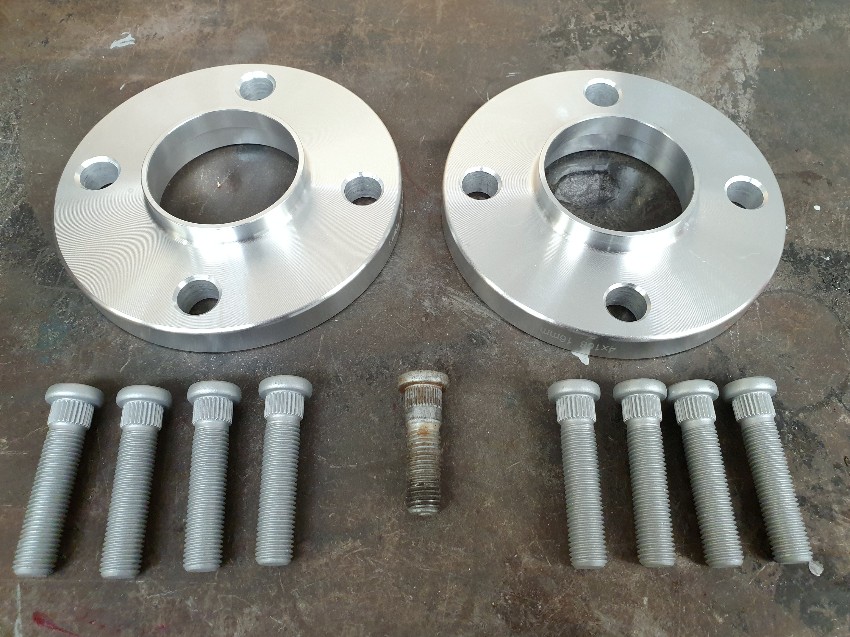
I hammered out the existing studs and managed to fit the replacements through a clearance hole in the disc back plate, and wind them home by locking the hub with a long screwdriver.
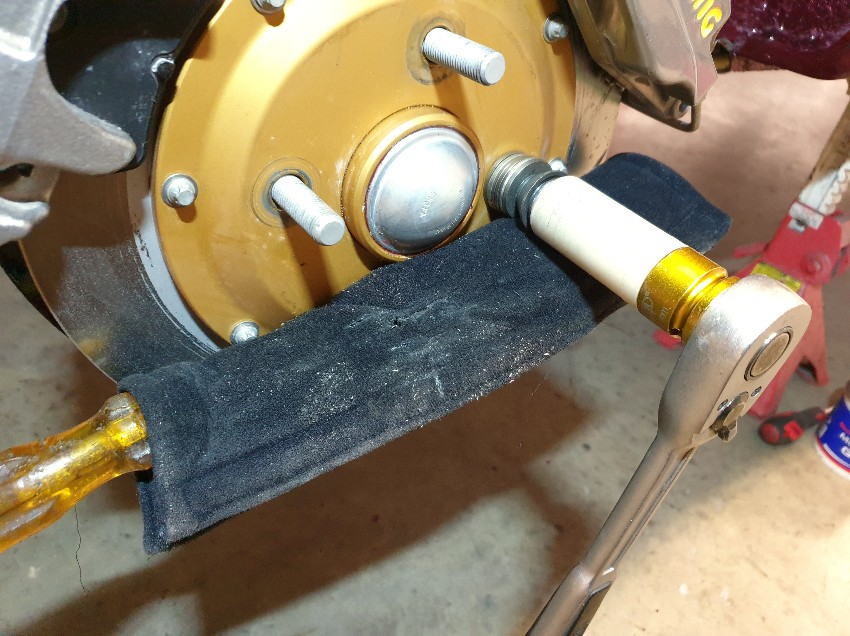
Studs and spacers fitted. Spacers yet to be milled.
- Excursion
- Bulletin Board User
- Posts: 15265
- Joined: Thu Jan 01, 1970 1:00 am
- Location: Skynet
- Your car: Ford Fiesta
Car: 1990 Ford Fiesta XR2i
Re: MWSTEWART | 500+ BHP Project | 10/04/2024
![]() by Excursion on Wed Apr 10, 2024 1:48 pm
by Excursion on Wed Apr 10, 2024 1:48 pm
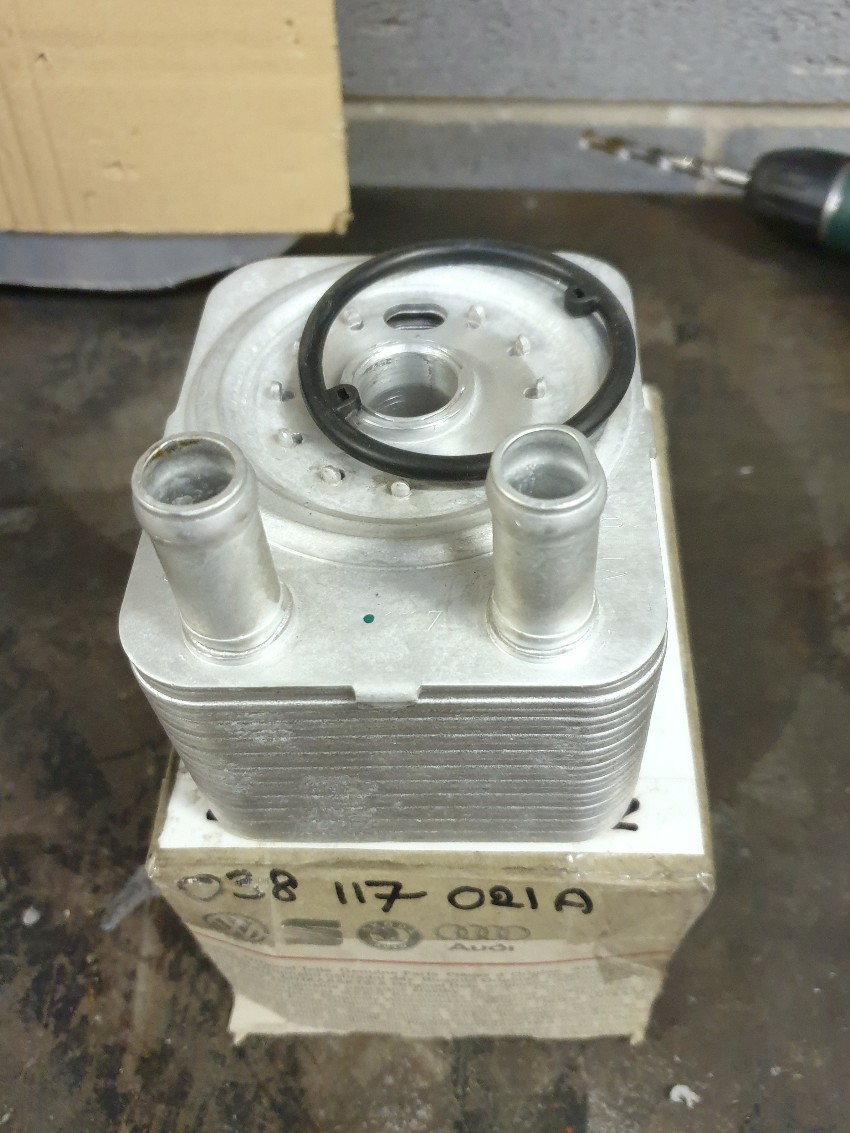
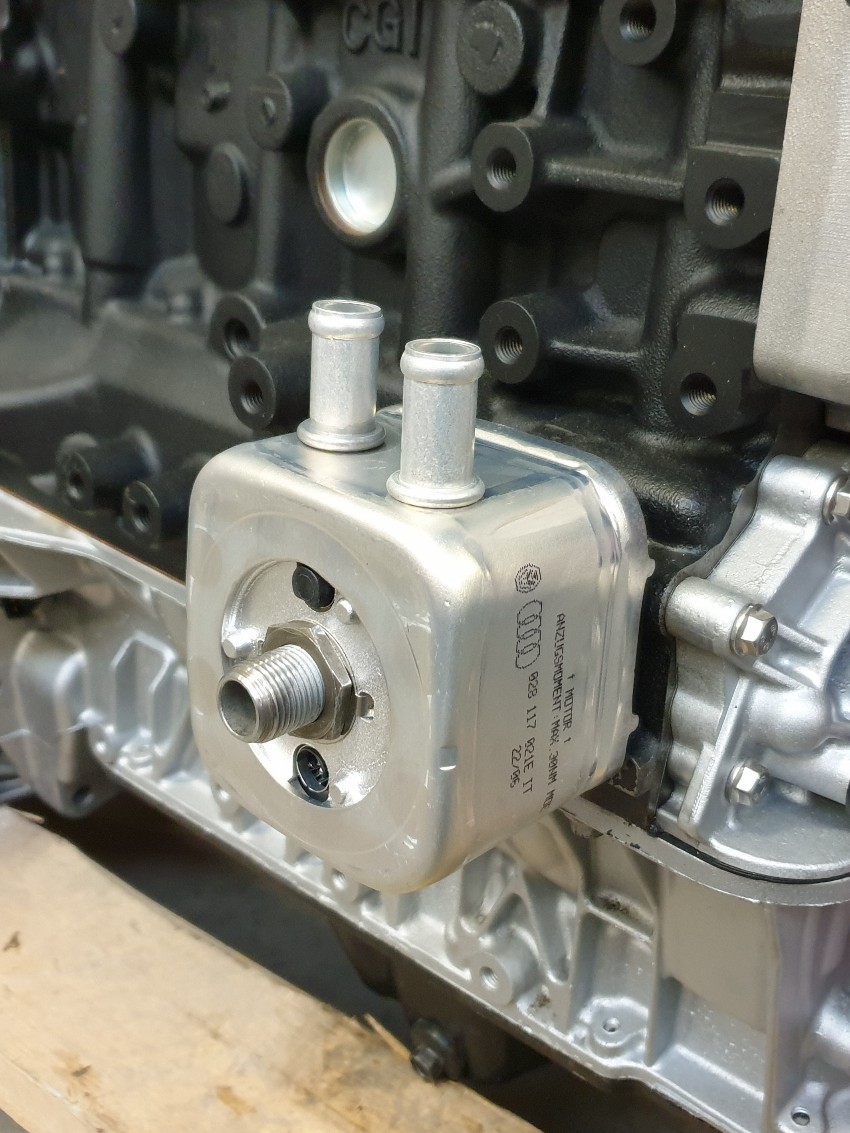
A short segway into engine preparation. I wanted to fit an OEM sandwich oil cooler - technically more of an oil temperature management device because they both aid warm up and prevent high temperatures. The Ford part is steel, rusts at the water unions, and is heavy. I wanted an aluminium part and an upgrade to double capacity.
I found a Ford part used in the US market which at some point switched to aluminium, but I couldn't pin down exactly when, so I looked elsewhere. Many VAG cars use a double capacity sandwich cooler, so I tried part 038 117 021A. A trial fit showed this to be unsuitable because the seal arrangement is designed for installation in reverse orientation to the Zetec.
Whilst I was searching for a suitable part I turned my attention to the mounting stanchion/oil supply tube. It must be extended or replaced in order to accommodate a double capacity cooler in addition to the screw-on filter. Ford use a 3/4 UNF thread for the filter, which is fairly common, so I bought a used VAG oil filter housing 06A115405BP for the stanchion and half nut to lock the cooler in place. Aftermarket oil coolers have a screw on extension tube but this won't work with the VAG coolers.
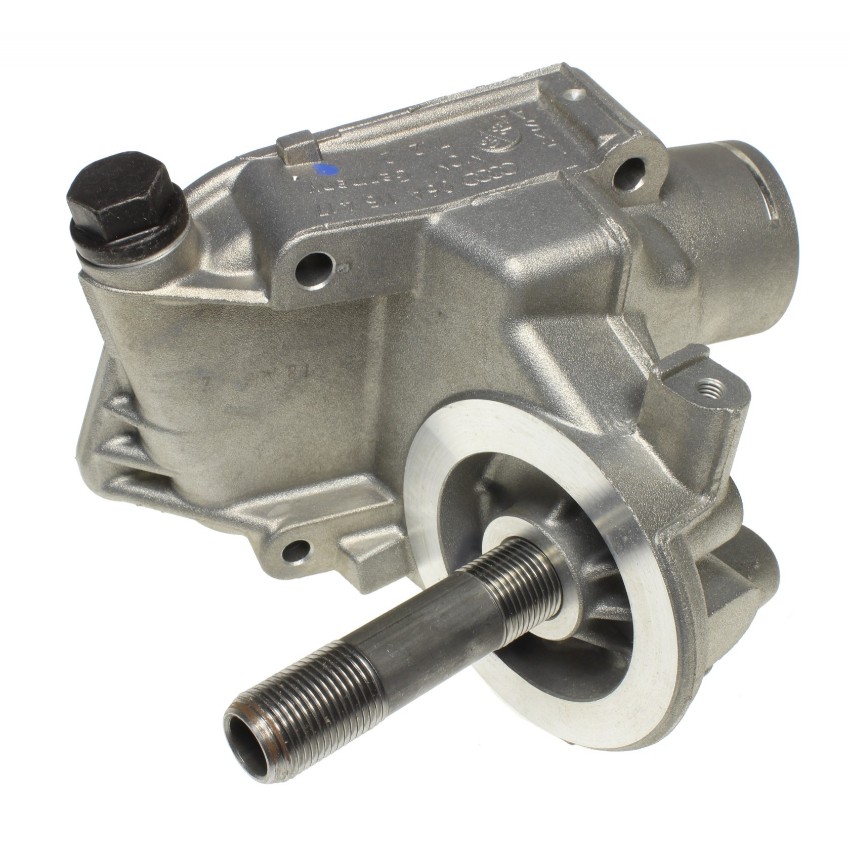
The Zetec stanchion has a different thread at one end to suit that used in the block. I determined the exact length required, and cut down the VAG part to suit ready to weld to the Ford part. I made a jig to align the two parts for welding by cutting an access window in a 3/4 UNF nut.
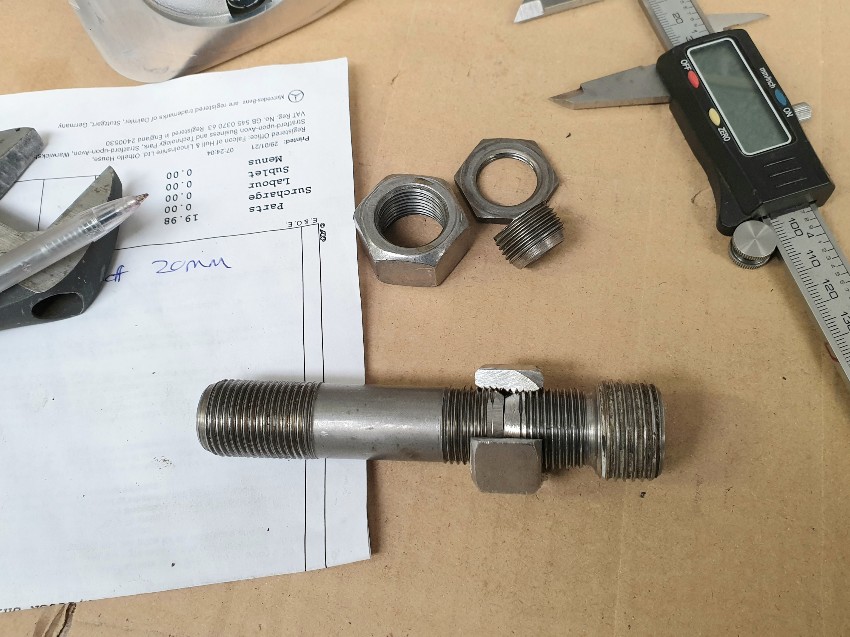
The following collage shows the original stanchion, double nut method used to remove, and the extended version that I made.
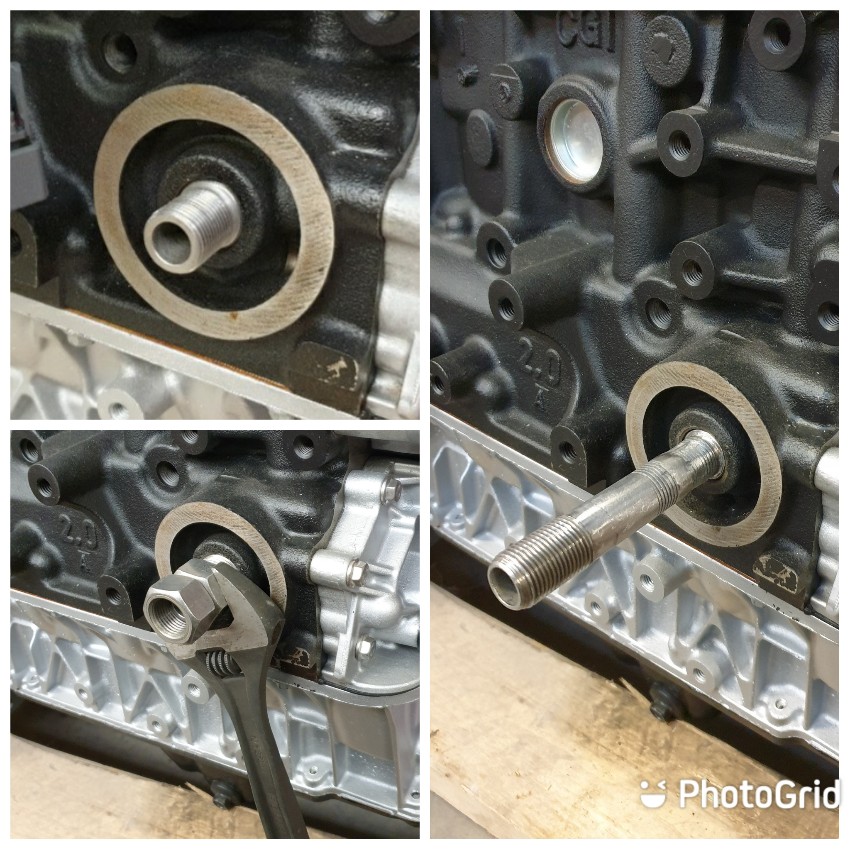
Here is the completed solution. VAG part 028117021E proved to be perfect and is a higher quality part than the friction welded plate type that I originally tried.
- Excursion
- Bulletin Board User
- Posts: 15265
- Joined: Thu Jan 01, 1970 1:00 am
- Location: Skynet
- Your car: Ford Fiesta
Car: 1990 Ford Fiesta XR2i
Re: MWSTEWART | 500+ BHP Project | 10/04/2024
![]() by Excursion on Wed Apr 10, 2024 1:49 pm
by Excursion on Wed Apr 10, 2024 1:49 pm
- Excursion
- Bulletin Board User
- Posts: 15265
- Joined: Thu Jan 01, 1970 1:00 am
- Location: Skynet
- Your car: Ford Fiesta
Car: 1990 Ford Fiesta XR2i
Re: MWSTEWART | 500+ BHP Project | 10/04/2024
![]() by Excursion on Wed Apr 10, 2024 1:49 pm
by Excursion on Wed Apr 10, 2024 1:49 pm
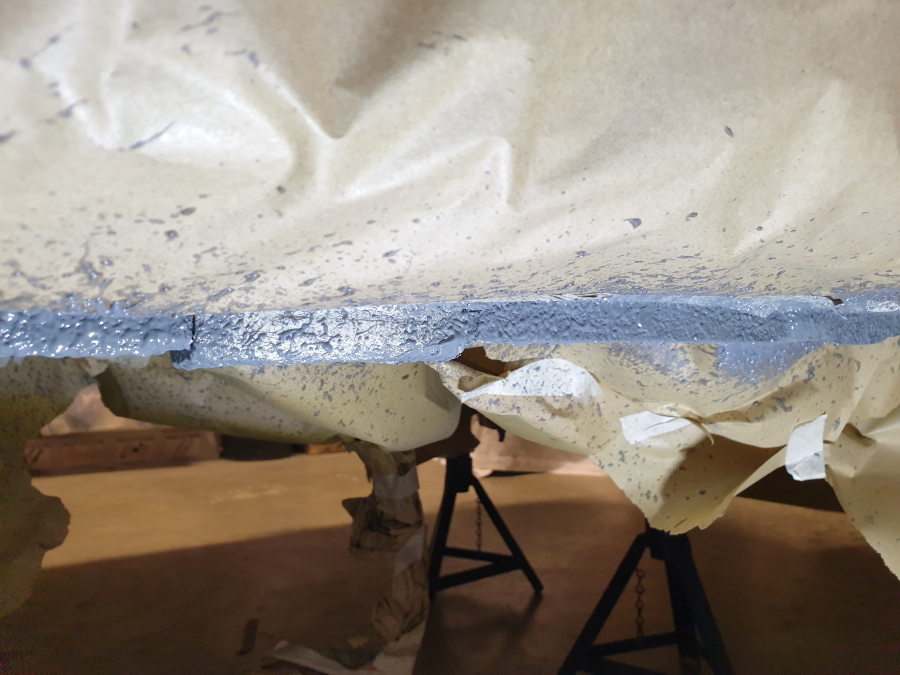
The exhaust will pass between the Focus subframe and the boot floor battery box that I had fabricated. Now the rear heat shield is finished I could pay attention to this area.
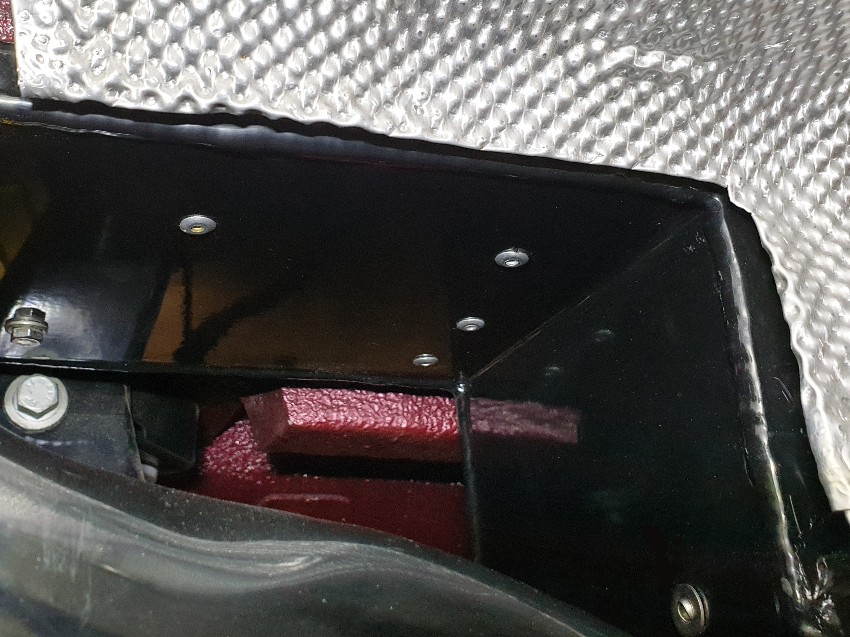
Space is tight in this particular area, so I chose 4mm thick adhesive foam back heat shield material designed for the inside of motorcycle fairings.
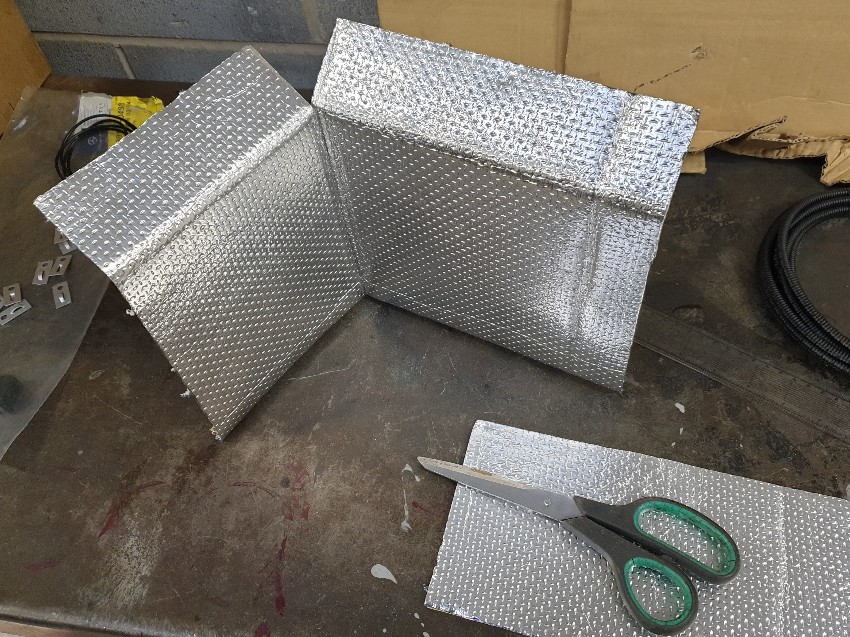
Job done. I used adhesive aluminium tape to seal joints and edges.
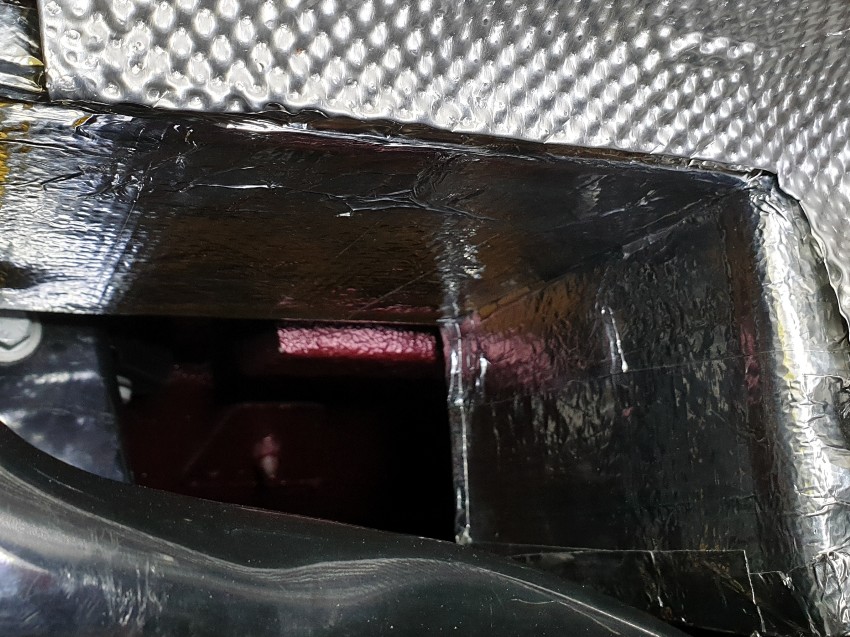
Looking to the rear of the car from in front of the subframe and battery box.
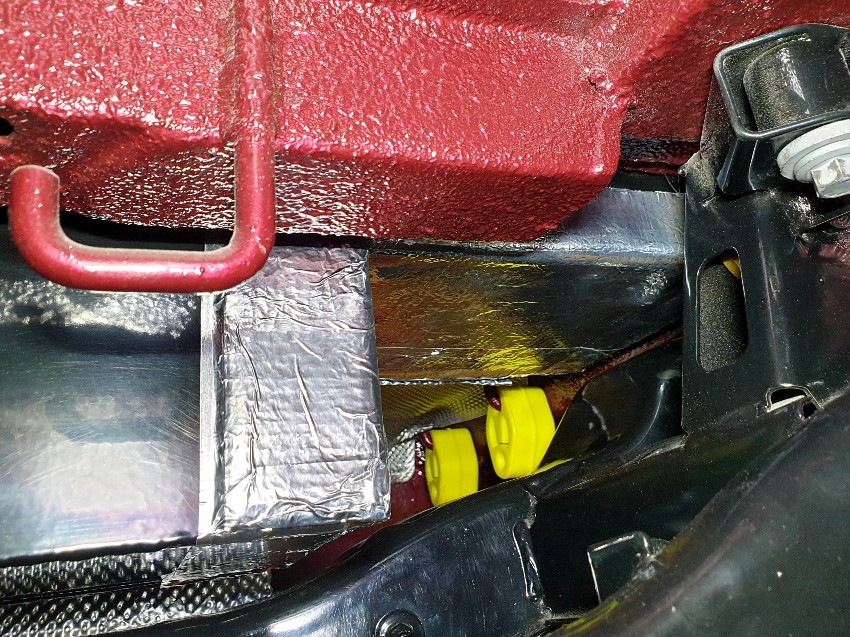
Rear ARB - Drop Links
For the Mk2 Focus onwards Ford upgraded from a rubber isolator design to a dual ball joint drop link. I've chosen the Mk3 Focus/C-Max version - part number 1856667 - which use an M12 lower stud.
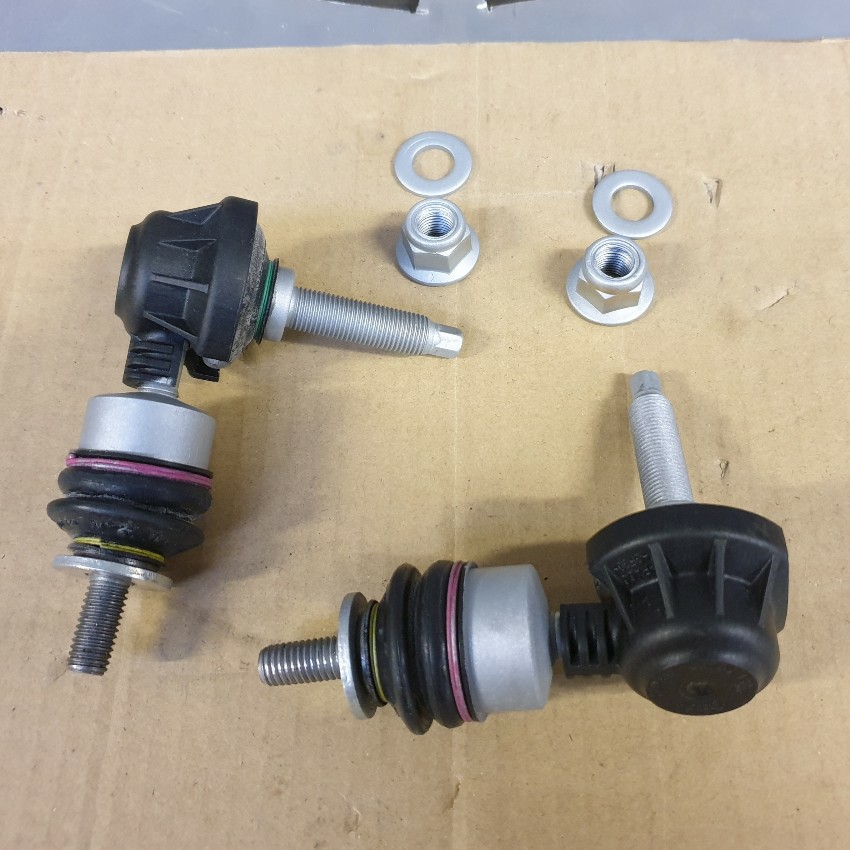
As with all parts on the car, for increased corrosion resistance I bolster electro-plating with an additional coat of zinc based primer.
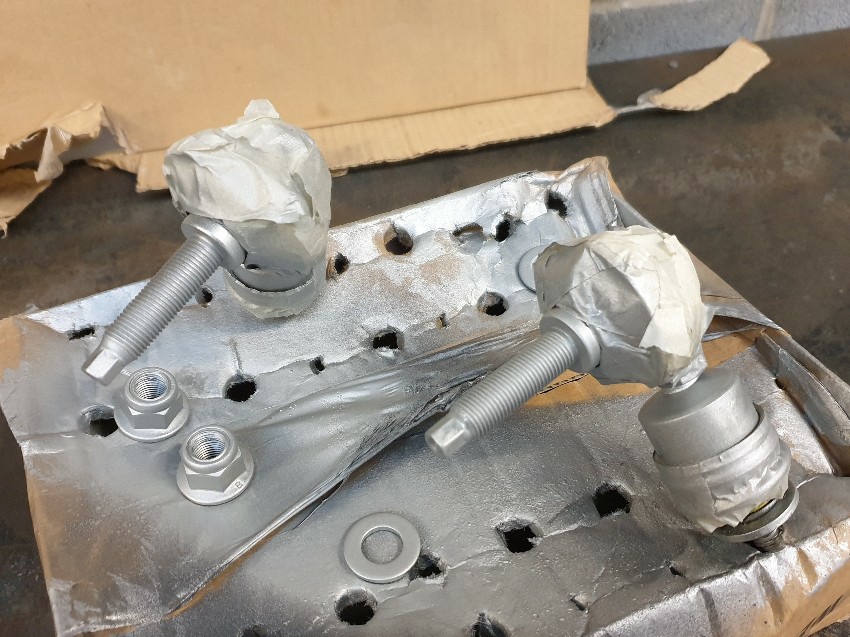
I had a small problem to solve for mounting the drop links: the standard Focus arms are pressed steel and approximately 5mm thick at the ARB drop link mounting point. In contrast the bespoke billet arms are 30mm thick, so the upper drop link stud was too short to pass through the arm.
My solution was to adapt a pair of mild steel female weld-in bushes: 16mm diameter, 30mm deep, 25mm head, and M10x1.5 thread. The bore in the lower arms was 16.5mm so the .5mm clearance allows for paint and a bit of grease.
I filed flats on the bushes to accommodate a 20mm spanner, and being threaded all the way through the centre bore allows a 5mm Allen key to lock the ARB drop link whilst the bush is turned.
Job complete. I was pleased that I had correctly calculated the ARB positions for the shortened subframe. Photos show the suspension at full droop and the links at near max articulation.
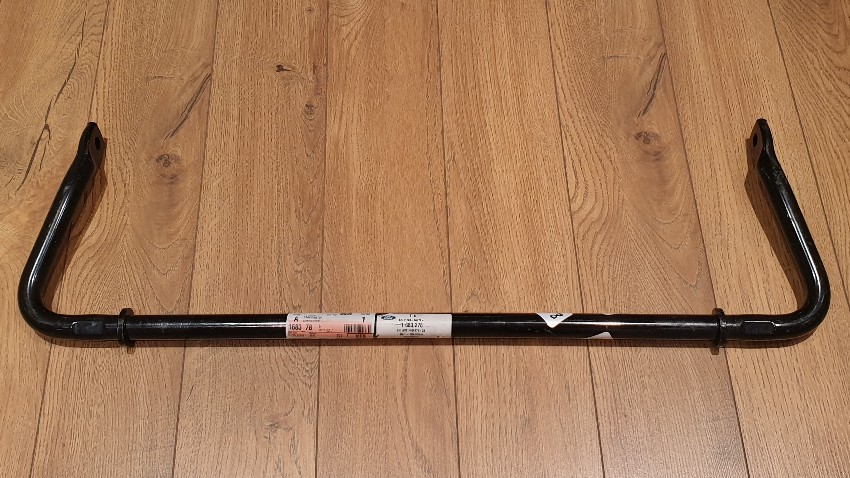
I've built the car a 19mm rear ARB, which is the smallest that Ford produced (there may be alternative sizes in use by Mazda or Volvo). This should be a benign option until I get a feel for the car and what the best setup is. In preparation for future suspension tuning I have picked up a new 21.5mm bar to suit ball joint drop links, which is the stiffest that Ford produced - part number 1683278. Ford themselves were selling them off on eBay for only £30 delivered.
Battery Brackets
The battery box wouldn't be complete without a battery mounting system. I've bought a ready-made copy of the original Fiesta clamp, remade in stainless. For the other end of the battery, which will be a fixed mount, I bent some 1.5mm stainless to suit the 'feet' on the battery.
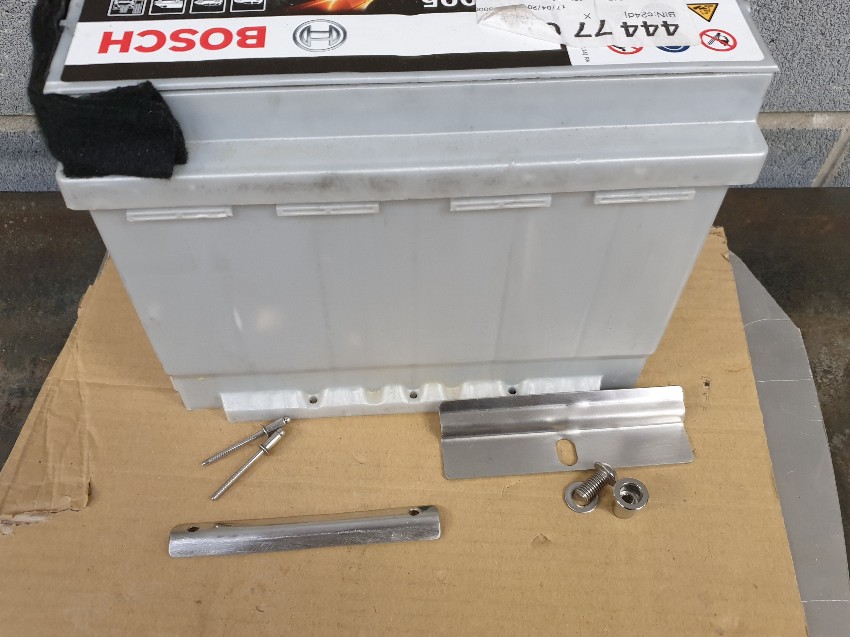
Fixed mount riveted to the end of the box. I will add a rivnut for the removable bracket once I settle on a battery type.
- Excursion
- Bulletin Board User
- Posts: 15265
- Joined: Thu Jan 01, 1970 1:00 am
- Location: Skynet
- Your car: Ford Fiesta
Car: 1990 Ford Fiesta XR2i
Re: MWSTEWART | 500+ BHP Project | 10/04/2024
![]() by Excursion on Wed Apr 10, 2024 1:51 pm
by Excursion on Wed Apr 10, 2024 1:51 pm
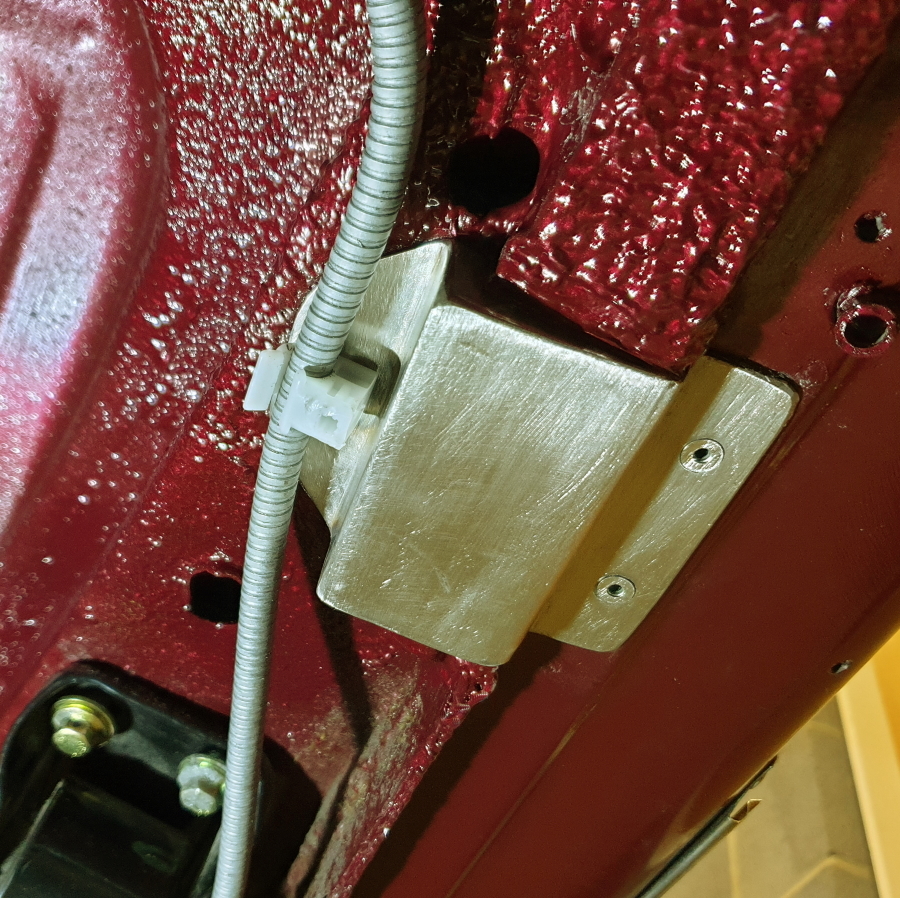
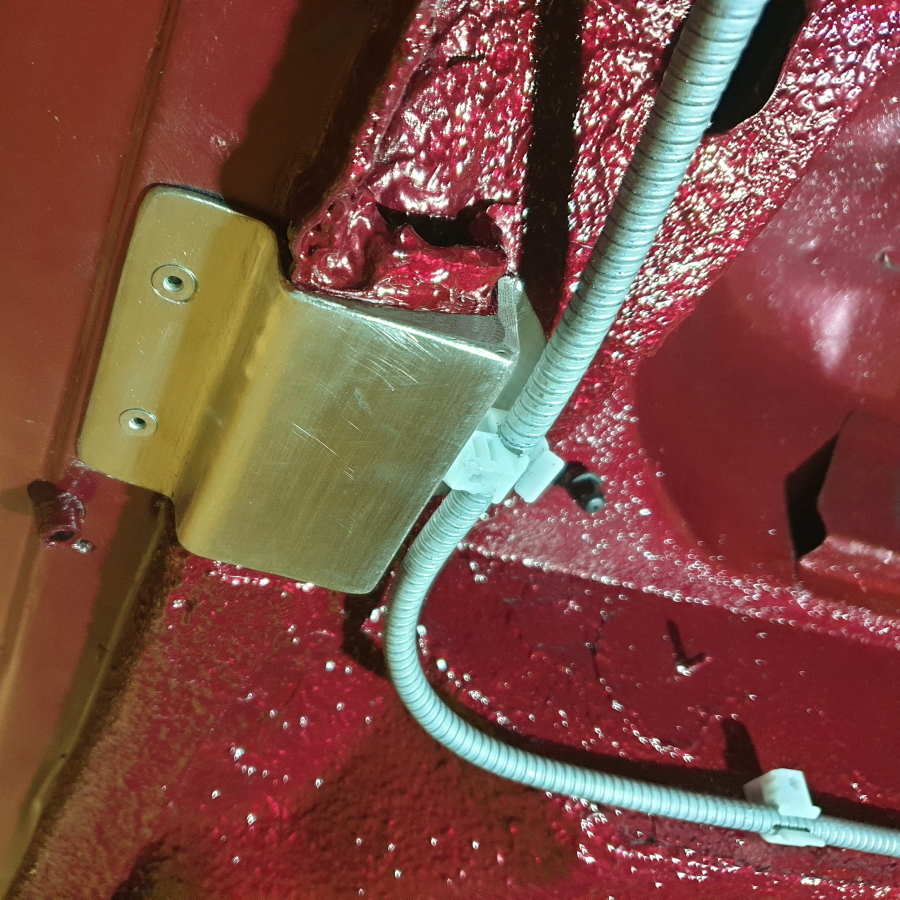
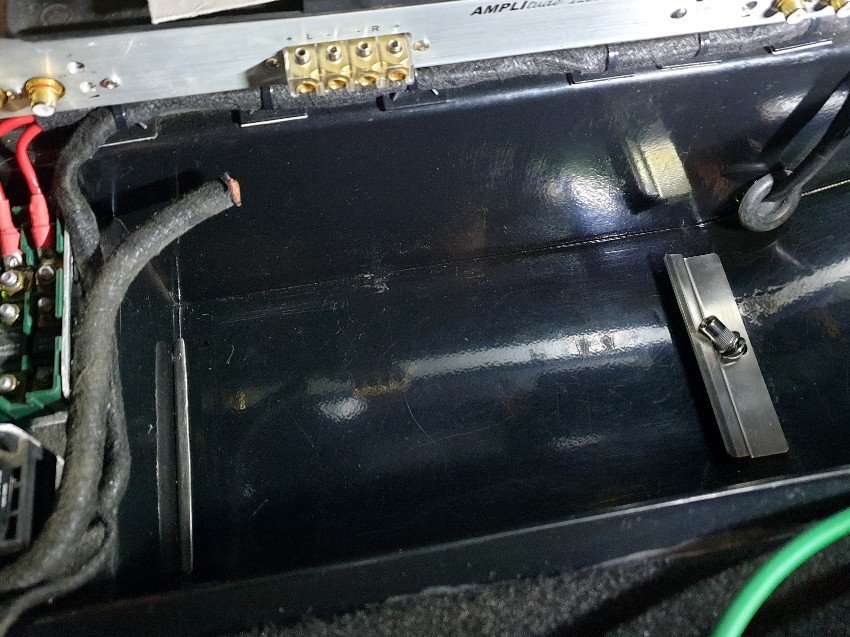
A very quick job completed. Moving forward from the rear of the car to some protection for the rear subframe and suspension bushes. The charcoal canister on the Mk2 Focus is mounted on top of the rear subframe and features a heat shield to protect it, which I kept after modifying the subframe my car. I have modified that shield to fit around the battery box to provide some additional protection to that and the suspension lower arm bush.
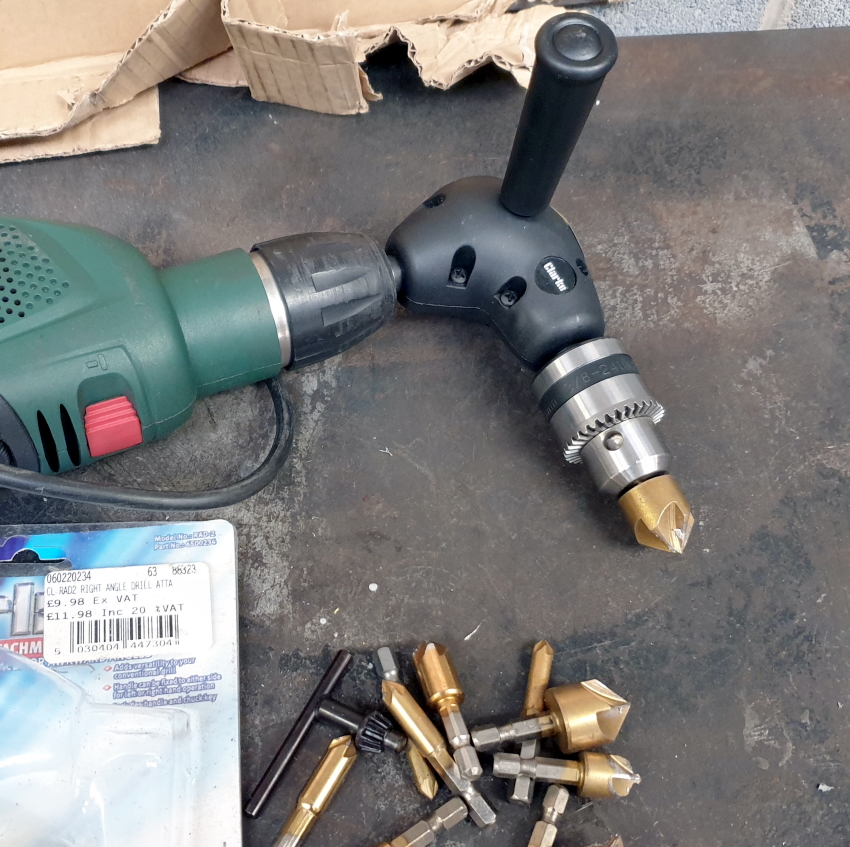
I added a captive stainless fitting to the side of the battery box, but there was only 170mm clearance available to for the drill when countersinking the reverse side. I've only used the right angle drill attachment a handful of times but given the price it has proved invaluable.
Shield in place, mounted to the original subframe fitting and the new captive fitting described above. Focus ST/RS exhaust mount added to another exhaust mount that I added back when fabrication work was taking place.
I've added a couple of stainless fixings to the rear silencer heat shield to keep it snug against the rear of the battery box.
- Excursion
- Bulletin Board User
- Posts: 15265
- Joined: Thu Jan 01, 1970 1:00 am
- Location: Skynet
- Your car: Ford Fiesta
Car: 1990 Ford Fiesta XR2i
Re: MWSTEWART | 500+ BHP Project | 10/04/2024
![]() by Excursion on Wed Apr 10, 2024 1:51 pm
by Excursion on Wed Apr 10, 2024 1:51 pm
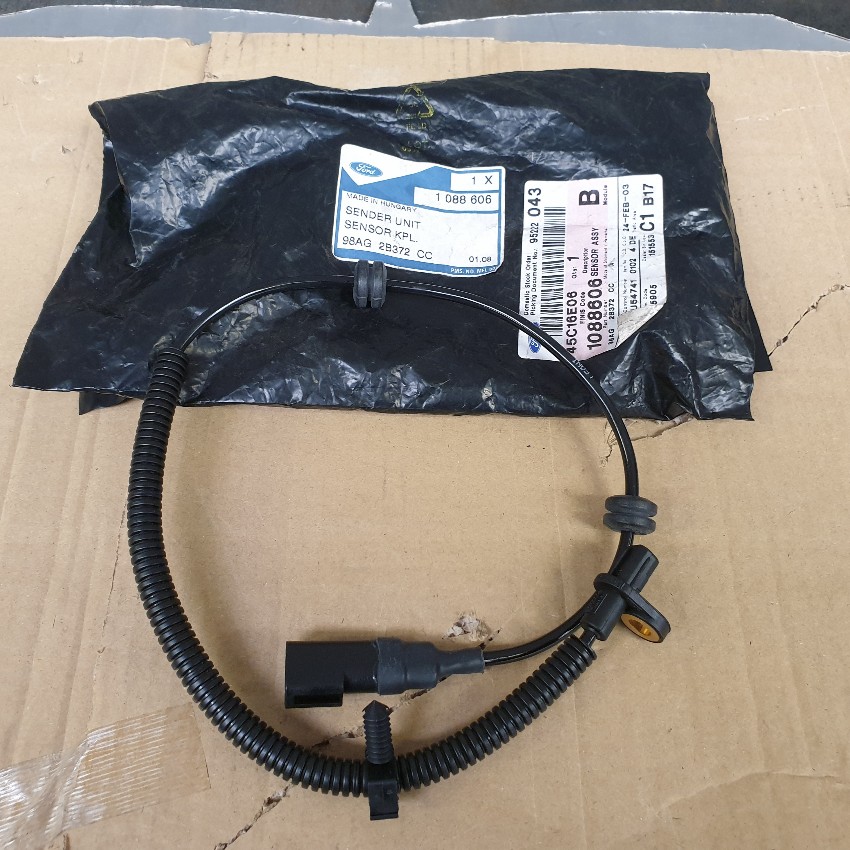
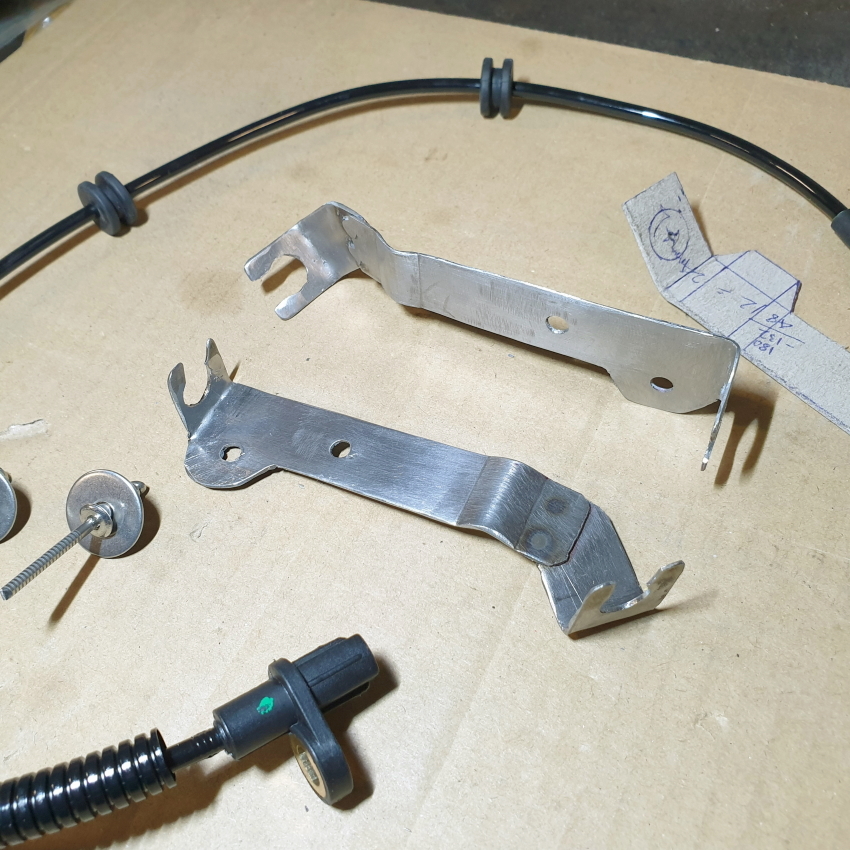
I'm using the Focus Mk1 rear ABS sensors to suit a disc brake equipped car - Ford part 1088606.
I fabricated a pair of brackets from to mount the sensor wires to the rear subframe; much like the brake lines the mounting is completely bespoke. The brackets are made from 1.5mm stainless and involved swaging, folding, and some welding.
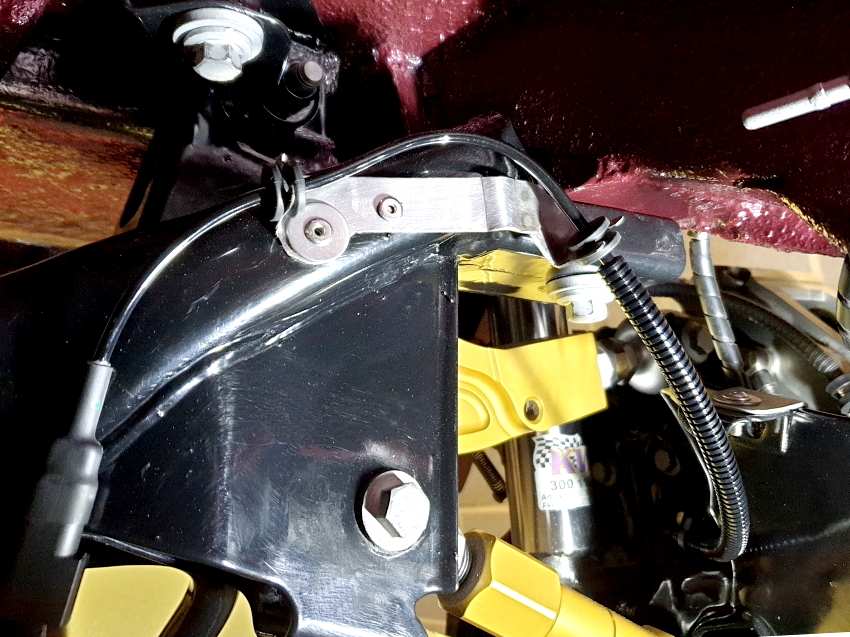
N/S/R in situ.
- Excursion
- Bulletin Board User
- Posts: 15265
- Joined: Thu Jan 01, 1970 1:00 am
- Location: Skynet
- Your car: Ford Fiesta
Car: 1990 Ford Fiesta XR2i
Re: MWSTEWART | 500+ BHP Project | 10/04/2024
![]() by Excursion on Wed Apr 10, 2024 1:51 pm
by Excursion on Wed Apr 10, 2024 1:51 pm
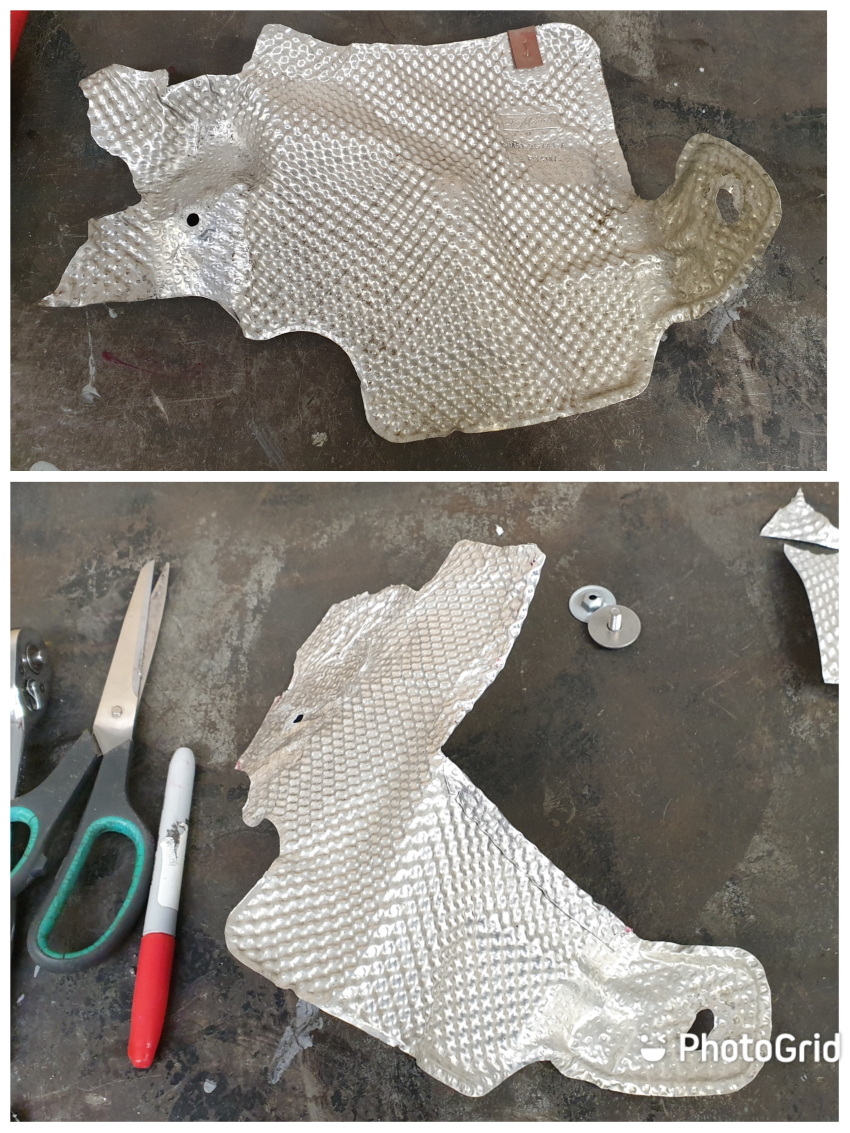
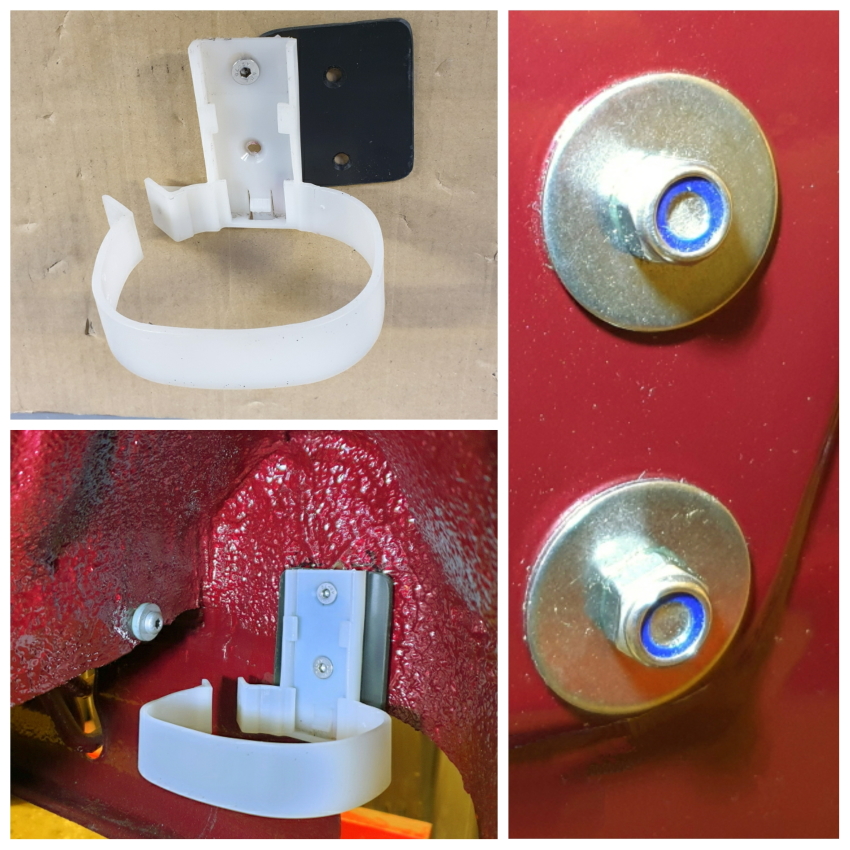
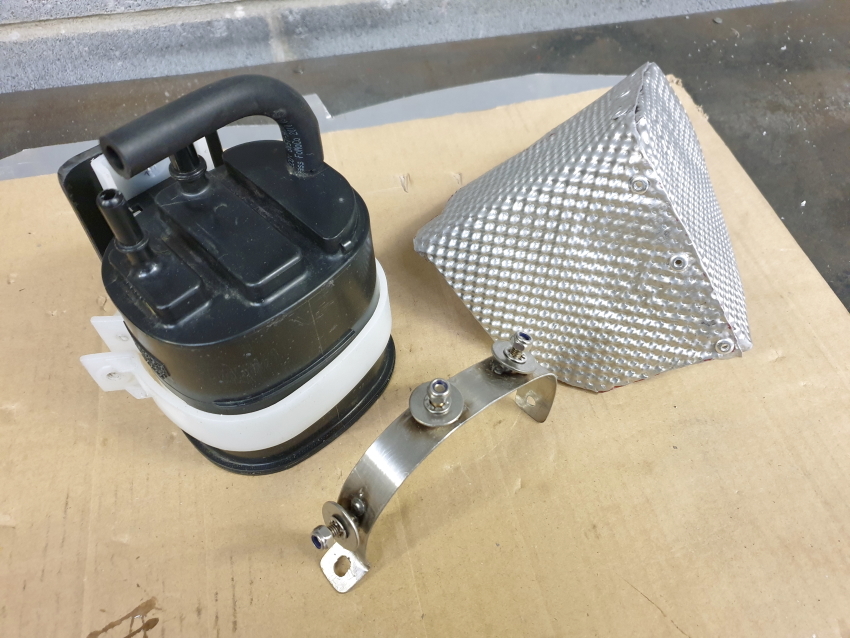
The Mk3 was launched with carburated engines and without evaporative emissions control. EFi, catalyst, and evap came along in 1992, with the charcoal canister mounted in front of the O/S front wheel. I need to liberate that space for an A/C dryer so I decided to relocate the canister to somewhere at the rear of the car. I found a lighter and more compact canister fitted to the fuel tank of a Mk7 Fiesta - Ford part AY11-9D653-AB.
Its white securing bracket was plastic welded to the side of the fuel tank, so I cut that off, ground off the mounting tabs, and made a black plastic backing plate to stiffen it for mounting to my chosen location in the rear of the N/S/R wheelarch. Stainless fastenings were used and the outer nuts & washers are hidden behind the rear bumper.
I've modified the arches to accept some fabric Mk5 Fiesta liners, and the N/S/R liner will now require modification to clear the canister.
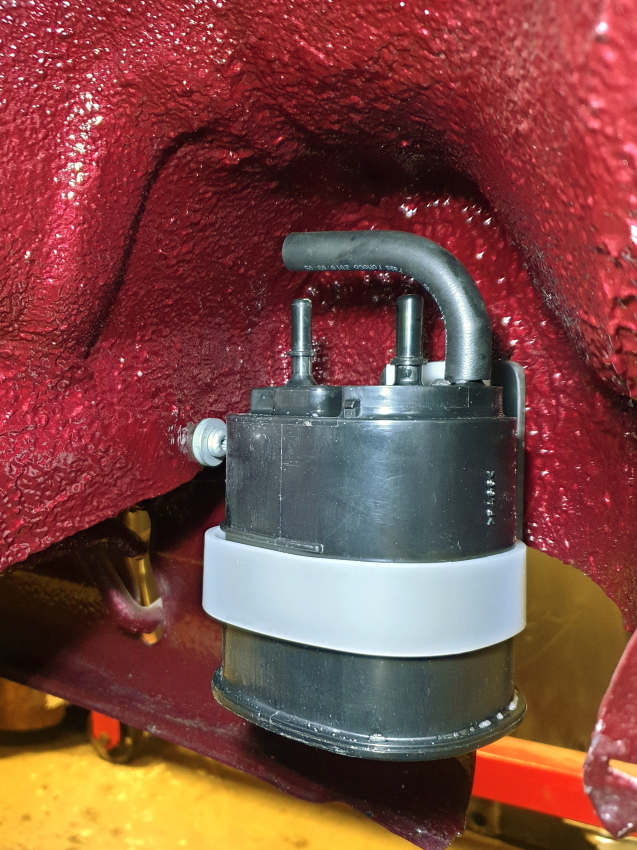
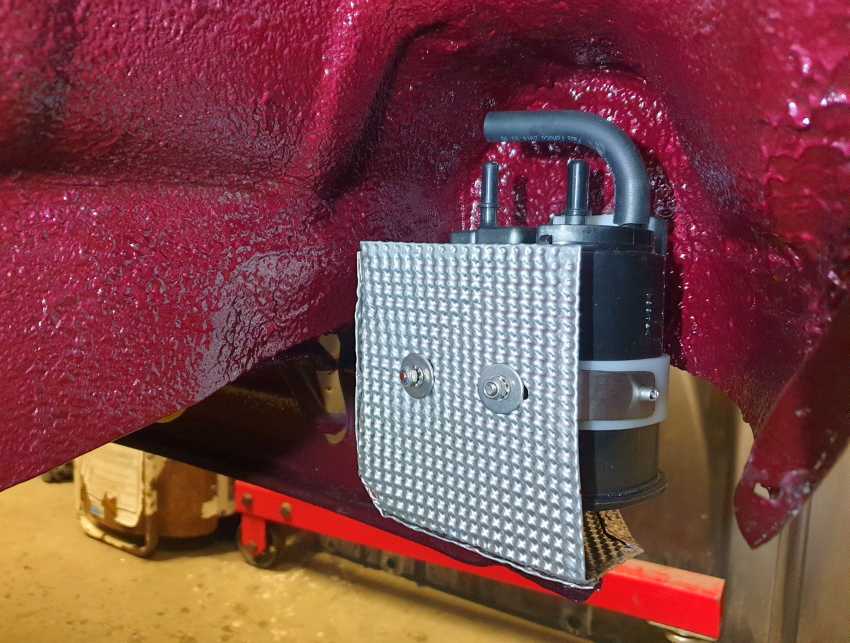
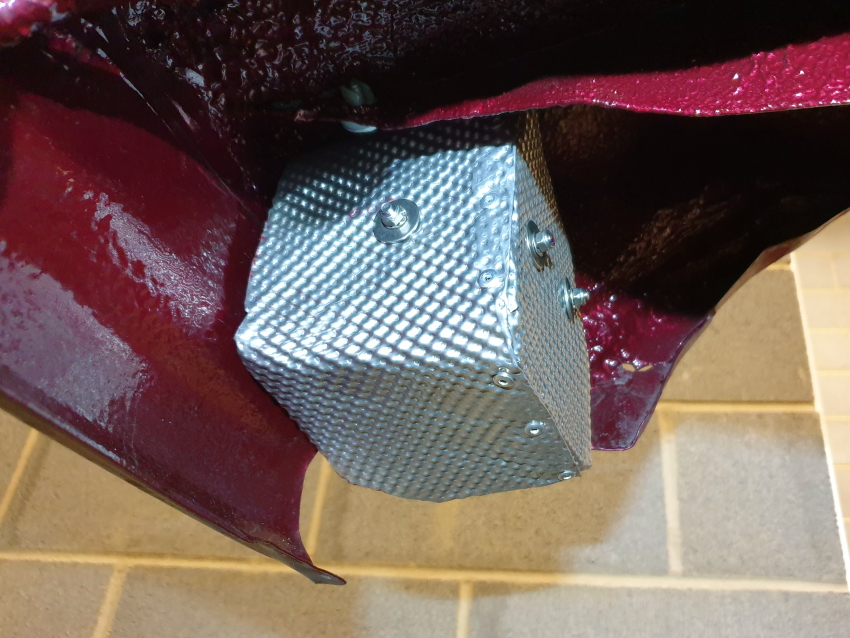
Being in proximity to the rear silencer location I thought it prudent to add a heat shield. I fabricated a stainless bracket and cut up what was left of the Mercedes CLA heat shield that I used as a prototype for the rear silencer shield. The canister shield was an odd shape owing to various angles in play around the wheearch.
Completed.
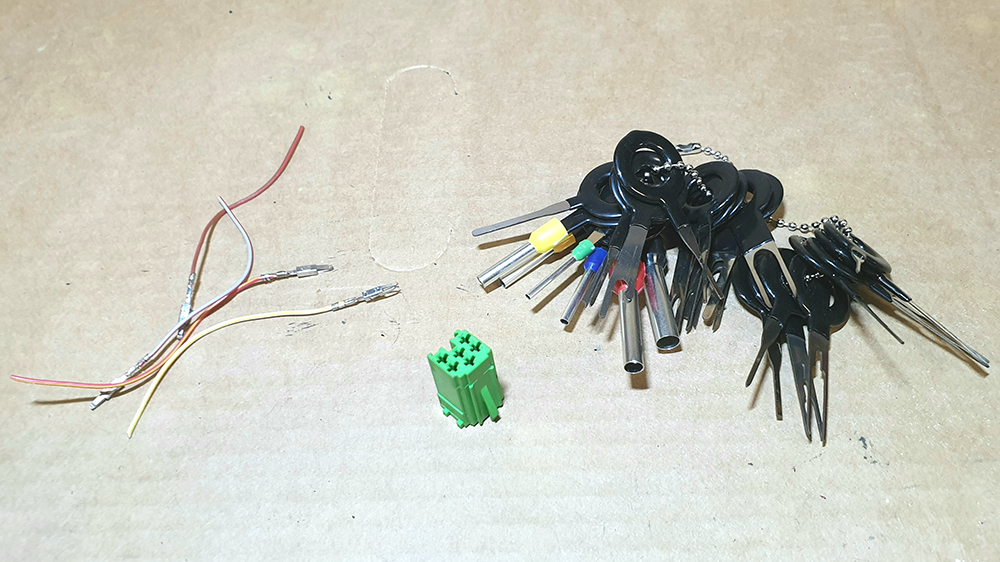
ABS: Rear Loom
I made the rear ABS loom and finished in black corrugated conduit. I had an original period correct Focus rear ABS loom decal lying around so I added that for an OEM look.
Rather than drill the subframe to secure the loom I used epoxy to bond on some Thomas & Betts cable tie mounts. They are very light, and very neat - no surprise that they are used in F1. I sprayed them black to match the subframe.

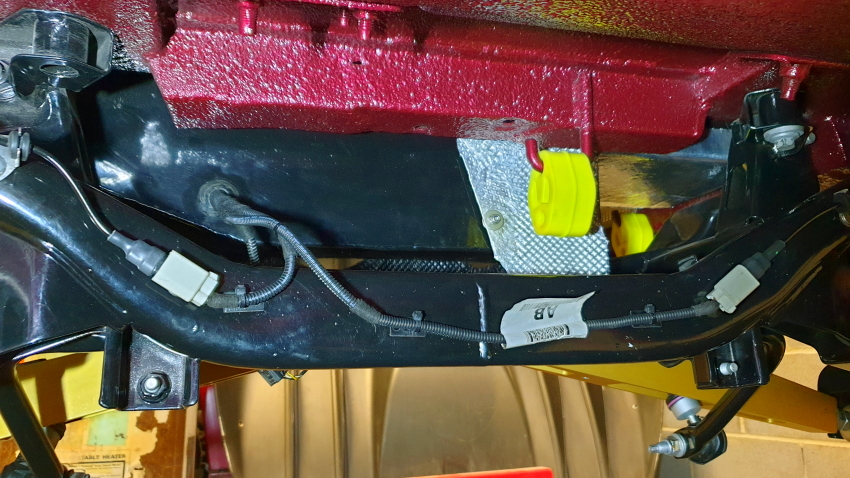
PAS System: Pump
I had planned to use an EHPAS system in the car and already had a new TRW pump for the theMk2 Focus. I'm not 100% focused on weight with this car - the aim is a GT hatchback - but I am quite interested in weight distribution, so the benefit of an electric pump in this case is to move weight that is otherwise mounted at the very front and top of the engine to somewhere behind - or close to - the front wheels.
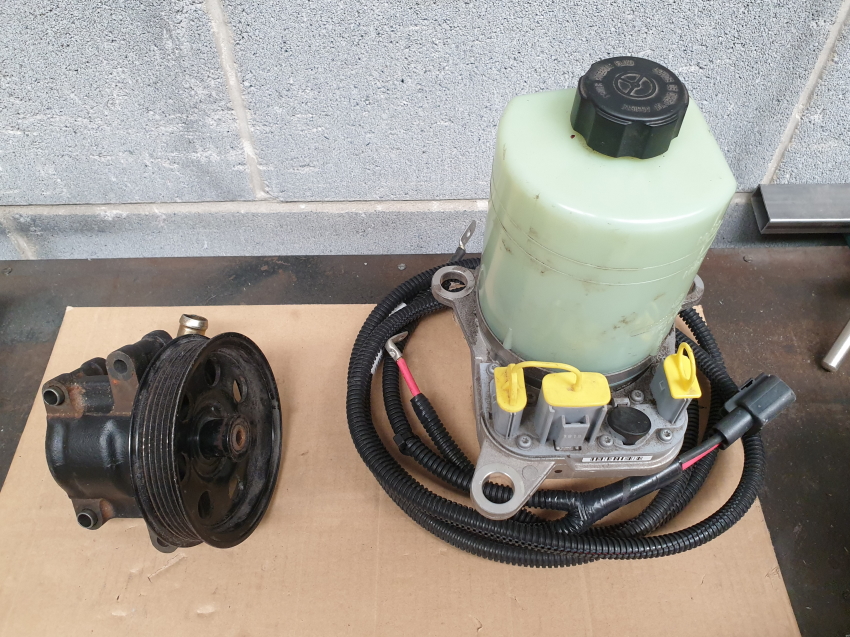
Whilst browsing one day a newer type alloy HPAS pump caught my eye - Ford part 1470514 - and, after some visual inspection I noticed that the mounting pattern was the same as the Mk1 Focus. I bought one to research further and results are as follows:
EPAS pump inc. additional fluid capacity: 5248g
Mk1 Focus pump: 3137g
Alloy pump: 2119g
Given the bulk of the EHPAS pump and the added wiring implications it just didn't seem worth it, so I shall proceed using the alloy pump.
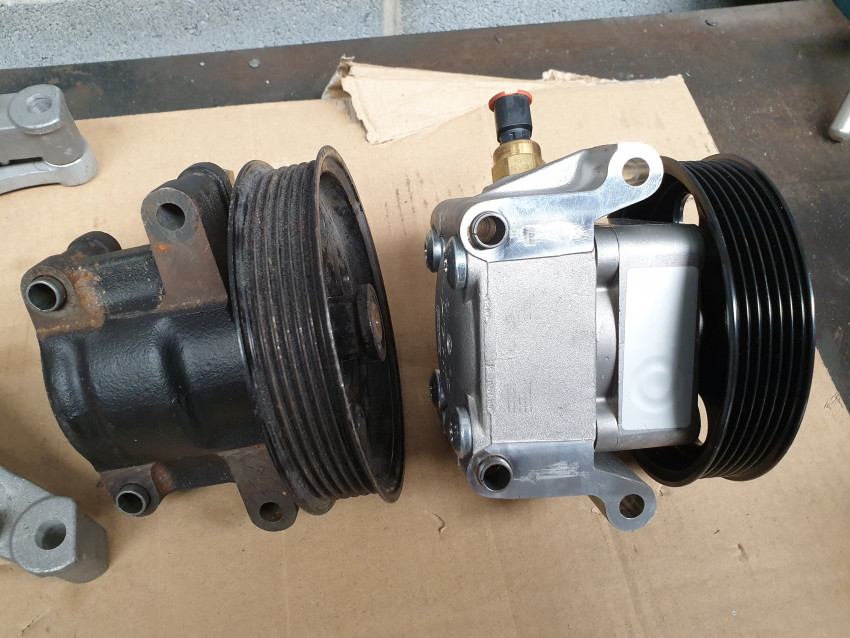
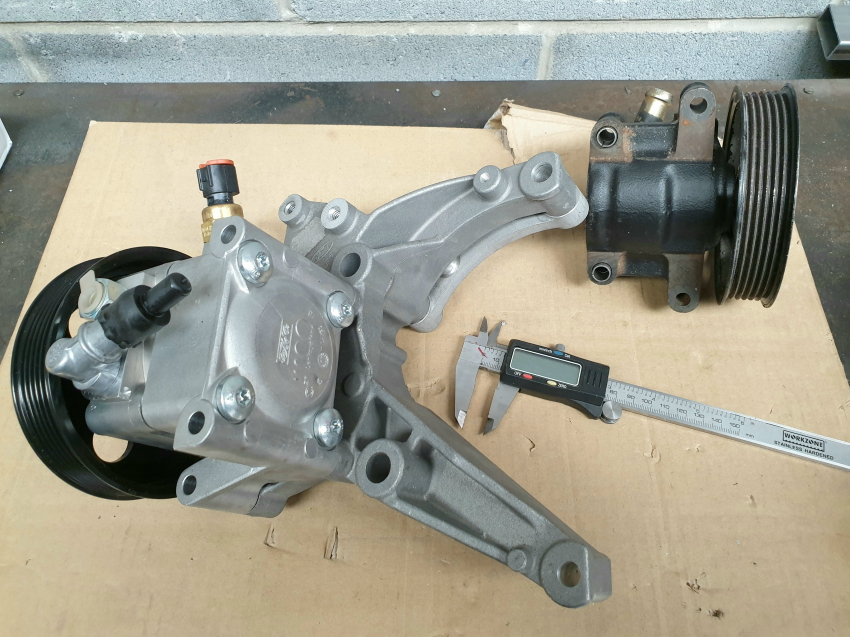
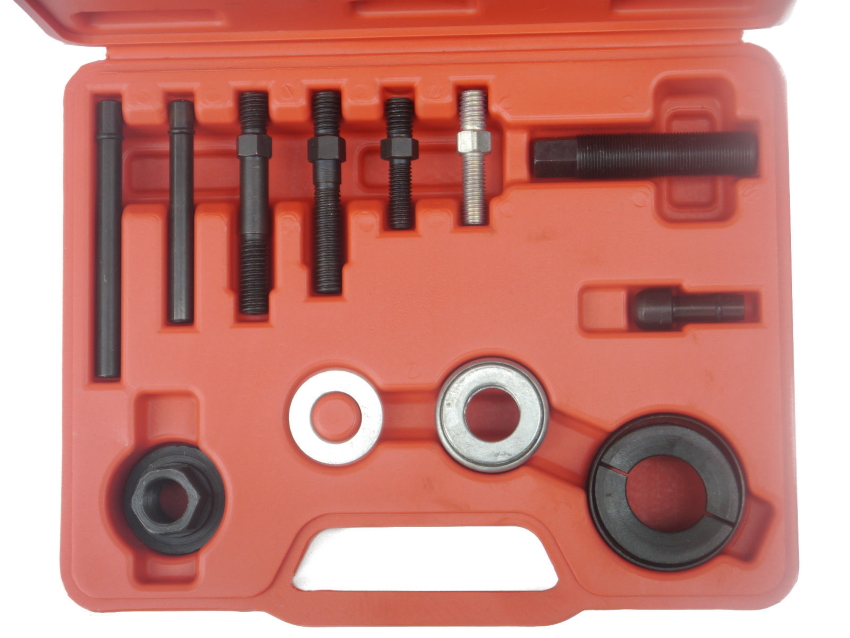
I compared the pulleys and the new pump is 11% smaller. I'm going to try it out and if required I can swap to the Mk1 Focus pulley using one of the cheap (£13) pulley extractor kits available on eBay:
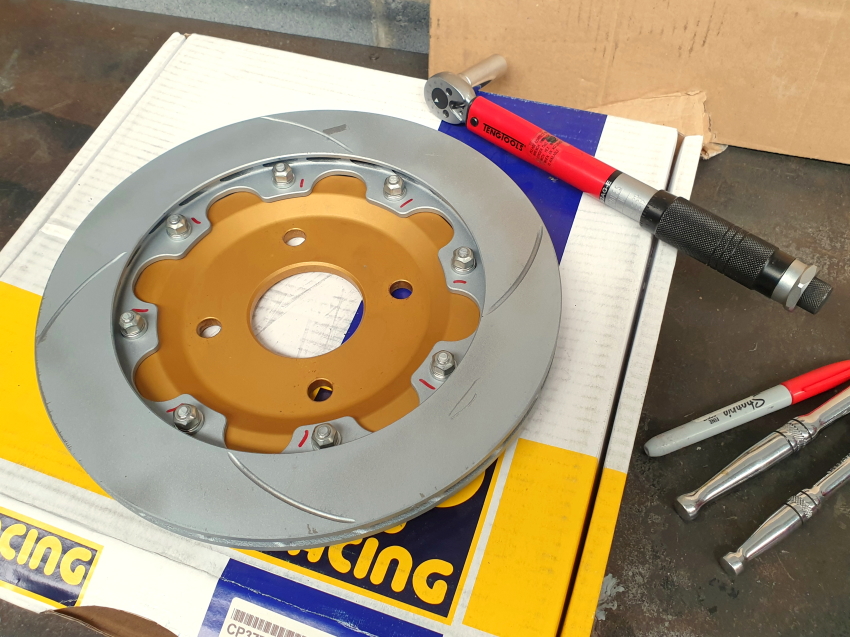
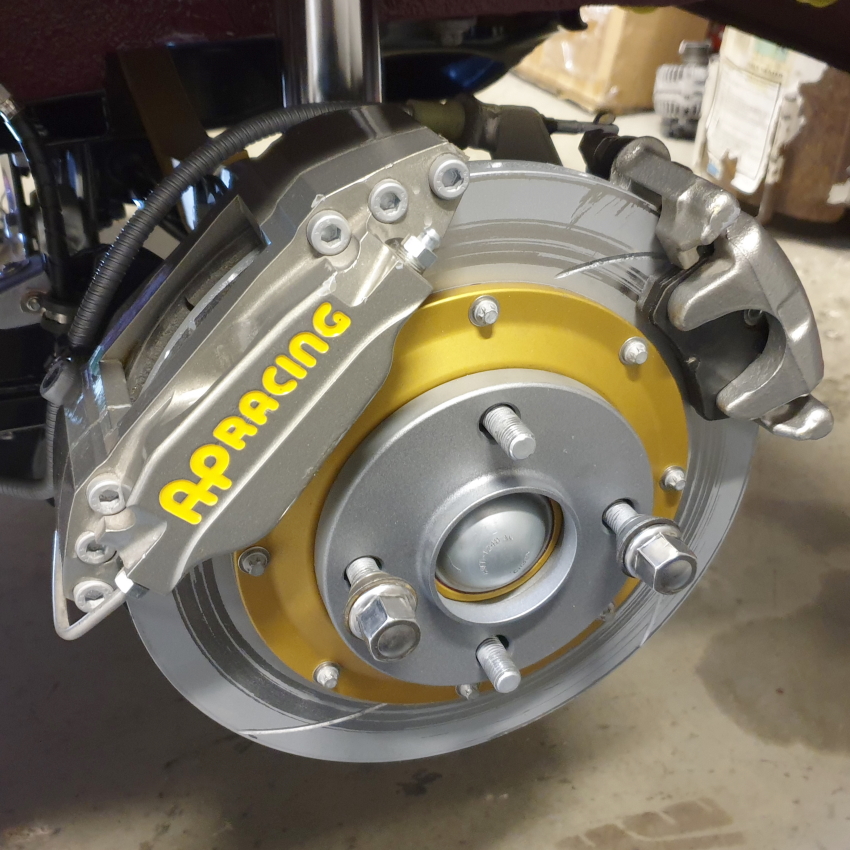
Brakes: O/S/R Disc and Handbrake Adjustment
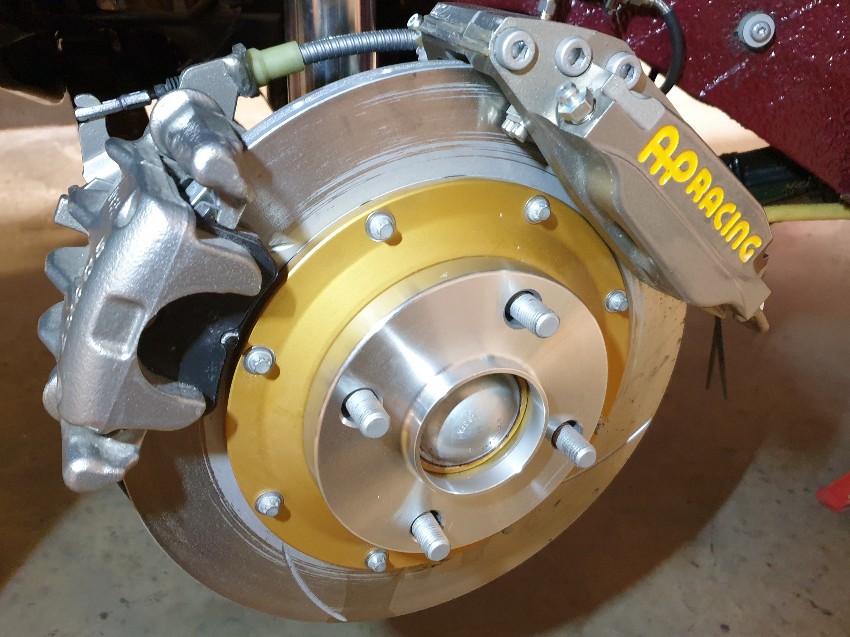
I hadn't built up the O/S/R disc so I've now done that. I painted the disc in zinc to prevent rust around the edges.
Bobbin fastening torque is 14Nm (10.5lb/ft). I've had course to use AP customer service a few times now and they are always very helpful.
After mounting & torqueing a wheel to check all clearances I have noted that the handbrake caliper is not sitting perfectly central over the disc, so I've removed both brackets to have the caliper mounting bushes milled down by 2mm.
- Excursion
- Bulletin Board User
- Posts: 15265
- Joined: Thu Jan 01, 1970 1:00 am
- Location: Skynet
- Your car: Ford Fiesta
Car: 1990 Ford Fiesta XR2i
Re: MWSTEWART | 500+ BHP Project | 10/04/2024
![]() by Excursion on Wed Apr 10, 2024 1:52 pm
by Excursion on Wed Apr 10, 2024 1:52 pm
I've sent off some Ferrari and Fiesta parts to be vapour blasted. Included within this batch is an early Fiesta RS1800 alloy thermostat housing. The subsequent thermostat housings were plastic: an early, more reliable single piece unit that is reasonably reliable, and a later, cheaper, two-piece version that is not.
Before:
.jpg)
.jpg)
.jpg)
.jpg)
After:
.jpg)
.jpg)
.jpg)
.jpg)
Fuel System
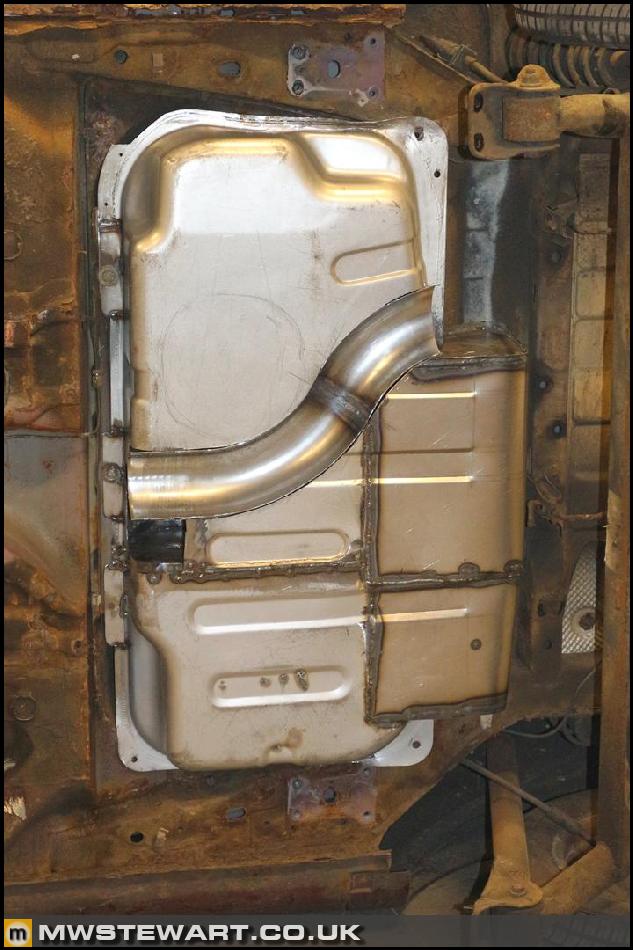
I've decided on my fuel delivery system: Focus RS Mk3 in tank. The Mk3 uses a twin electric lift pumps with integrated baffle container and a secondary Venturi pump unit to draw fuel from the opposite side of the exhaust tunnel, which I've added to the Fiesta tank. I've read of fuel starvation issues during hard track use, so I'm going to add a secondary baffle container to my fuel tank.
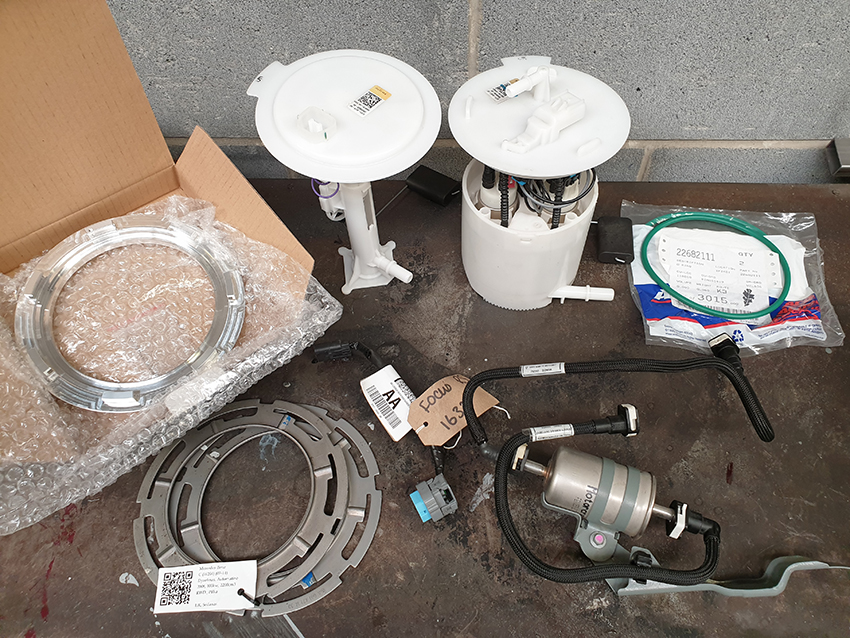
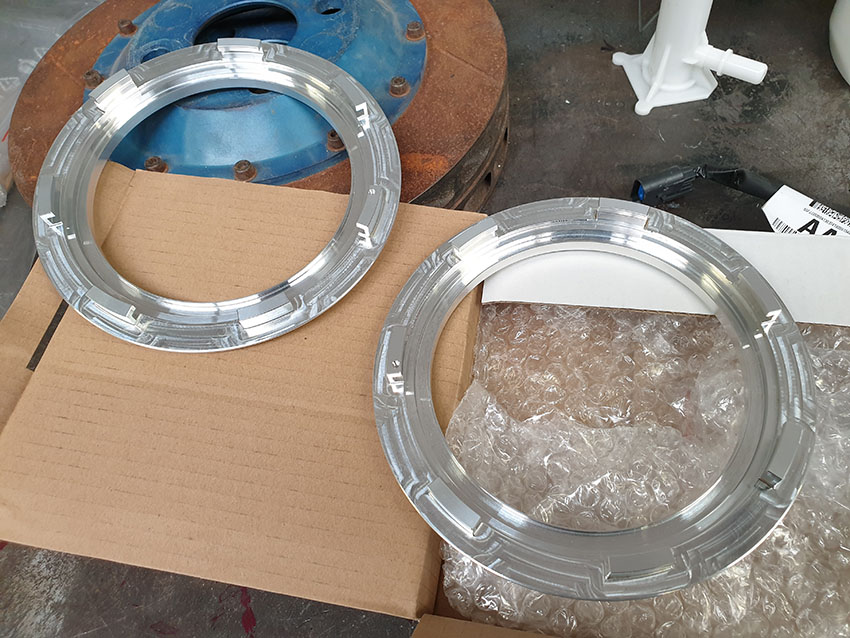
The Focus RS uses a standardised fuel pump cartridge mounting system which I've seen referred to as 'USCAR'. It is used by Ford, GM/Vauxhall, Mercedes, and a few other manufacturers. It uses a tab orientation system and a large o-ring to seal. I tracked down some very nice CNC billet mounting rings that can be welded into my new fuel tank, making this conversion much simpler.
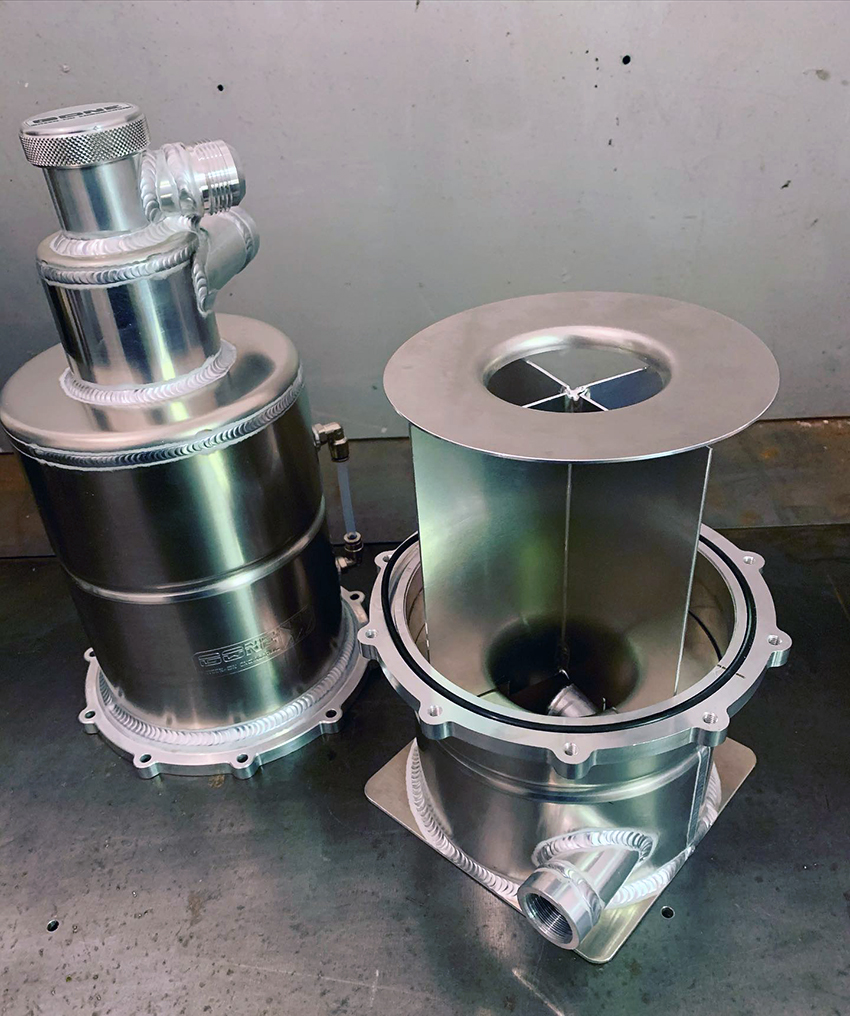
I've sent off my mock-up tank to my friend, Murray, who is going to make a (much better looking) version from aluminium.
Some of his work:
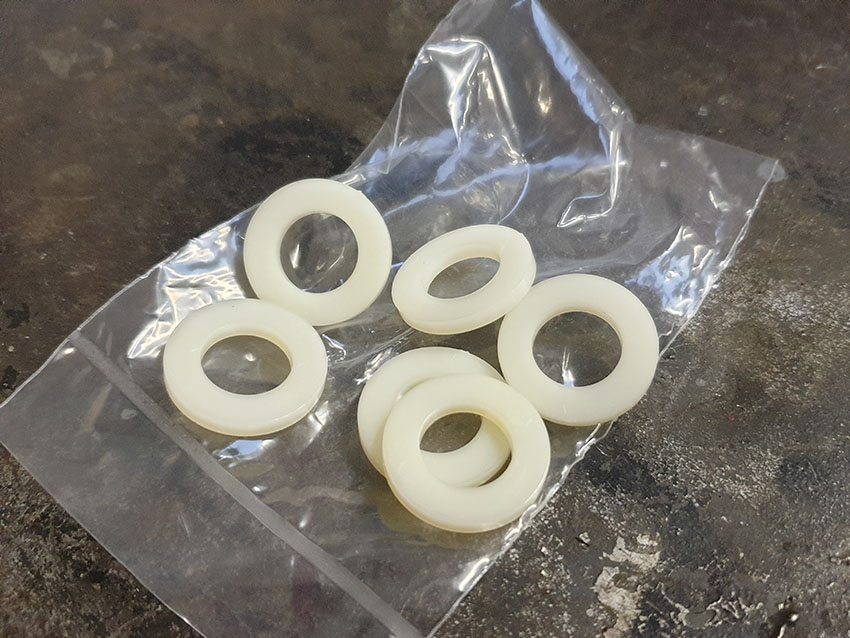
Handbrake Adjustment
The Racing Puma handbrake cable that I'm using is now obsolete, so to future proof as much as possible I was aiming for an effective handbrake on the minimum adjustment setting. I found that a couple of nylon spacers were required to achieve that.
I should now have sufficient adjustment to last the lifetime of the car.

Misc
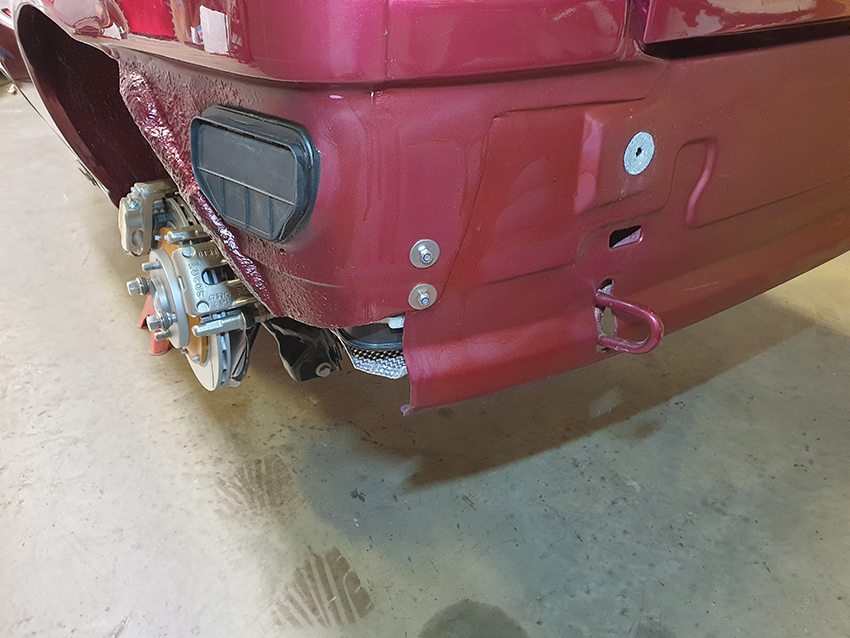
The rear end is finished and the bumper now on for good. I've waxed the rear valance, and I added a felt washer between the bumper and bodywork. The black air exhausts are new.
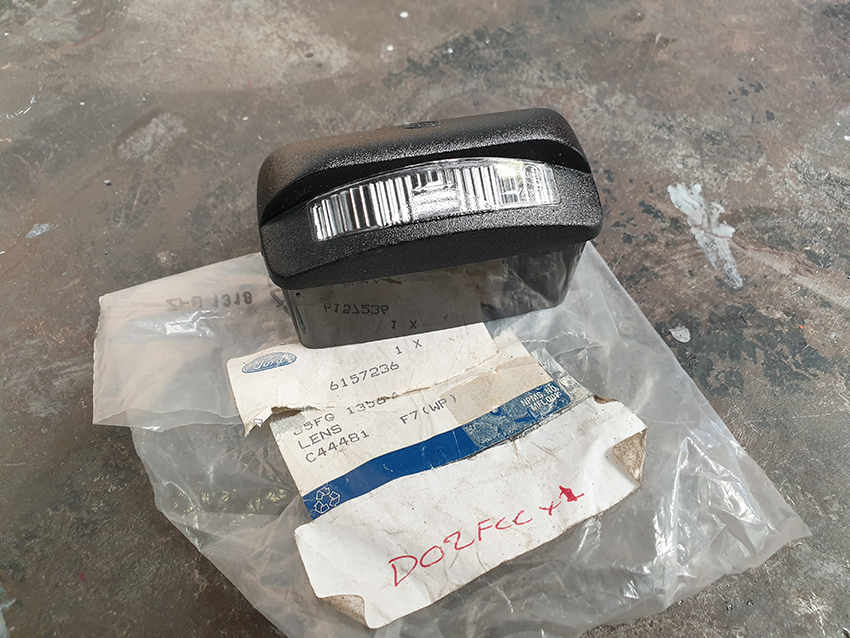
I have a nwe number plate light cover as the originals tend to fade, but I am missing the internal bulb holder. If anyone has one then please get in touch.
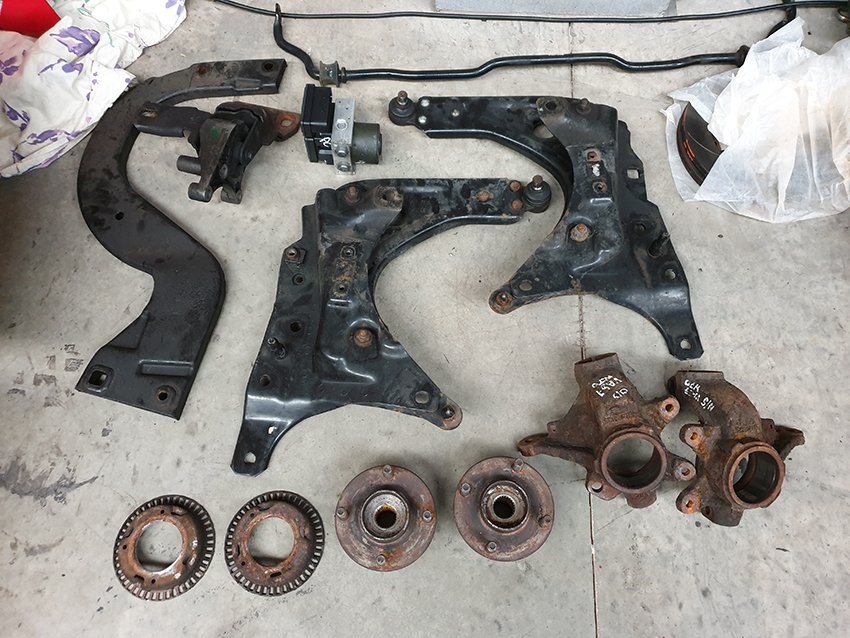
For the sake of expediency I will get the car on the road with Sport Ka front suspension: it is bolt-on and will save a lot of time. I will focus on a redesign of the front end once the car is MOTd and tested. The parts are pictured below ready for powder coating.
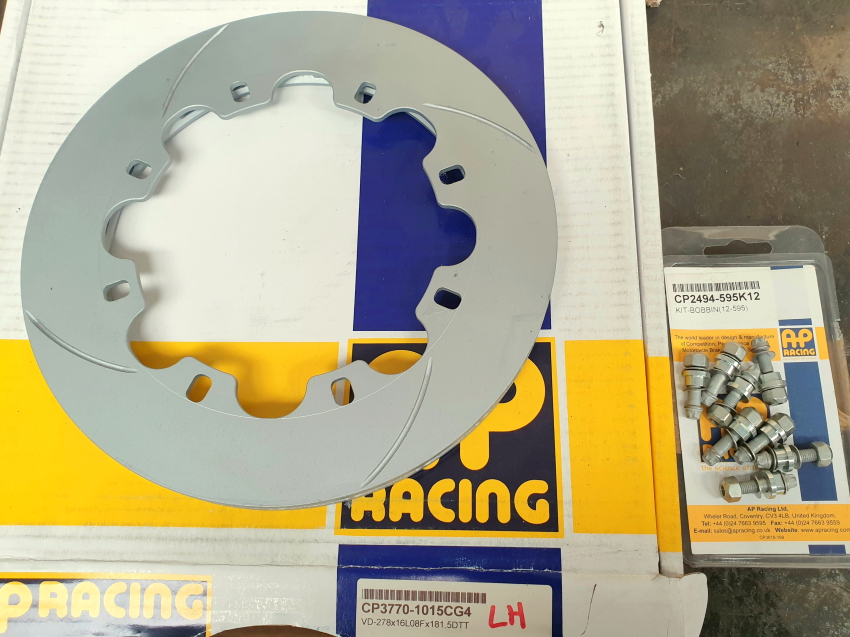
I have my front brake discs: AP Racing CP3948-128GA / 129GA. These are a NASCAR disc measuring 305mm x 33mm. I've gone for a larger width to aid with cooling given the constraint of a diameter to suit my OEM 16" wheels, yet these particular discs are still very light at 4.47kg each. I got an extremely good deal on them so I picked up a spare pair.
- Excursion
- Bulletin Board User
- Posts: 15265
- Joined: Thu Jan 01, 1970 1:00 am
- Location: Skynet
- Your car: Ford Fiesta
Car: 1990 Ford Fiesta XR2i
Re: MWSTEWART | 500+ BHP Project | 10/04/2024
![]() by Excursion on Wed Apr 10, 2024 1:54 pm
by Excursion on Wed Apr 10, 2024 1:54 pm
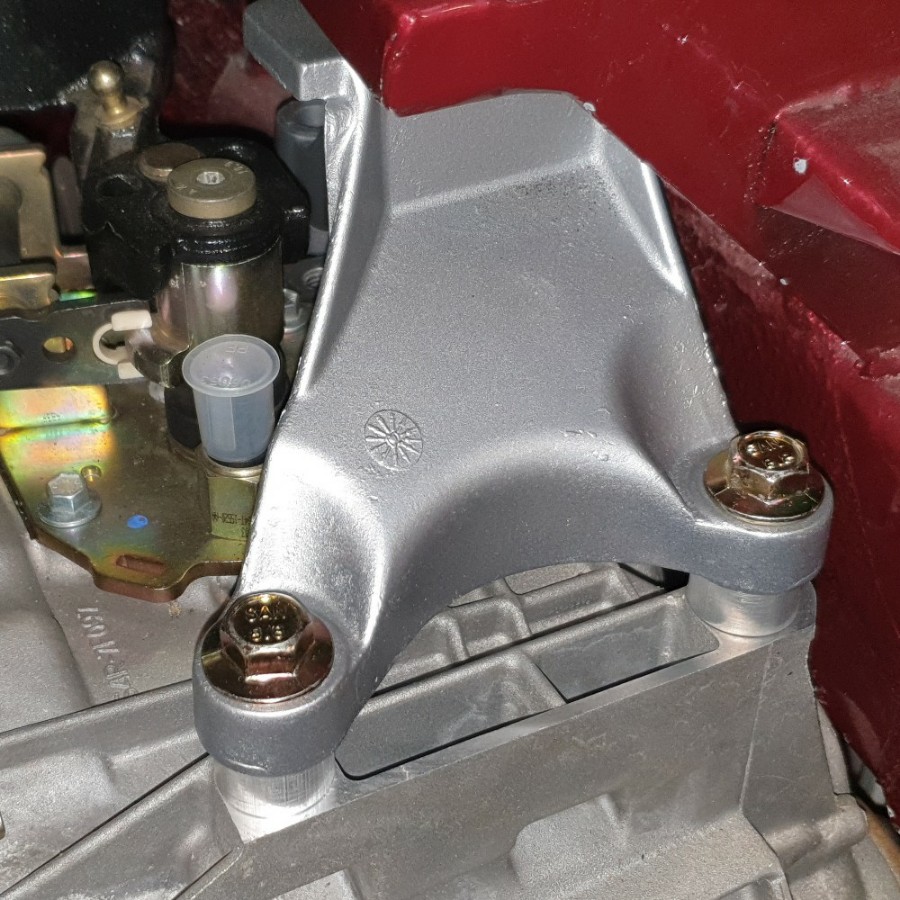
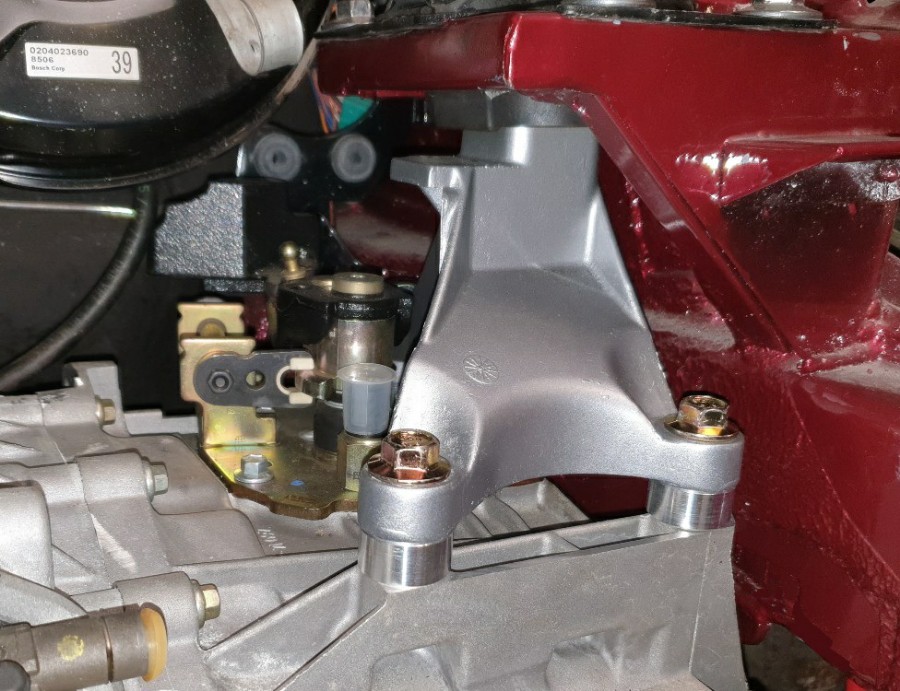
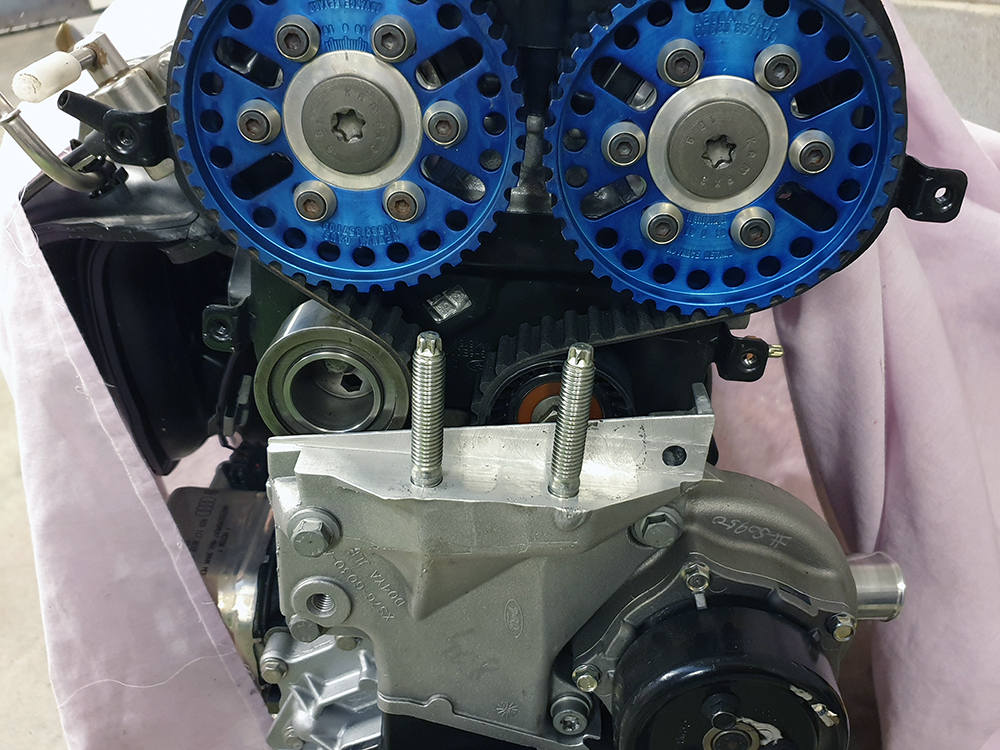
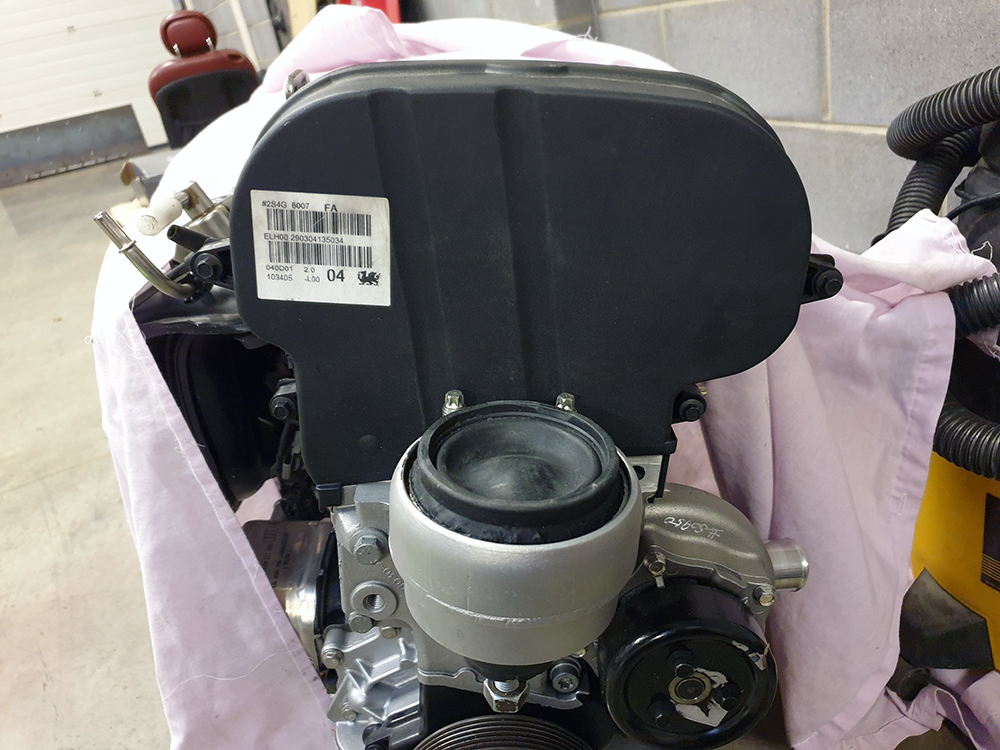
I mentioned in a previous post that the 'Black Top' Zetec engines are mounted with a forward inclination, and with that in mind I had redesigned the front crossmember to allow for a larger radiator with intercooler, A/C condenser, and sufficient room for a four branch manifold to mount the turbo over the gearbox. I've since decided to use a manifold with shorter primaries for better turbo response - which means that I now need more space around the front of the engine.
Here is a shot of the engine mount bracket which clearly illustrates the inclination. I decided to re-engineer this part to mount to provide purpendicular mounting of the engine.
Finished result below. The process involved welding up the original tapped holes, and some pockets on the rear which would have been exposed as holes after the mounting surface was milled at 90 degrees.
Mount bracket installed on my engine, and another photo of the mount installed.
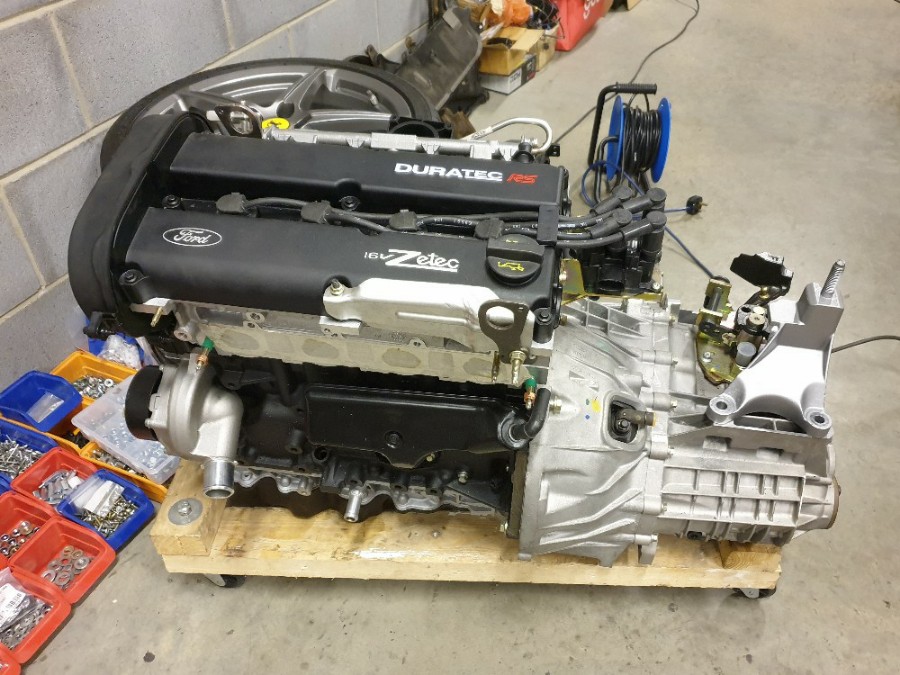
The Focus RS MTX75 gearbox I have is suited to the forward inclination, and after studying it I decided that are too many bellhousing reinforcement ribs to make modifying it a realistic option, plus there is a real risk of heat distorting the differential bearing mountings. I researched alternative MTX75s and was surprised to find at least 15 different variations - I found a version from the Mk3 Focus that will suit my needs; I'll rebuild it with the Focus RS internals.
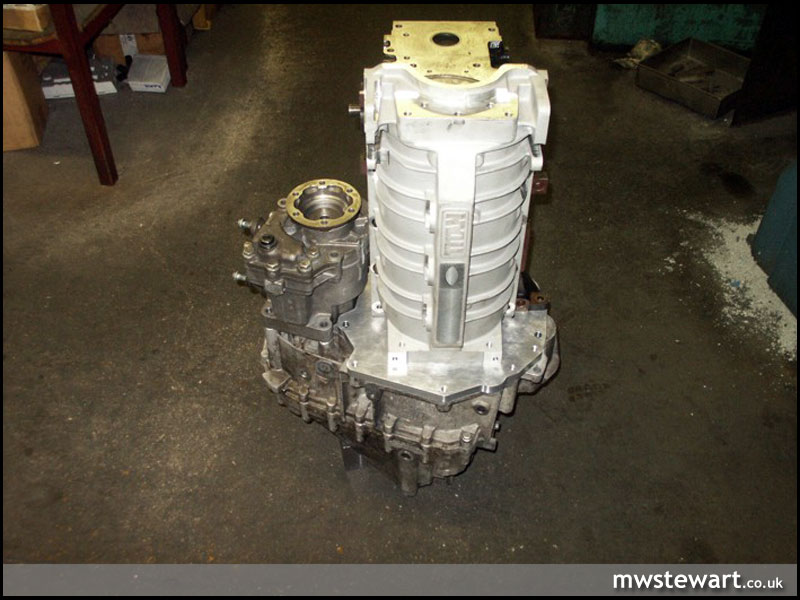
Mock up engine and gearbox below. I will modify the engine sump and lower gearbox mount to suit the new engine position.
- Excursion
- Bulletin Board User
- Posts: 15265
- Joined: Thu Jan 01, 1970 1:00 am
- Location: Skynet
- Your car: Ford Fiesta
Car: 1990 Ford Fiesta XR2i
Twitter
The second 20th Anniversary article, a dive into the history of how the site came about is available here: https://t.co/kbCfZ4sf0R
17:44, 4th December 2021 Twitter Web App
To celebrate https://t.co/wXVkvJipaS being 20 years old this year, I've written a series of articles detailing the… https://t.co/B0vE0Y3KvP
17:42, 4th December 2021 Twitter Web App
Follow fiestaturbo.com on Twitter:
http://twitter.com/fiestaturbo/
Facebook
New article! fiestaturbo.com is 20 years old this year and I'm writing a series delving into the history of it. …
Saturday, 4th December 2021 12:49
Some awesome Escorts from the Fair - FORD FAIR 2021: ESCORT EXHIBITION - …
Sunday, 31st October 2021 17:05
All the best Focuses from Ford Fair - FORD FAIR 2021: FOCUS PEEKING - Which was your …
Thursday, 7th October 2021 23:21
Become a fan:
http://www.facebook.com/fiestaturbo/
RSS Feeds
Subscribe to the RSS feed
What is RSS?
RSS is a technology that lets you use special applications or modern browsers to notify you you when a site is updated. You can then read the updated content in that application or your browser.
To subscribe to these RSS feeds you need to copy the links above. For instructions on how to add it to the feeds you keep track of, consult the documentation of your RSS reader.