Re-building my gear linkage (sort of guide)
Re-building my gear linkage (sort of guide)
![]() by heeman10 on Sat Aug 13, 2005 6:41 pm
by heeman10 on Sat Aug 13, 2005 6:41 pm
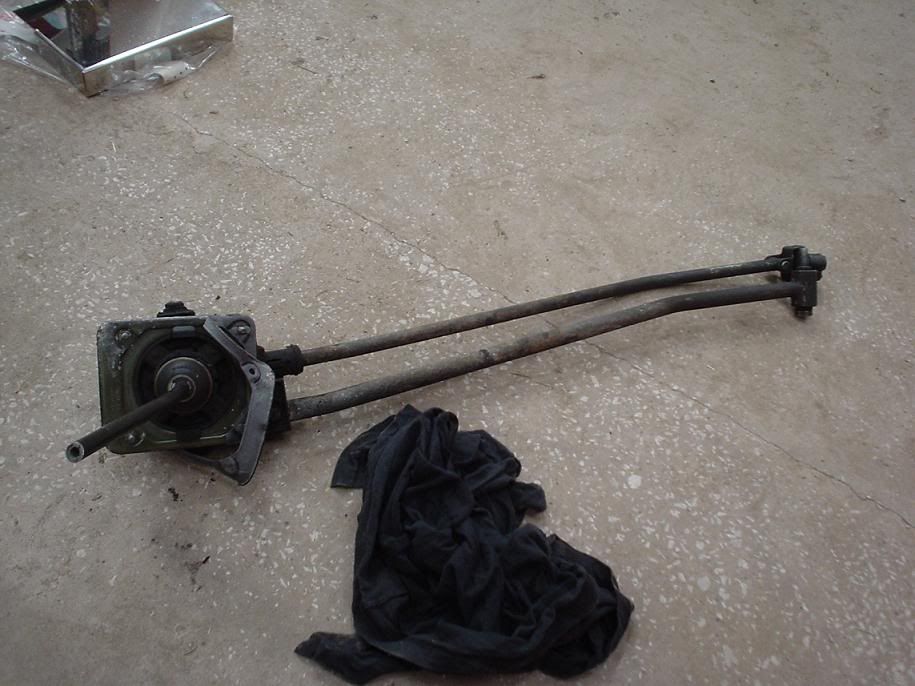
I'd never done it before, so it was just a case of removing it, stripping it and seeing what fell out
Linkage out:
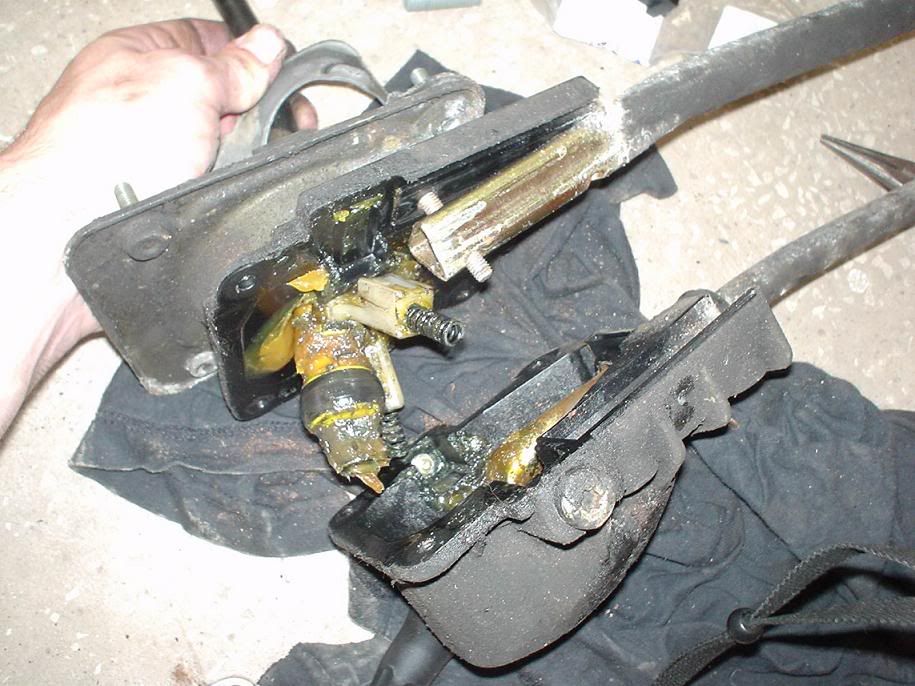
Next step was to strip the mechanism to see what I'd be looking at. There's a circlip at the base of the gear lever which needs pulling off (needle nose pliers, 3 second job). There are also 5 (IIRC) 10mm nuts and bolts holding the two halves of the mechanism together. Remove all these and watch it fall apart in your hands with bits falling out all over the place
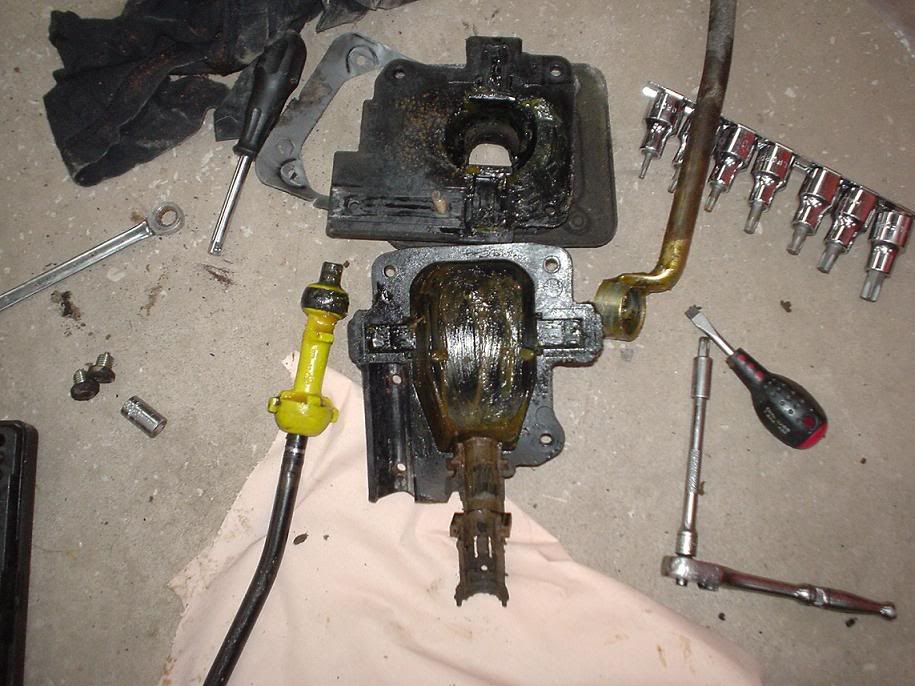
In the pic below, the triangular shaped rod is the reaction rod (that bolts solidly to the gearbox); yellow shaft with black doughnut is the bottom of the gear lever; two springs are the springs that return the lever to neutral:
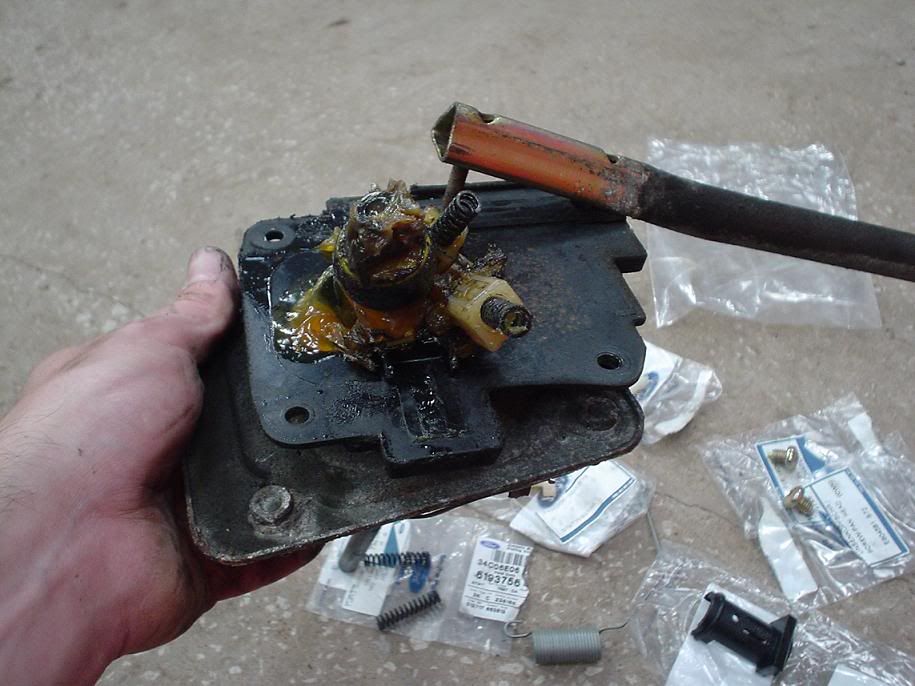
This picture shows the top half of the mechanism:
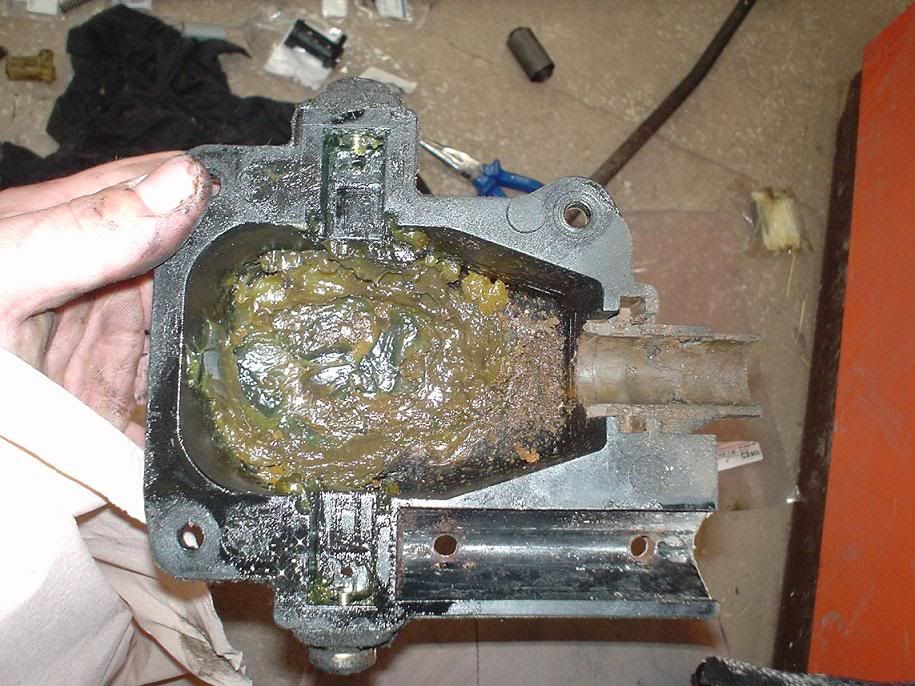
Here is a picture of the lower half (cup) of the mechanism. Note the copious amounts of brown crap and old grease. I think the brown crap is a resin-type material used to line the groove on the right of the picture, which holds the selector rod:
The pic below shows all parts with the old grease wiped off. Gear lever on the left (yellow), bottom cup of mechanism bottom centre, top half of mechanism top centre, gear selector shaft top right:
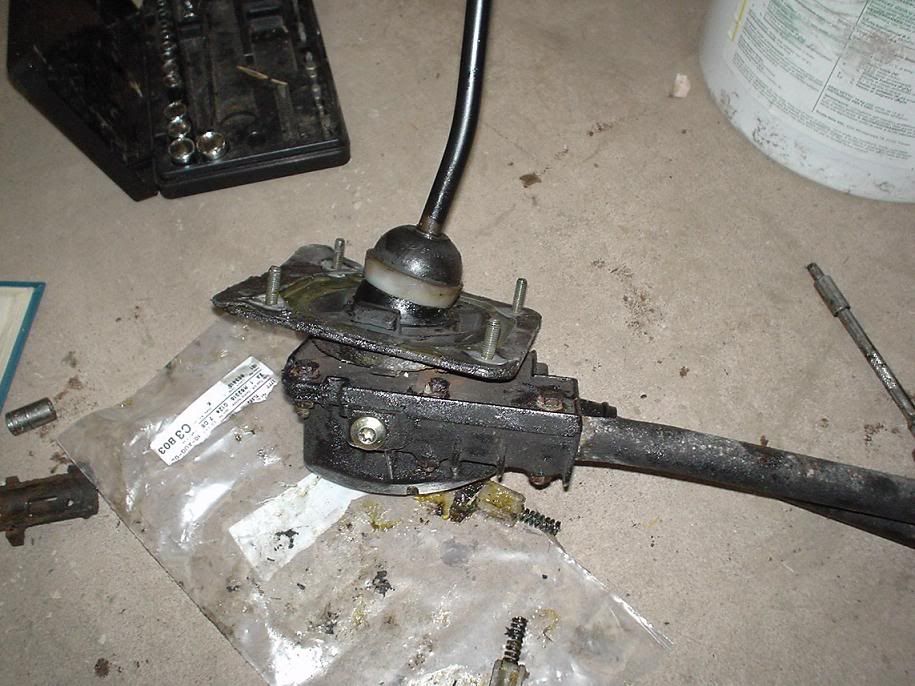
Here are the parts I replaced (old on top, new below); return springs and spring housings, then selector shaft retaining clip, and return spring retaining screws:

Re-assembled the whole lot (I'm afraid I couldn't take pics of this as it gets very messy when filling it all with new grease etc, but it's not so difficult once you've had a play):
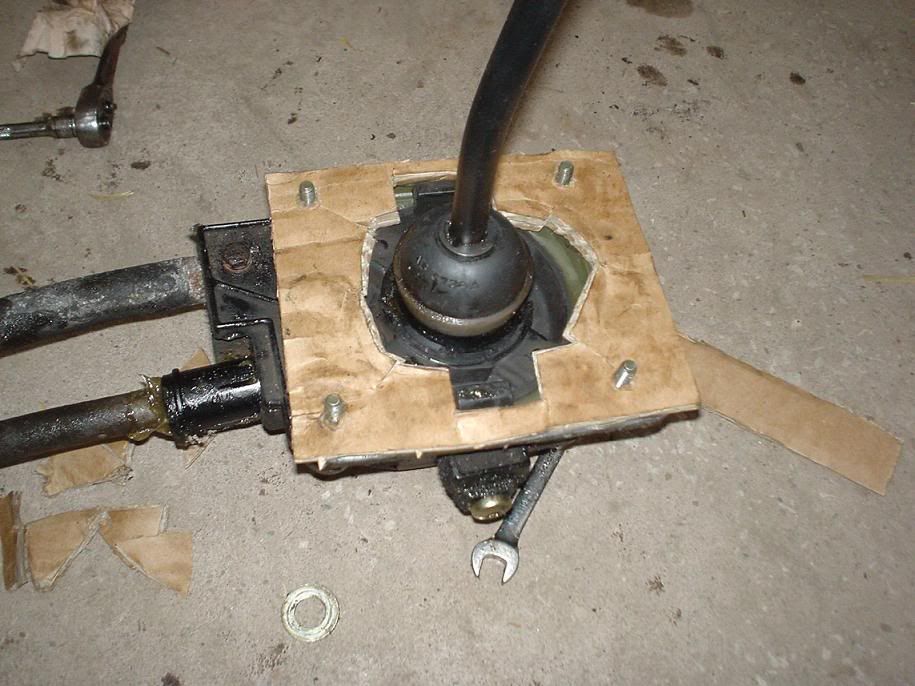
Then as my top gasket/insulating padding had broken, and was pretty thin (I put the resonance I sometimes get through the floor of the car/gear lever down to this) I made up a new one out of cardboard. Not pretty, but it's quick thick and corrugated so will hopefully go some way towards cutting down on the noise transmitted through the selector mechanism:
And that's it, job done. Took about 2 and a half hours in all I think, so no biggy

James .:. 193bhp/245lbft Zetec Turbo Mk3. Click sig for conversion thread + videos .:.
- heeman10
- Elite Post Master


- Posts: 28746
- Joined: Fri Nov 08, 2002 5:32 pm
- Location: Somerset
- Your car: Audi TT TDI Quattro S line
![]() by andyhardy on Sat Aug 13, 2005 6:49 pm
by andyhardy on Sat Aug 13, 2005 6:49 pm
It's also quite amusing that you've put up a post about greasing up rods
Cheers,
Andy
- andyhardy
- Elite Post Master
- Posts: 10781
- Joined: Wed Mar 26, 2003 2:54 pm
- Location: Hell on Earth Drives: People mad
![]() by JamieFRST on Sat Aug 13, 2005 6:59 pm
by JamieFRST on Sat Aug 13, 2005 6:59 pm
Nice work, I need to adjust mine, the gear stick is too close to the passenger seat...is that much hassel to do?

- JamieFRST
- Keep It Tidy

- Posts: 23917
- Joined: Tue May 01, 2001 1:00 am
Car: 1991 Ford Fiesta RS Turbo
![]() by heeman10 on Sat Aug 13, 2005 7:09 pm
by heeman10 on Sat Aug 13, 2005 7:09 pm
Jamie - I can do, yeah....although one part was a sizeable spring....and I have no idea where that goes
Adjusting the lever is no biggy. Helps if there's someone to help you, but if you're careful you can do that on your own too. Put the car in 4th gear. Slacken off the 13mm pinch bolt on the selector rod sleeve, get someone in the car to play around with the gear lever and find a point that feels good for 4th gear. Tighten the 13mm pinch bolt back on the selector shaft and you're good to go
James .:. 193bhp/245lbft Zetec Turbo Mk3. Click sig for conversion thread + videos .:.
- heeman10
- Elite Post Master
- Posts: 28746
- Joined: Fri Nov 08, 2002 5:32 pm
- Location: Somerset
- Your car: Audi TT TDI Quattro S line
![]() by heeman10 on Sat Aug 13, 2005 7:11 pm
by heeman10 on Sat Aug 13, 2005 7:11 pm
PaulC wrote:Part numbers would be good
Does it make a big difference?
Like I say, it feels tighter and more precise, but I do suspect that crumbly brown resin could be what's causing the shifts to be reluctant. I'll see how it gets on when I take it for a spin. Bit damp at the moment you see
James .:. 193bhp/245lbft Zetec Turbo Mk3. Click sig for conversion thread + videos .:.
- heeman10
- Elite Post Master
- Posts: 28746
- Joined: Fri Nov 08, 2002 5:32 pm
- Location: Somerset
- Your car: Audi TT TDI Quattro S line
![]() by heeman10 on Sat Aug 13, 2005 7:14 pm
by heeman10 on Sat Aug 13, 2005 7:14 pm
2 * Catch assy 6172154 (return spring holders) 0.68p each
2 * spring, lock 6193756 (horizontal return springs) 0.31p each
2 * screw, pan head 1648726 (return spring retaining screws) 0.98p each
1 * bearing, gear change lever gate 6192095 (bush for the change rod) 0.81p
1 * bracket, retracting spring (vertical return spring) 0.27p
1 * spring, gear change rod retracting 6073629 £1.00
1 * insulator 6164018 (for the stabilizer bar) £2.91
Parts in bold are the ones I used this afternoon. Parts in italic aren't necessary. the 27p bracket and 1.00 spring are for some weird gearbox I think, with a push down/pull up reverse function. The 2.91 insulator shouldn't need replacing, and needs pressing out and pressing in with a proper hydraulic press. So you can remove 4 pounds (+ VAT) worth of parts from that list. Nice cheap job
James .:. 193bhp/245lbft Zetec Turbo Mk3. Click sig for conversion thread + videos .:.
- heeman10
- Elite Post Master
- Posts: 28746
- Joined: Fri Nov 08, 2002 5:32 pm
- Location: Somerset
- Your car: Audi TT TDI Quattro S line


![]() by Max M4X WW on Sun Aug 14, 2005 1:31 am
by Max M4X WW on Sun Aug 14, 2005 1:31 am
So with a quickshift whats different? I like the idea of one of these i think.
- Max M4X WW
- Elite Post Master
- Posts: 18161
- Joined: Sun Jun 22, 2003 9:52 pm
- Location: Hampshire
- Your car: Merc CL500
Car: 2014 BMW M135i
![]() by heeman10 on Sun Aug 14, 2005 3:07 pm
by heeman10 on Sun Aug 14, 2005 3:07 pm
James .:. 193bhp/245lbft Zetec Turbo Mk3. Click sig for conversion thread + videos .:.
- heeman10
- Elite Post Master
- Posts: 28746
- Joined: Fri Nov 08, 2002 5:32 pm
- Location: Somerset
- Your car: Audi TT TDI Quattro S line
- Max M4X WW
- Elite Post Master
- Posts: 18161
- Joined: Sun Jun 22, 2003 9:52 pm
- Location: Hampshire
- Your car: Merc CL500
Car: 2014 BMW M135i
Re: Re-building my gear linkage (sort of guide)
![]() by John_D on Wed Mar 24, 2010 9:31 am
by John_D on Wed Mar 24, 2010 9:31 am
need to do mine as its shot, emiled fordpartsuk to see if they still stock the parts, got my doubts though
- John_D
- Elite Post Master
- Posts: 1007
- Joined: Sat Nov 12, 2005 7:09 pm
- Location: Fife
Re: Re-building my gear linkage (sort of guide)
![]() by dijsil on Wed Mar 24, 2010 11:15 am
by dijsil on Wed Mar 24, 2010 11:15 am
- dijsil
- Poster

- Posts: 172
- Joined: Tue May 06, 2008 6:24 pm
Re: Re-building my gear linkage (sort of guide)
![]() by TANGO. on Wed Mar 24, 2010 1:06 pm
by TANGO. on Wed Mar 24, 2010 1:06 pm

- TANGO.
- Senior Poster

- Posts: 412
- Joined: Tue Oct 31, 2006 3:56 pm
Re: Re-building my gear linkage (sort of guide)
![]() by John_D on Wed Mar 24, 2010 3:30 pm
by John_D on Wed Mar 24, 2010 3:30 pm
dijsil wrote:if the gear leaver doesnt stay in the moddle if i service the linkage it will solve my problem ?
yes, mine stays where it was last left
- John_D
- Elite Post Master
- Posts: 1007
- Joined: Sat Nov 12, 2005 7:09 pm
- Location: Fife
Re: Re-building my gear linkage (sort of guide)
![]() by dijsil on Wed Mar 24, 2010 4:29 pm
by dijsil on Wed Mar 24, 2010 4:29 pm
and from where do you get the parts ?
- dijsil
- Poster
- Posts: 172
- Joined: Tue May 06, 2008 6:24 pm
Re: Re-building my gear linkage (sort of guide)
![]() by John_D on Wed Mar 24, 2010 5:32 pm
by John_D on Wed Mar 24, 2010 5:32 pm
dijsil wrote:ok thanks,
and from where do you get the parts ?
ford probably
- John_D
- Elite Post Master
- Posts: 1007
- Joined: Sat Nov 12, 2005 7:09 pm
- Location: Fife
Re: Re-building my gear linkage (sort of guide)
![]() by dijsil on Wed Mar 24, 2010 6:14 pm
by dijsil on Wed Mar 24, 2010 6:14 pm
- dijsil
- Poster
- Posts: 172
- Joined: Tue May 06, 2008 6:24 pm
Re: Re-building my gear linkage (sort of guide)
![]() by John_D on Wed Mar 24, 2010 6:16 pm
by John_D on Wed Mar 24, 2010 6:16 pm
- John_D
- Elite Post Master
- Posts: 1007
- Joined: Sat Nov 12, 2005 7:09 pm
- Location: Fife
Re: Re-building my gear linkage (sort of guide)
![]() by heeman10 on Wed Mar 24, 2010 8:42 pm
by heeman10 on Wed Mar 24, 2010 8:42 pm
dijsil wrote:if the gear leaver doesnt stay in the moddle if i service the linkage it will solve my problem ?
You probably need new plungers and springs. You can see them in the pic below (the two springs, and the plastic components they sit in):
My linkage is for sale if anyone wants it, has only done 8,000 miles or so since the overhaul
James .:. 193bhp/245lbft Zetec Turbo Mk3. Click sig for conversion thread + videos .:.
- heeman10
- Elite Post Master
- Posts: 28746
- Joined: Fri Nov 08, 2002 5:32 pm
- Location: Somerset
- Your car: Audi TT TDI Quattro S line
Re: Re-building my gear linkage (sort of guide)
![]() by dijsil on Sat Mar 27, 2010 11:34 am
by dijsil on Sat Mar 27, 2010 11:34 am
connected the spring with 2 tick cable ties because the silencer gets hot, if it smelts i will replace it with some copper wire or something metal.
- Attachments
-
- dijsil
- Poster
- Posts: 172
- Joined: Tue May 06, 2008 6:24 pm
Re: Re-building my gear linkage (sort of guide)
![]() by 96festy on Wed Mar 31, 2010 7:36 pm
by 96festy on Wed Mar 31, 2010 7:36 pm
 just take your time!!!
and if you curse and swear at it while your brother is holdin it, it wont work!!!
dont forget to lift the stick slightly so you can put the snap washer over the half round rubber/plastic thing!!!
will fit it tomorrow and say how it is

- 96festy
- Newbie Poster

- Posts: 39
- Joined: Fri Nov 27, 2009 11:22 am
Re: Re-building my gear linkage (sort of guide)
![]() by John_D on Tue Apr 06, 2010 7:13 pm
by John_D on Tue Apr 06, 2010 7:13 pm
and got the up-to-date prices
Fiesta MK3-Pin Locking
Part Number: 6172154(QTY2)
Retail Price: £1.19each
You Pay: £1.07each
Fiesta MK3-Spring
Part Number: 6193756(QTY2)
Retail Price: .61p each
You Pay: .55p each
Fiesta MK3-Screw
Part Number: 1648726(QTY2)
Retail Price: £2.67each
You Pay: £2.40each
Fiesta MK3-Gear Change Lever Gate Bearing
Part Number: 6192095(QTY1)
Retail Price: £1.48
You Pay: £1.33
Fiesta MK3-Spring Gear Change Rod Retracting
Part Number: 6073629(QTY1)
Retail Price: £2.75
You Pay: £2.48
Fiesta MK3-Spring Gear Change Rod Retracting Bracket
Part Number: 6063773(QTY1)
Retail Price: .53p
You Pay: .48p
Fiesta MK3-Spring Gear Change Rod Bush
Part Number: 6164018(QTY1)
Retail Price: £6.43
You Pay: £5.79
- John_D
- Elite Post Master
- Posts: 1007
- Joined: Sat Nov 12, 2005 7:09 pm
- Location: Fife
Re: Re-building my gear linkage (sort of guide)
![]() by jateu_01 on Thu Feb 24, 2011 12:51 am
by jateu_01 on Thu Feb 24, 2011 12:51 am
Cheers J
- jateu_01
- Newbie Poster
- Posts: 13
- Joined: Wed Sep 15, 2010 4:49 pm
Re: Re-building my gear linkage (sort of guide)
![]() by jayrs on Thu Feb 24, 2011 7:33 pm
by jayrs on Thu Feb 24, 2011 7:33 pm

- jayrs
- Elite Post Master
- Posts: 31520
- Joined: Mon Apr 19, 2004 10:32 pm
- Location: I.O.W
- Your car: FRST, XR2, ST170, ST225
Car: 1991 Ford Fiesta RS Turbo
Re: Re-building my gear linkage (sort of guide)
![]() by jateu_01 on Thu Feb 24, 2011 8:20 pm
by jateu_01 on Thu Feb 24, 2011 8:20 pm
- jateu_01
- Newbie Poster
- Posts: 13
- Joined: Wed Sep 15, 2010 4:49 pm
- jayrs
- Elite Post Master
- Posts: 31520
- Joined: Mon Apr 19, 2004 10:32 pm
- Location: I.O.W
- Your car: FRST, XR2, ST170, ST225
Car: 1991 Ford Fiesta RS Turbo
Re: Re-building my gear linkage (sort of guide)
![]() by jateu_01 on Thu Feb 24, 2011 8:43 pm
by jateu_01 on Thu Feb 24, 2011 8:43 pm
- jateu_01
- Newbie Poster
- Posts: 13
- Joined: Wed Sep 15, 2010 4:49 pm
Re: Re-building my gear linkage (sort of guide)
![]() by jayrs on Thu Feb 24, 2011 8:53 pm
by jayrs on Thu Feb 24, 2011 8:53 pm
- jayrs
- Elite Post Master
- Posts: 31520
- Joined: Mon Apr 19, 2004 10:32 pm
- Location: I.O.W
- Your car: FRST, XR2, ST170, ST225
Car: 1991 Ford Fiesta RS Turbo
Re: Re-building my gear linkage (sort of guide)
![]() by jordan2litre on Fri Jul 06, 2012 2:18 pm
by jordan2litre on Fri Jul 06, 2012 2:18 pm
- jordan2litre
- Senior Poster

- Posts: 240
- Joined: Sun Oct 18, 2009 3:01 pm
- Your car: Fiesta mk3 SI 2.0L
Car: 1995 Ford 2.0 zetec
Re: Re-building my gear linkage (sort of guide)
![]() by rsturbonutter on Fri Jul 06, 2012 3:20 pm
by rsturbonutter on Fri Jul 06, 2012 3:20 pm
http://mwstewart.co.uk/articles/pumalinkage/
You will find everythinbg you need here fella
- rsturbonutter
- Elite Post Master
- Posts: 1815
- Joined: Wed May 04, 2011 4:59 pm
- Location: on track somewhere dodging trains
- Your car: Fiesta RS turbo
Re: Re-building my gear linkage (sort of guide)
![]() by jordan2litre on Fri Jul 06, 2012 4:19 pm
by jordan2litre on Fri Jul 06, 2012 4:19 pm
- jordan2litre
- Senior Poster
- Posts: 240
- Joined: Sun Oct 18, 2009 3:01 pm
- Your car: Fiesta mk3 SI 2.0L
Car: 1995 Ford 2.0 zetec
Twitter
The second 20th Anniversary article, a dive into the history of how the site came about is available here: https://t.co/kbCfZ4sf0R
17:44, 4th December 2021 Twitter Web App
To celebrate https://t.co/wXVkvJipaS being 20 years old this year, I've written a series of articles detailing the… https://t.co/B0vE0Y3KvP
17:42, 4th December 2021 Twitter Web App
Follow fiestaturbo.com on Twitter:
http://twitter.com/fiestaturbo/
Facebook
New article! fiestaturbo.com is 20 years old this year and I'm writing a series delving into the history of it. …
Saturday, 4th December 2021 12:49
Some awesome Escorts from the Fair - FORD FAIR 2021: ESCORT EXHIBITION - …
Sunday, 31st October 2021 17:05
All the best Focuses from Ford Fair - FORD FAIR 2021: FOCUS PEEKING - Which was your …
Thursday, 7th October 2021 23:21
Become a fan:
http://www.facebook.com/fiestaturbo/
RSS Feeds
Subscribe to the RSS feed
What is RSS?
RSS is a technology that lets you use special applications or modern browsers to notify you you when a site is updated. You can then read the updated content in that application or your browser.
To subscribe to these RSS feeds you need to copy the links above. For instructions on how to add it to the feeds you keep track of, consult the documentation of your RSS reader.